# Important
This function of FizzGate is currently only available to commercial users.
# FizzGate aggregation module
FizzGate can support extending the functionality of the aggregation editor. Among the aggregation types currently officially supported, there are only three RPC request methods: REQUEST, Dubbo, and gRPC. However, what FizzGate can support includes but is not limited to RPC. Although when designing the aggregation module, we consider RPC request aggregation more to avoid too much business logic entering the aggregation module and affecting performance. However, if you want to support more data aggregation types, FizzGate now Each stage also provides corresponding solutions.
##Extension methods
The distribution process of the configuration file after the FizzGate aggregation editor is configured is: Editor -> Management Storage -> Cache -> Node. The editor is responsible for editing the configuration file, and the intermediate management end is responsible for the storage and node distribution of the configuration file. , the final node is responsible for identifying and parsing the configuration file. So we need to modify it in two parts:
- Add support for aggregation types in the background editor;
- Add support for new types in the aggregation code in the node;
# Editor support
# Front-end development steps
- Install qiankun dependency on the main application
yarn add qiankun
- Enter the directory module, use vue-cli to generate the vue project (mysql), and install the qiankun dependency
cd module
vue create mysql
yarn add qiankun
- Write mysql micro front-end module. (1) Create a new public-path.js file in the src directory
if (window.__POWERED_BY_QIANKUN__) {
   __webpack_public_path__ = window.__INJECTED_PUBLIC_PATH_BY_QIANKUN__;
}
(2) Introduce the public-path.js file at the top of the src/main.js file and export the corresponding life cycle function of qiankun
import './public-path';
/**
  * bootstrap will only be called once when the micro application is initialized. Usually we can initialize some global variables here.
  */
  export async function bootstrap() {
   console.log('vue app bootstraped');
}
/**
  * The mount method will be called every time the application is entered. Usually we trigger the application's rendering method here.
  */
export async function mount(props) {
   window.globalProps = props;
   render(props);
}
/**
  * The method that will be called every time the application is cut out/uninstalled. Usually here we will uninstall the application instance of the micro application
  */
export async function unmount() {
   // install.$destroy();
}
/**
  * Optional life cycle hook, only effective when loading micro applications using loadMicroApp method
  */
  export async function update(props) {
   console.log('update props', props);
}
(3) vue.config.js configuration modification. Set the publicPath prefix to "/module/mysql", set devServer to allow cross-domain, and configure ouput to package the micro-application into umd library format.
const packageName = require('./package.json').name;

module.exports = {
   //Path prefix
   publicPath: "/module/mysql",
   outputDir: "mysql",
   lintOnSave: true,
   productionSourceMap: false,
   configureWebpack: {
      output: {
           library: `${packageName}`,
           libraryTarget: 'umd'
      }
   },
   devServer: {
     port: 1890,
     headers: {
       "Access-Control-Allow-Origin": "*"
     }
   }
};
- The routing of the mysql micro-module needs to be set to abstract mode, and the routing base path must be modified.
const router = new VueRouter({
   mode: "abstract",
   // base: "/",
   base: window.__POWERED_BY_QIANKUN__ ? '/' : '/module/mysql/',
   routes
})
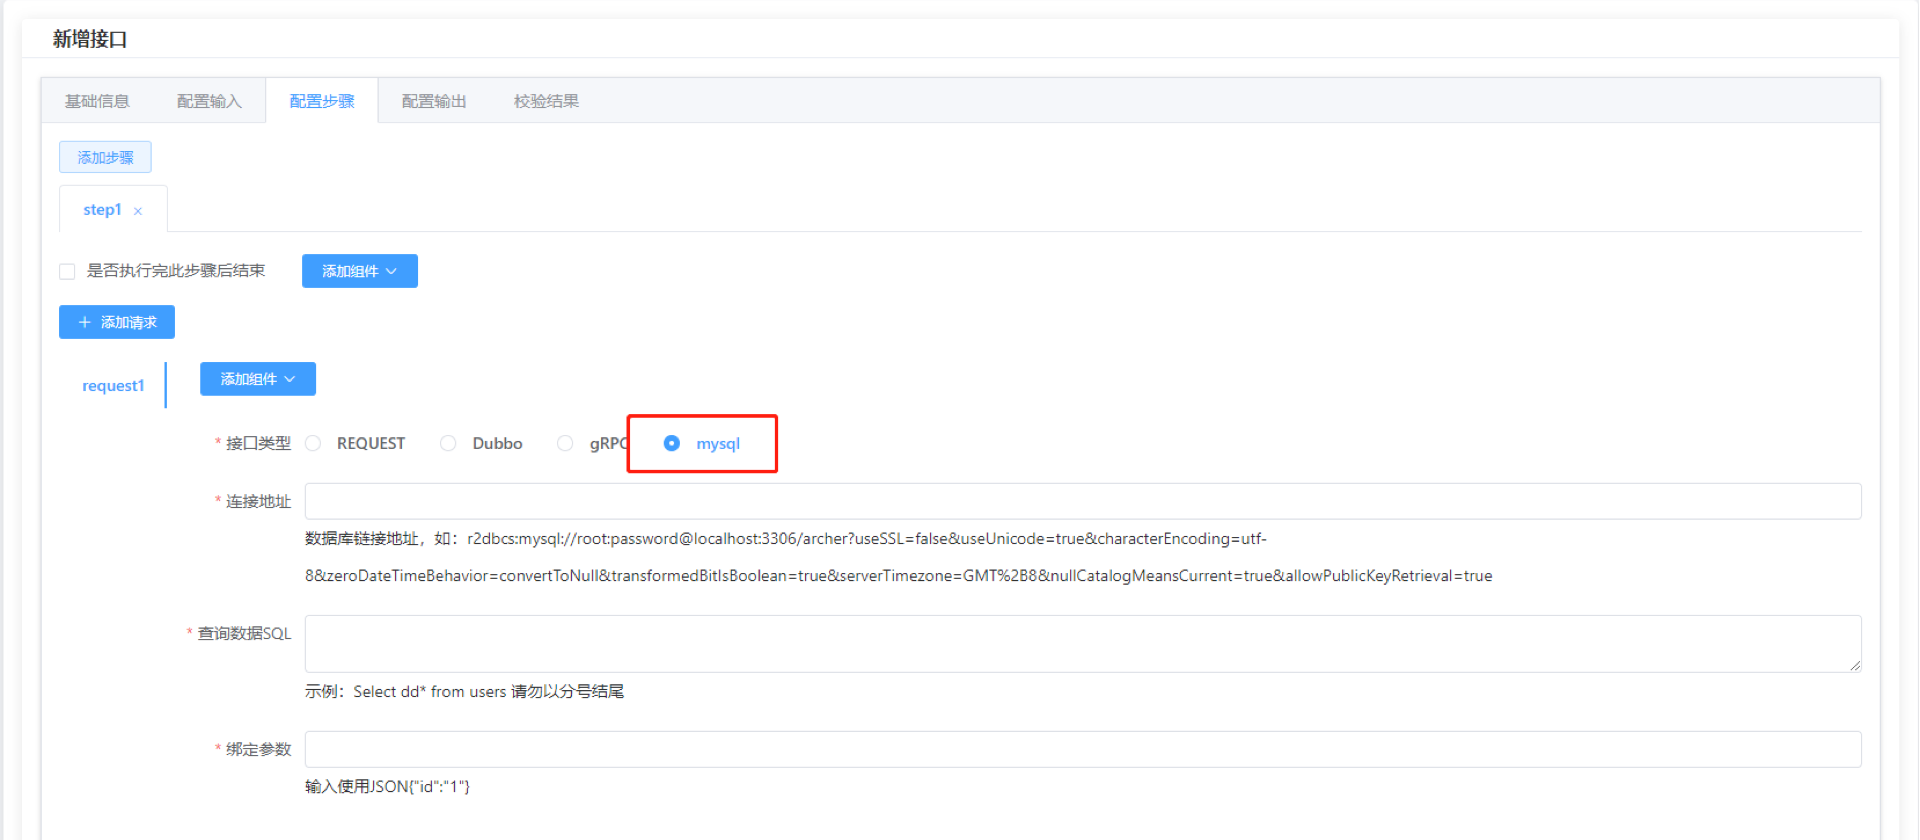
- Write mysql components
<template>
     <el-form :rules="rules" size="small"
             label-width="110px" :model="requestForm">
         <el-form-item label="Connection address" prop="URL" key="URL">
                 <el-input v-model="requestForm.URL" clearable></el-input>
                 <span class="key-tips">Database link address, such as: r2dbcs:mysql://root:password@localhost:3306/archer?useSSL=false&useUnicode=true&characterEncoding=utf-8&zeroDateTimeBehavior=convertToNull&transformedBitIsBoolean=true&serverTimezone=GMT%2B8&nullCatalogMeansCurrent= true&allowPublicKeyRetrieval=true</span>
         </el-form-item>
         <el-form-item label="Query data SQL" prop="sql" key="sql">
                 <el-input type="textarea" v-model="requestForm.sql" clearable></el-input>
                 <span class="key-tips">Example: Select dd* from users Do not end with semicolon</span>
         </el-form-item>
         <el-form-item label="bind parameters" prop="binds" key="binds">
                 <el-input v-model="requestForm.binds" clearable></el-input>
                 <span class="key-tips">Input uses JSON{"id":"1"}</span>
         </el-form-item>
     </el-form>
</template>
<script>
export default {
     name: 'mysqlItem',
     data() {
       return {
         rules: {
           URL: [
             { required: true, message: 'URL is required', trigger: 'change' }
           ],
           sql: [
             { required: true, message: 'required', trigger: 'change' },
           ],
           binds: [
             { required: true, message: 'required', trigger: 'change' }
           ]
         },
         requestForm: {
             URL:"",
             sql:"",
             binds:""
         }
       }
     },
     created(){
         if (window.globalProps)
             this.requestForm = window.globalProps.requestForm;
     }
}
</script>
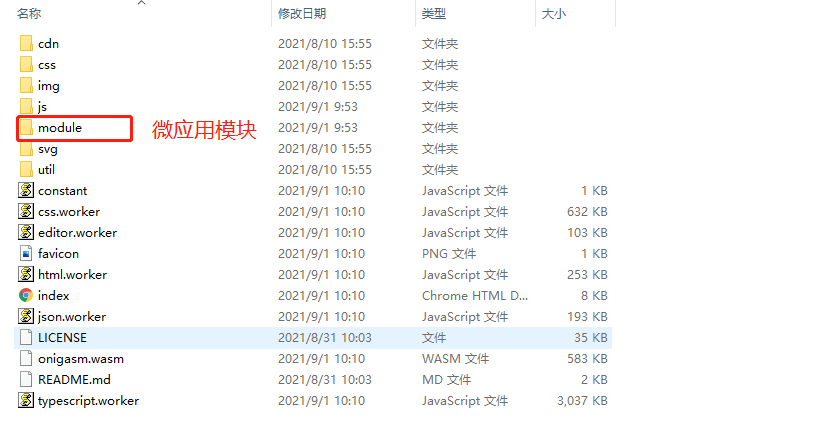
- Configure the access information of the micro application module (1) Next, you need to enable the FizzGate management background to load the module and find the constant.js file in the FizzGate background. Here we take the sample project as an example. Configure mysql under aggregate.plugins, configure a unique name value, and access entry address entry. (2) When deploying, it is recommended to place the module packaging file in the module folder of the root directory. Taking the sample project as an example, the access address of the production environment is: /module/mysql/index.html
var Constant = (function(){
     return {
         aggregate:{
             plugins:{
                 mysql:{
                     "name" : "mysqlItem",
                     "entry": NODE_ENV === 'development' ? "//localhost:1890/module/mysql/" : '/module/mysql/index.html'
                 }
             }
         }
     }
})();
# Front-end project startup
It is recommended to use nginx to start the fizz main backend management system; when developing micro-modules, use yarn run serve to start it directly.
Nginx configuration (1) Under nginx/html, create a new folder fizzAdmin to place the front-end static resource files

(2) Nginx configuration modification: Add the following configuration under the nginx/config/nginx.conf file
server {
     listen 9000;
     server_name localhost;
     location/{
         root html/fizzAdmin;
     }
     location ^~ /api {
         rewrite ^/api/(.*) /$1 break;
         proxy_pass https://demo.fizzgate.com;
     }
}
(3) Start nginx. Click the nginx application icon, or start nginx using the command line
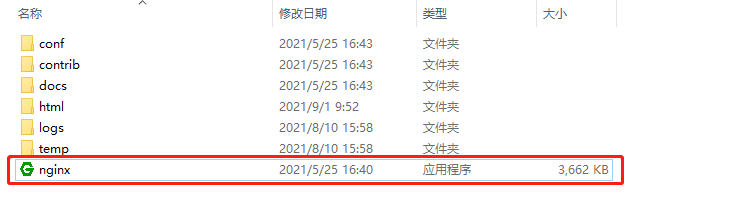
(4) After startup, it can be accessed through the browser: http://localhost:9000/
- Modify the entry configuration in the file constant.js. Since the main application has been deployed on nginx, NODE_ENV has always been production, so you need to manually set the entry value to 😕/localhost:1890/module/mysql/
var Constant = (function(){
     return {
         aggregate:{
             plugins:{
                 mysql:{
                     "name" : "mysqlItem",
                     "entry": "//localhost:1890/module/mysql/"
                     // "entry": NODE_ENV === 'development' ? "//localhost:1890/module/mysql/" : '/module/mysql/index.html'
                 }
             }
         }
     }
})();
- Start the mysql micro front-end project, location: /module/mysql (1) Dependent installation
yarn
(2) Project operation
yarn run serve
(3) It runs successfully and can be accessed from the fizz background management system or individually (http://localhost:1890/module/mysql/)
# Front-end project deployment
- It is recommended that the main application and the micro front-end module be deployed on the same server, and the resource files of the micro module be placed in the module folder of the same level.
- Modify the entry configuration of constant.js
var Constant = (function(){
     return {
         aggregate:{
             plugins:{
                 mysql:{
                     "name" : "mysqlItem",
                     "entry": NODE_ENV === 'development' ? "//localhost:1890/module/mysql/" : '/module/mysql/index.html'
                 }
             }
         }
     }
})();
# illustrate
The debug mode can start the server, and the FizzGate management background can load the Web Component of the corresponding path according to the configuration.
# Node support
# Node development steps
- Register Input in the appropriate location
InputFactory.registerInput(MySQLInput.TYPE, MySQLInput.class);
- Write MySQLInput.java
public class MySQLInput extends Input implements IInput {
     static public InputType TYPE = new InputType("MYSQL");
     public static Class inputConfigClass (){
         return MySQLInputConfig.class;
     }
     public void beforeRun(InputContext context){

     }
     public Mono<Map> run(){
         // items are processed based on the results after reading from the database
         Map<String, Object> result = new HashMap<String, Object>();
         result.put("data", items);
         result.put("request", this);
         return Mono.just(result);
     }
}
- Write the configuration MySQLInputConfig.java
public class MySQLInputConfig extends InputConfig {

public MySQLInputConfig(Map configBody) {
super(configBody);
}
     // Parse the configuration passed by the front end here
public void parse(){
     }
}