# Overview
The interface list function is used to maintain the aggregate interface. The aggregate interface is a simple interface from the perspective of the external caller. The response results are obtained through parameter input requests. The internal implementation will call multiple underlying back-end services and aggregate and convert the multiple call results into The data format desired by the external caller. For more details, please see the service orchestration introduction. The following describes the operation of the interface list function.
# Interface list
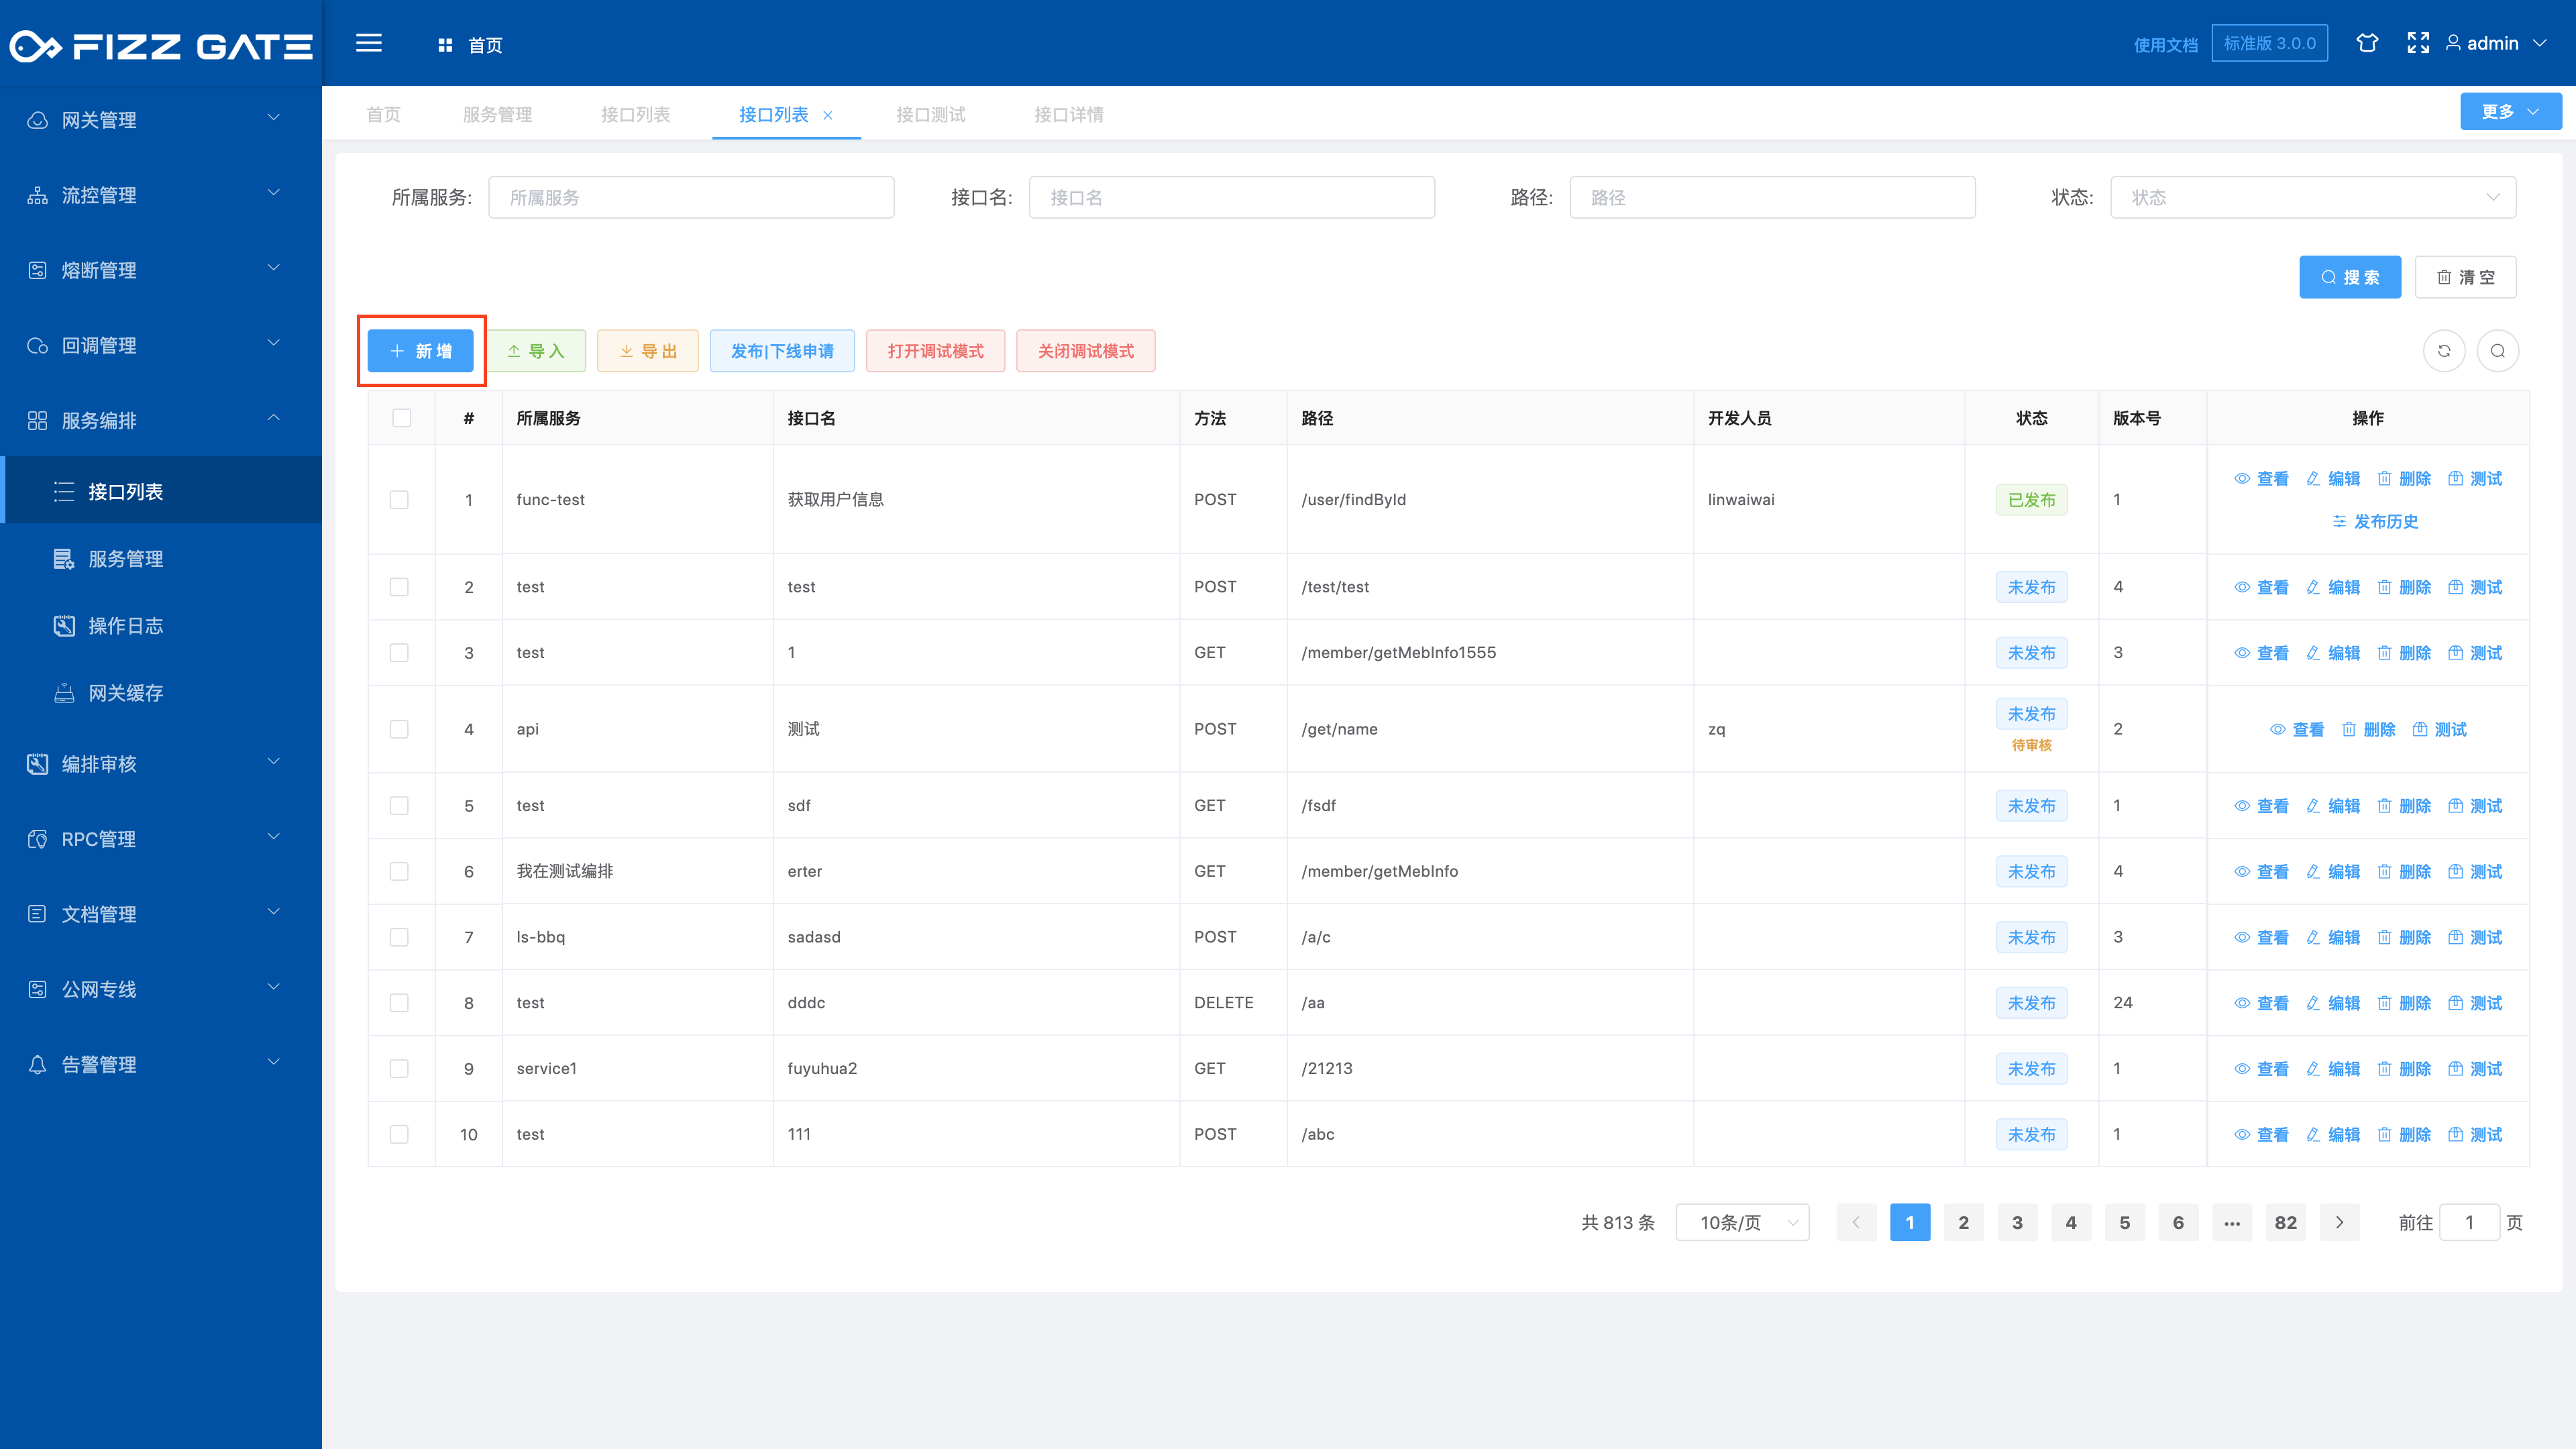
Menu location: Service Orchestration > Interface List. Click the menu to enter the interface list page, as shown in the figure.

# Add new interface
Click the Add button to pop up the new window, as shown in the figure.
# Basic information
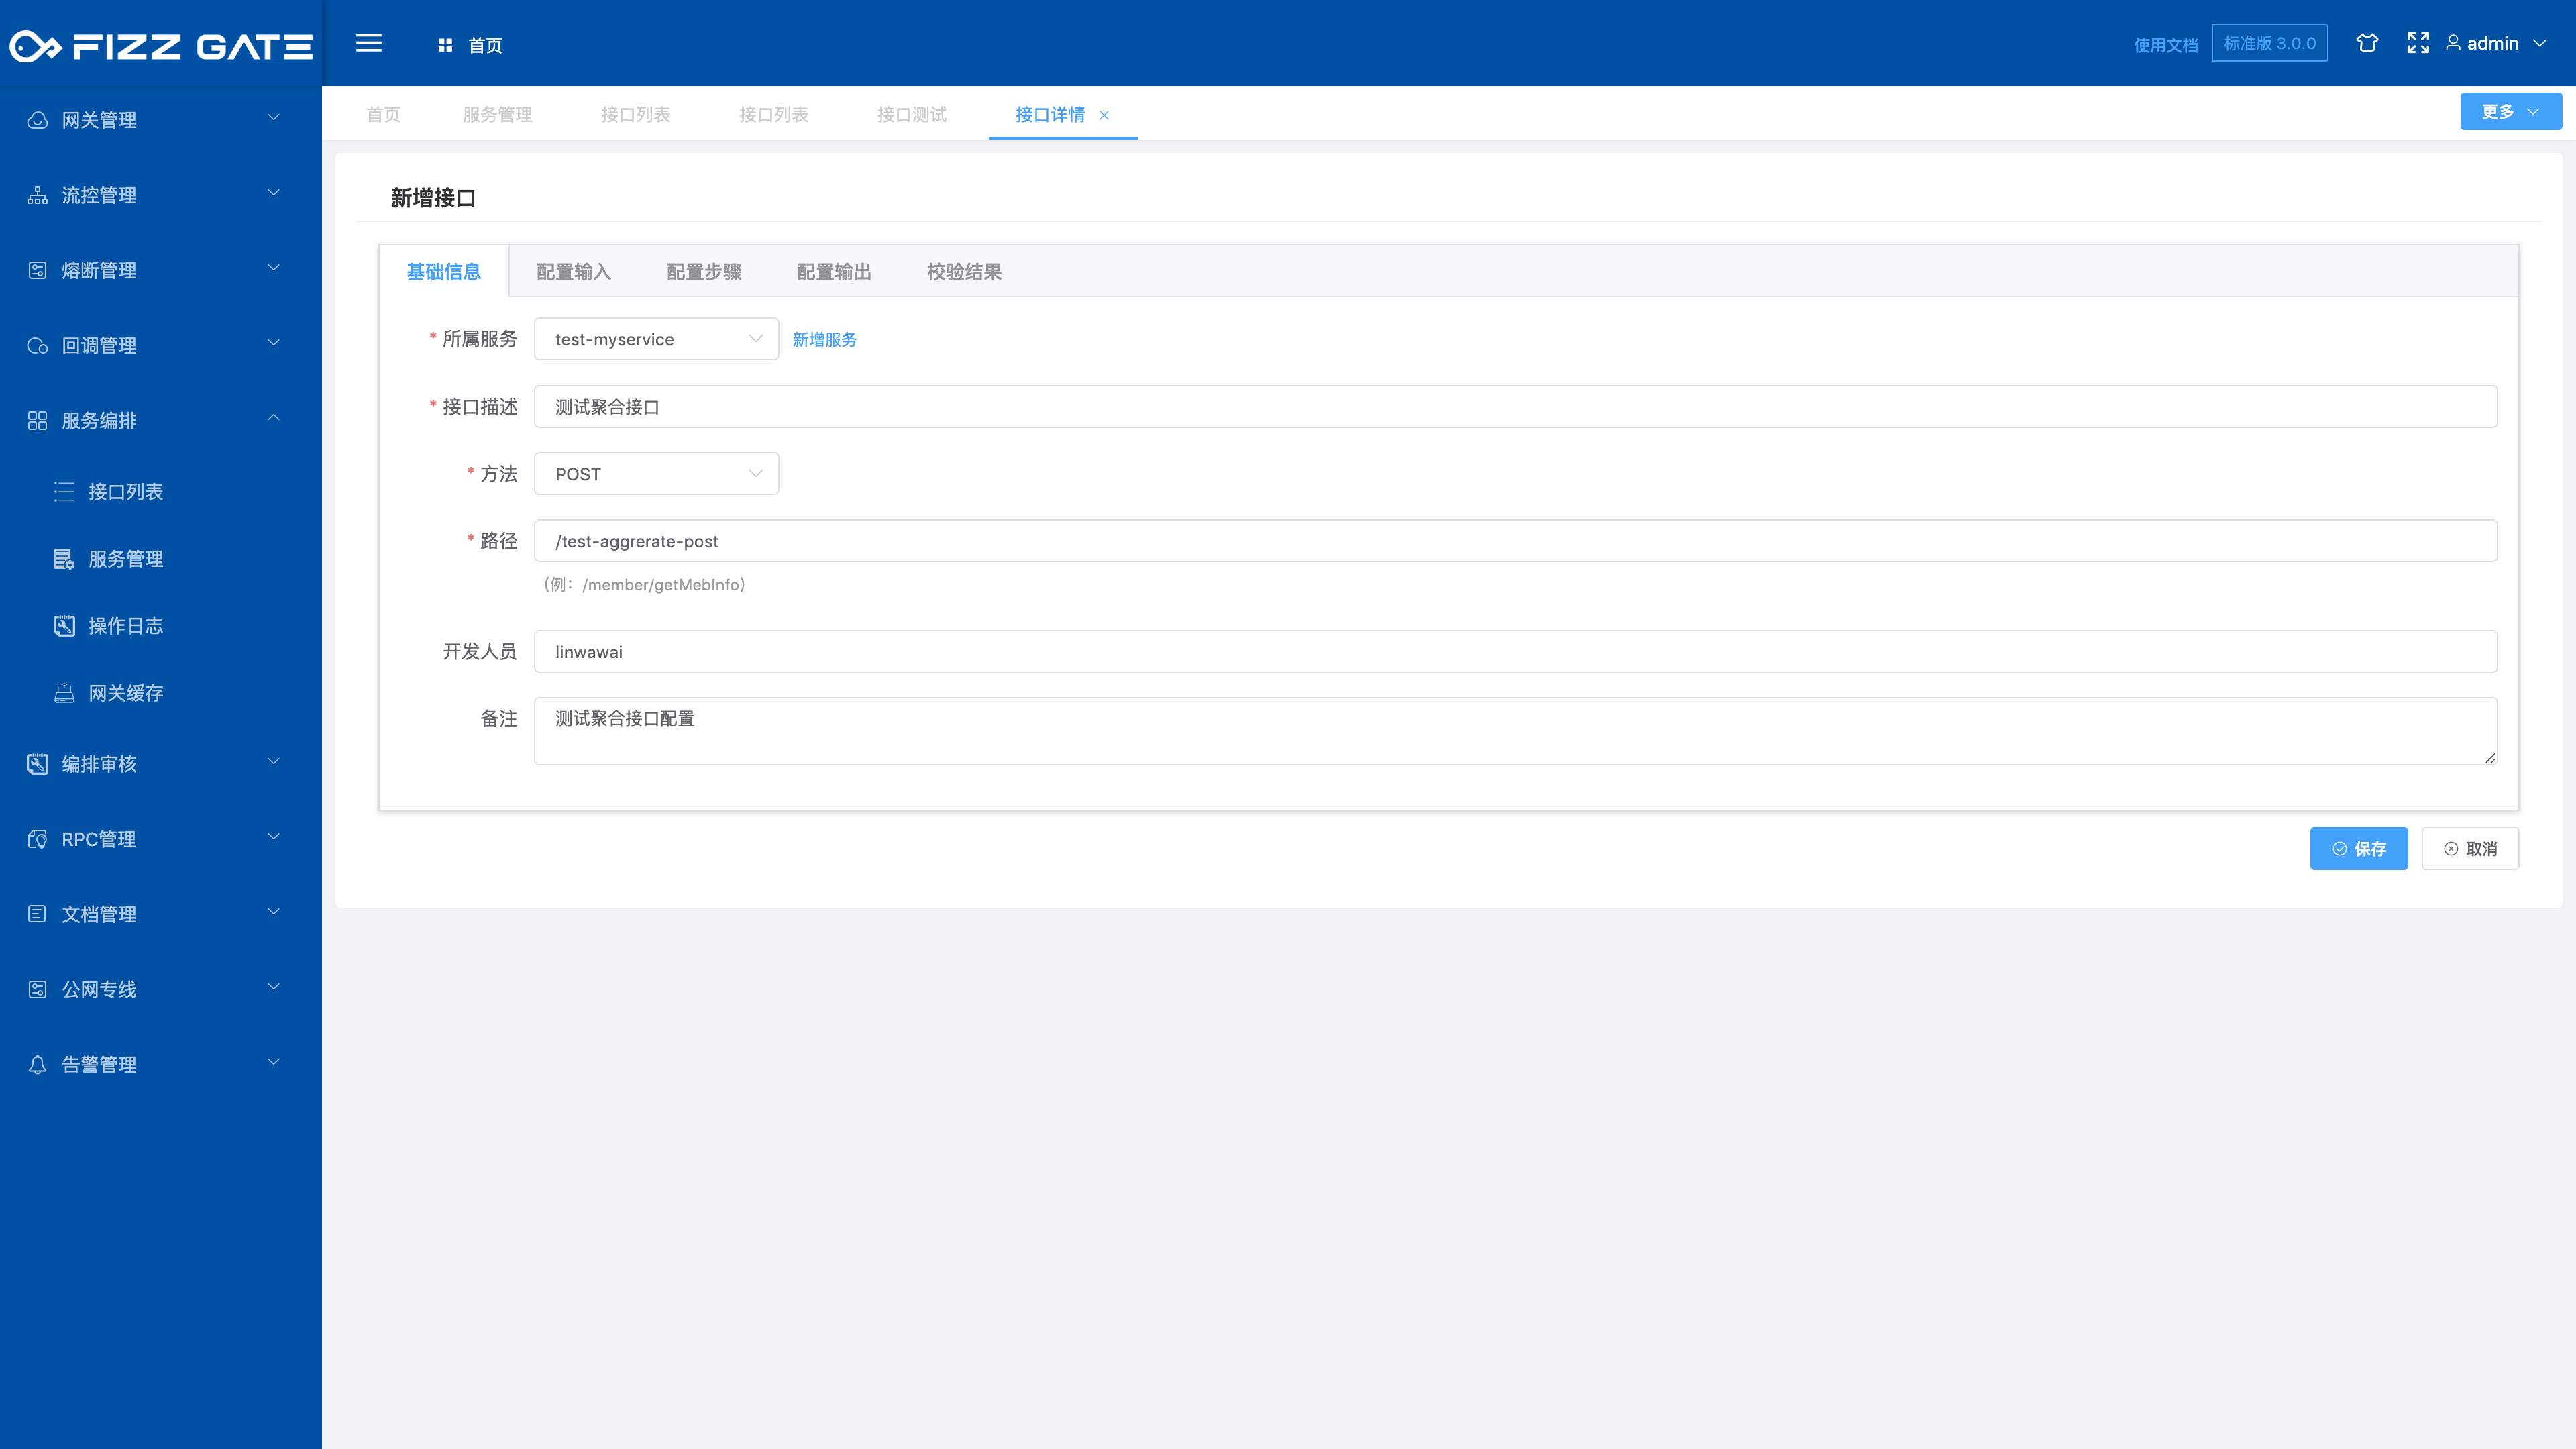
Belonging service: The service to which the interface belongs. For more details, please see the service management function introduction. This is required;
Interface name: Interface name, used for display, cannot exceed 200 characters in length, required;
Method: interface request method type, optional GET|POST, required;
Path: interface request path suffix, the length cannot exceed 2000 characters, required;
Developer: The developer responsible for the interface, the length cannot exceed 200 characters;
Description: Interface function description, the length cannot exceed 2000 characters;
For example, the service is set to my-test-service, the method is set to POST, the path is set to test-aggregate-post, and the corresponding aggregation interface request is POST http://{FizzGate integration platform ip address}:{port port}/proxy /my-test-service/test-aggregate-post.
# Configuration input
Most of the input parameters of the aggregation interface are defined through JSON Schema. Let’s briefly introduce JSON Schema below.
# Introduction to JSON Schema
JSON Schema is actually JSON data and is used to annotate and verify JSON documents. It can be compared to XML Schema. The latest version is 2019-09.
As ordinary users, we do not need to understand the specification content of JSON Schema, as long as we can build JSON Schema.
To understand JSON Schema, you must first understand what JSON is. JSON is the abbreviation of JavaScript Object Notation, a simple data exchange format. Originally JSON was based on JavaScript and was widely used on the World Wide Web. Due to its concise and clear hierarchical structure and ease of reading, it is used in more and more scenarios.
JSON contains the following data structure:
- object:
{ "key1": "value1", "key2": "value2" }
- array:
[ "first", "second", "third" ]
- number:
42
3.1415926
- string:
"This is a string"
- boolean:
true
false
- null:
nullThrough the above simple data types, complex structured data can be constructed. Here are two examples:
{
"name": "George Washington",
"birthday": "February 22, 1732",
"address": "Mount Vernon, Virginia, United States"
}
{ "first_name": "George", "last_name": "Washington", "birthday": "1732-02-22", "address": { "street_address": "3200 Mount Vernon Memorial Highway", "city": "Mount Vernon", "state": "Virginia", "country": "United States" } }The above two examples are valid JSON data and contain the same valid information. However, when the program reads the data, it needs to know exactly how the data is organized, such as which fields are required and what types these fields are. This is when JSON Schema comes in handy. See the following JSON Schema example:
{
"type": "object",
"properties": {
"first_name": { "type": "string" },
"last_name": { "type": "string" },
"birthday": { "type": "string", "format": "date" },
"address": {
"type": "object",
"properties": {
"street_address": { "type": "string" },
"city": { "type": "string" },
"state": { "type": "string" },
"country": { "type" : "string" }
}
}
}
}
When verifying the first example using the above JSON Schema, the verification fails; but the verification of the second example passes.
JSON Schema itself is also written through JSON, which is also data itself. It is not a computer program, but a declaration format that "describes the structure of other data". This is both a strength and a weakness. JSON Schema can concisely describe the structure of data and automatically validate the data, but it is unable to express the relationship between data elements.
For more JSON Schema knowledge, you can read Understanding JSON Schema (opens new window).
# Request header
Define the request header parameters of the aggregate interface.

For example:
{
   "type": "object",
   "properties": {
     "headerParam1": {
       "type": "string",
       "title": "Request header parameter 1",
       "titleEn": "headerParam1"
     }
   },
   "required": [
     "headerParam1"
   ]
}
The above example defines the required request header parameter headerParam1.
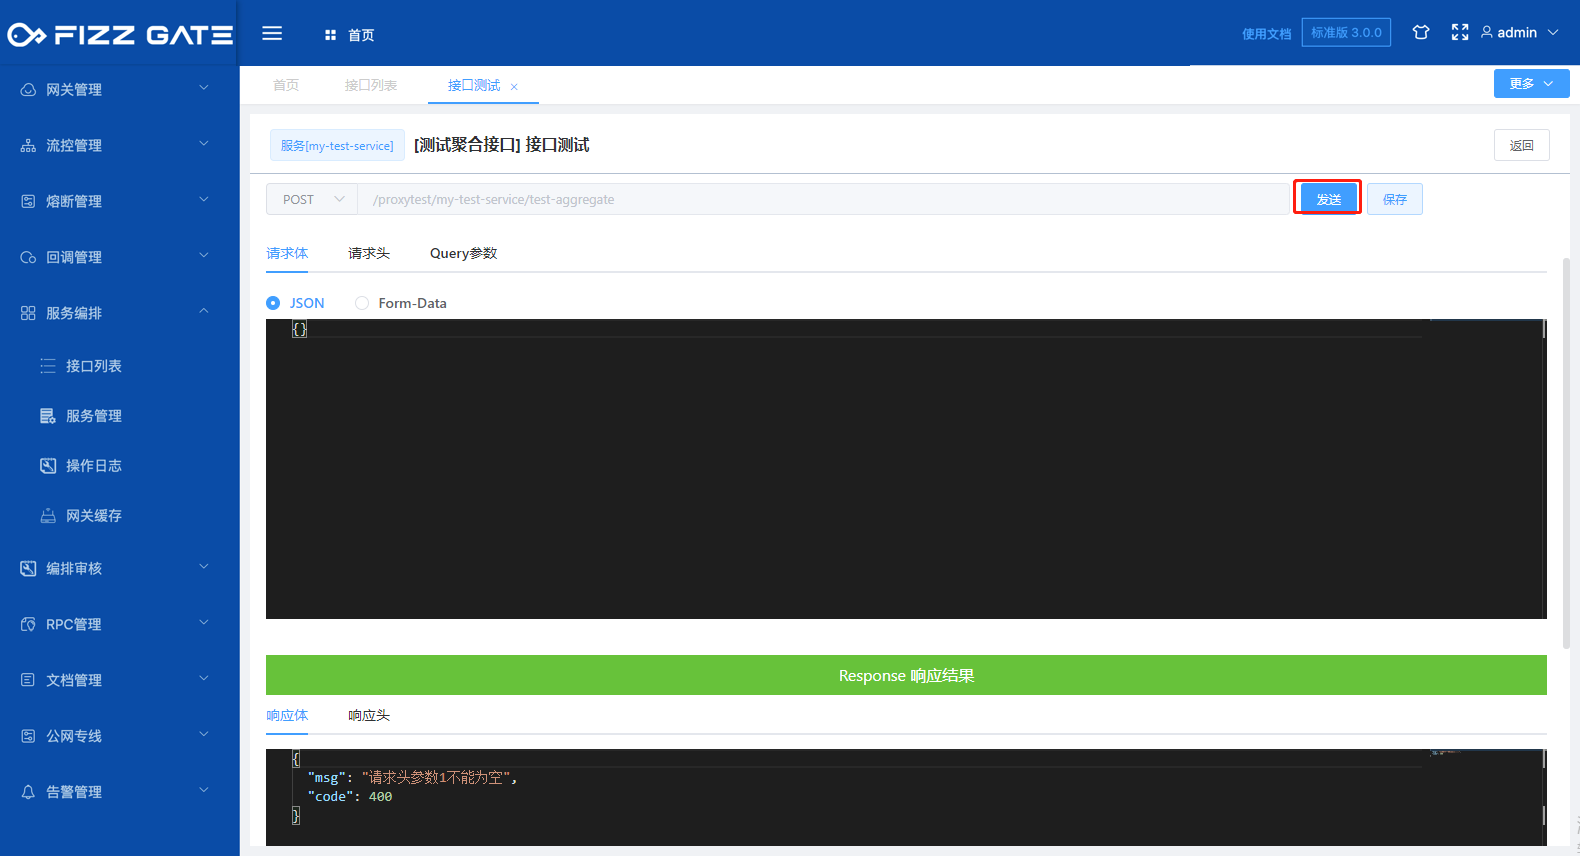
The title field is used to prompt when verification fails. For example, if no request header is passed when requesting the interface, it will prompt "Request header parameter 1 cannot be empty" (the error prompt output is configured by the verification result, please see the following introduction for details). as the picture shows.

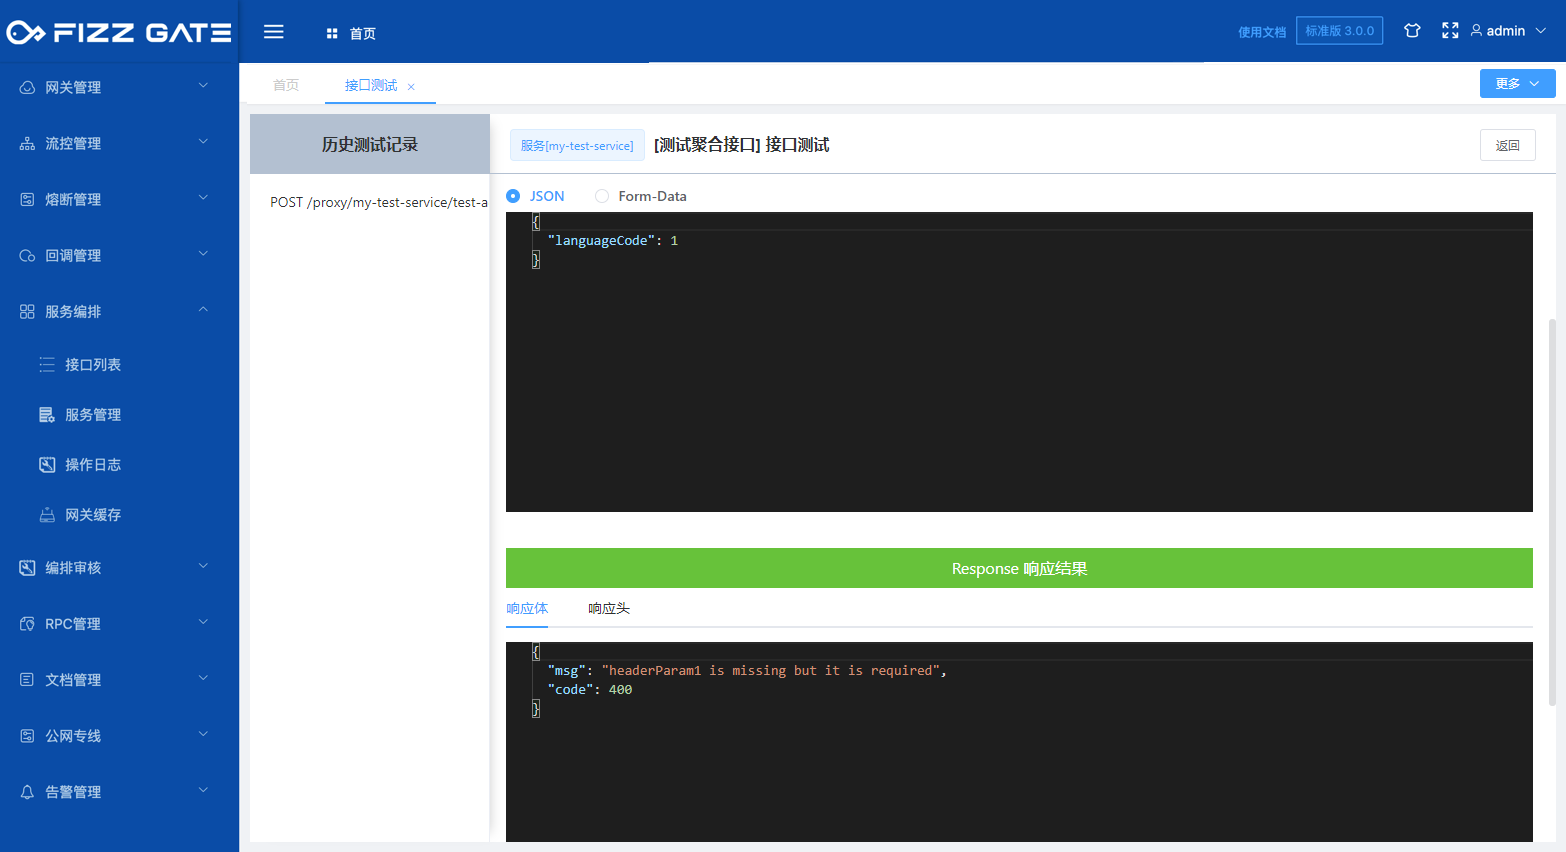
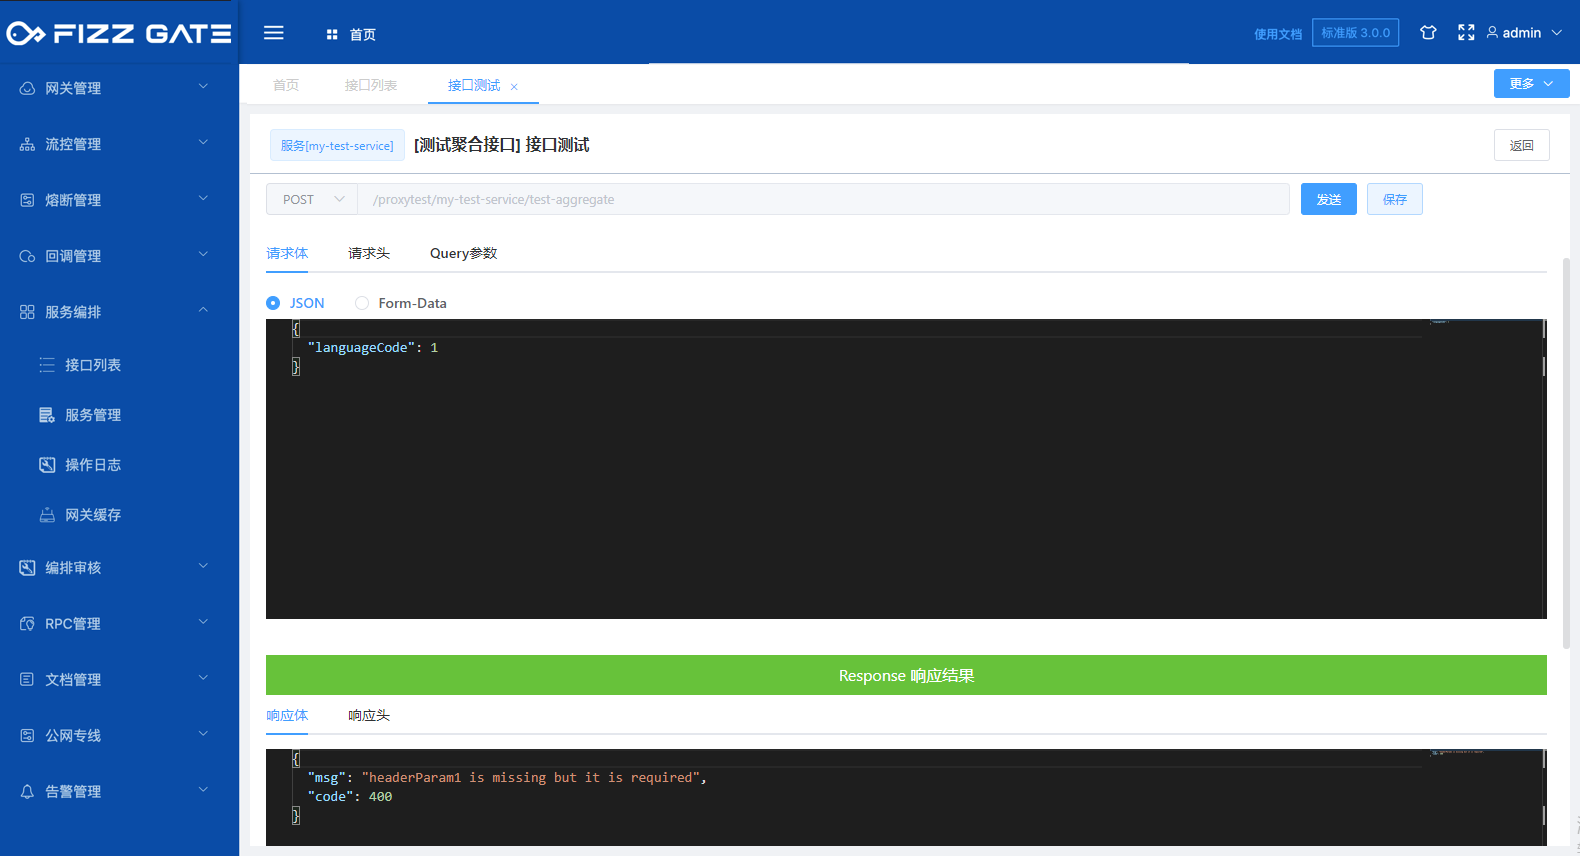
When the language configuration is defined (for details, please see the language configuration introduction later), when the option is English, the titleEn field will be used to prompt when the verification fails. For example, when the request header is not passed when requesting the interface, it will prompt "headerParam1 is missing but it is required" (the error prompt output is configured through the verification result, please see the following introduction for details), as shown in the figure.
# Request body
Define the request body parameters of the aggregate interface.
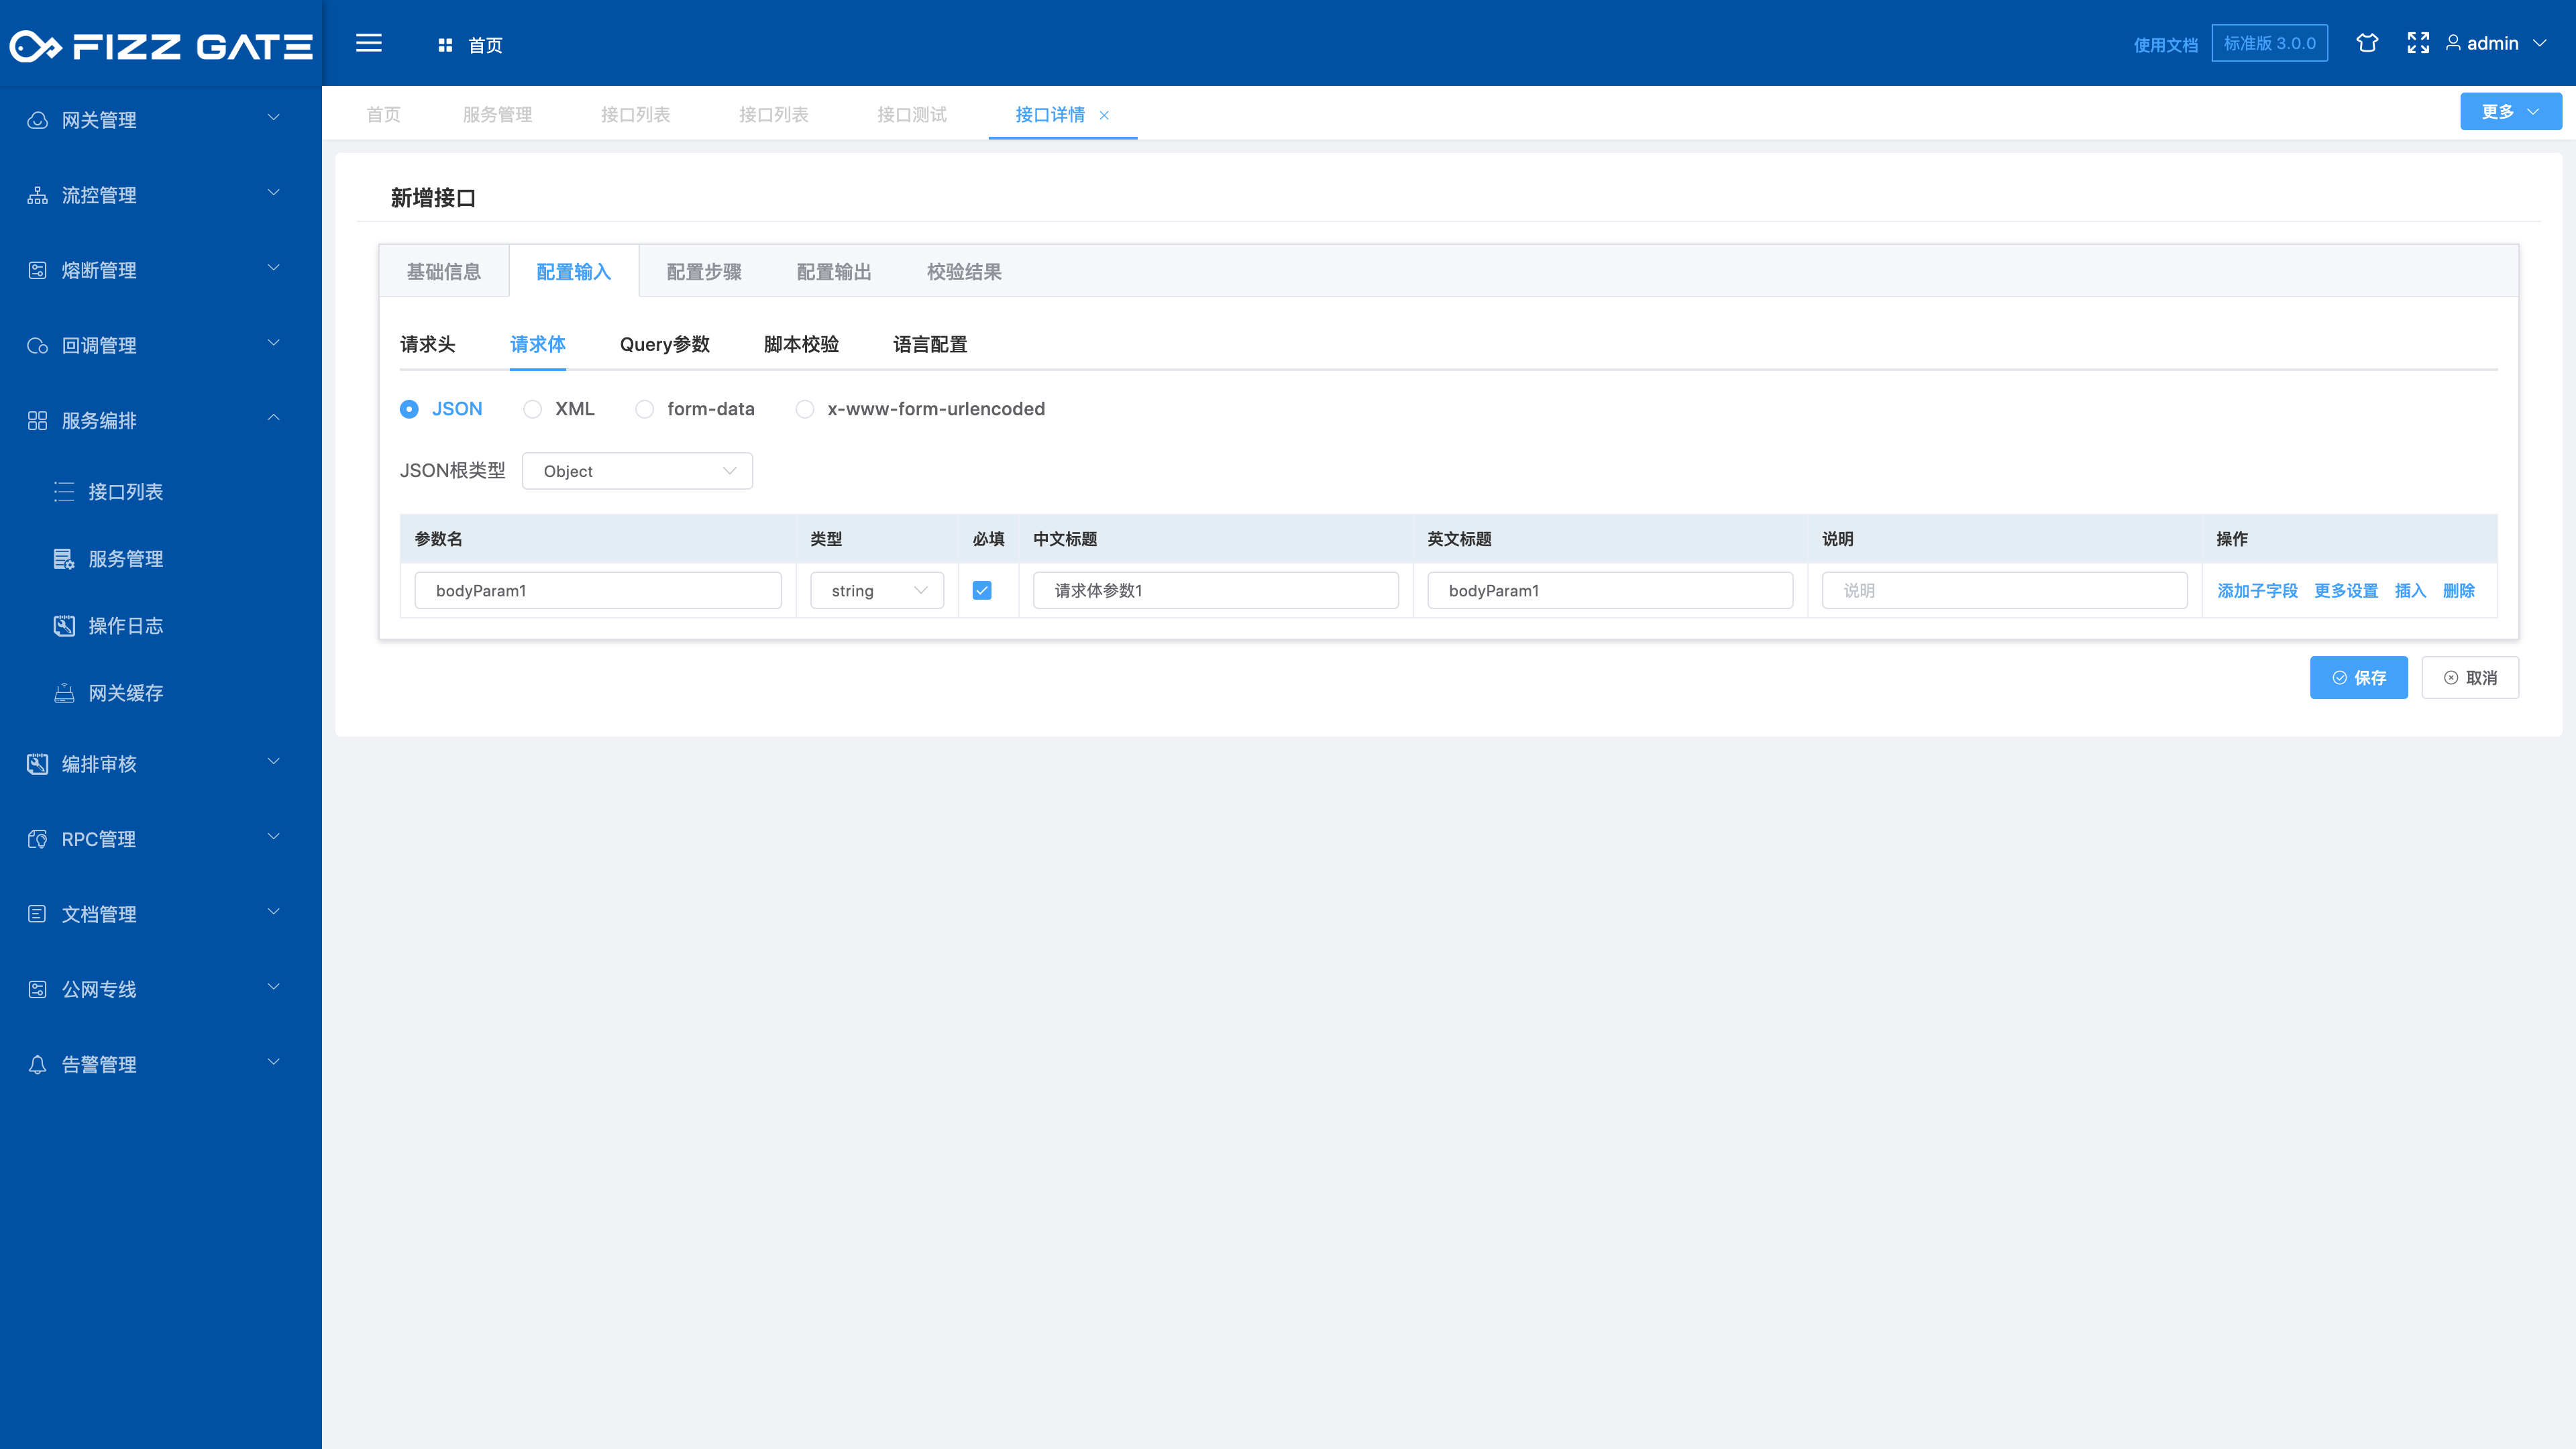
For example:
{
   "type": "object",
   "properties": {
     "bodyParam1": {
       "type": "string",
       "title": "Request body parameter 1",
       "titleEn": "bodyParam1"
     }
   },
   "required": [
     "bodyParam1"
   ]
}
The above example defines the required request body parameter bodyParam1.
The title field is used to prompt when verification fails. For example, when the request body parameter is not passed when requesting the interface, it will prompt "Request body parameter 1 cannot be empty" (the error prompt output is configured through the verification result, please see the following introduction for details) ,as the picture shows.
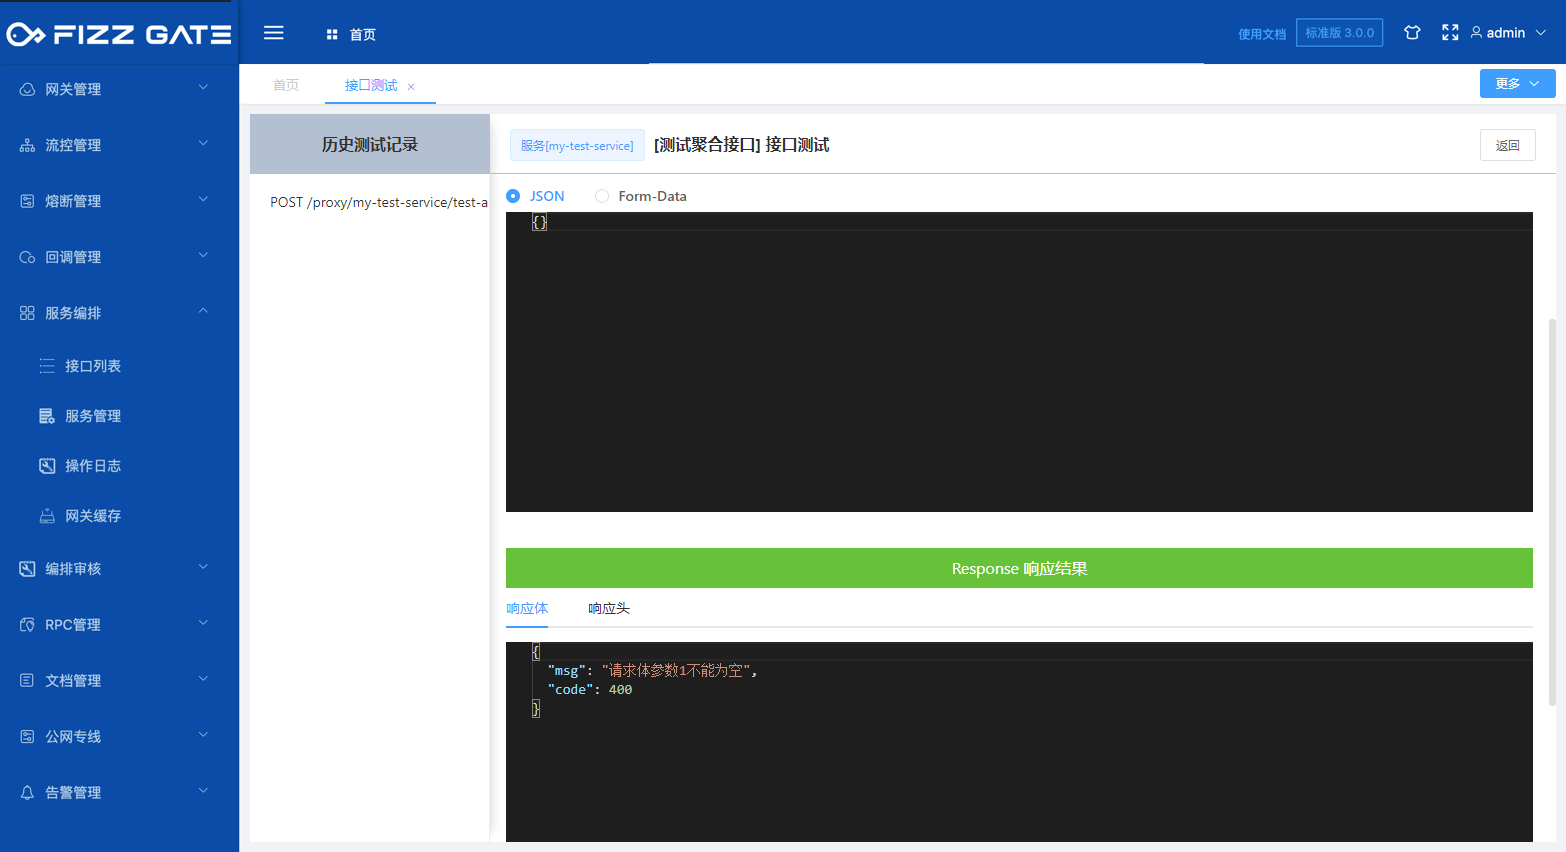
When the language configuration is defined (for details, please see the language configuration introduction later), when the option is English, the titleEn field will be used to prompt when verification fails. For example, when the request body parameter is not passed when requesting the interface, it will prompt "bodyParam1 is missing" but it is required” (the error prompt output is configured through the verification result, please see the following introduction for details), as shown in the figure.

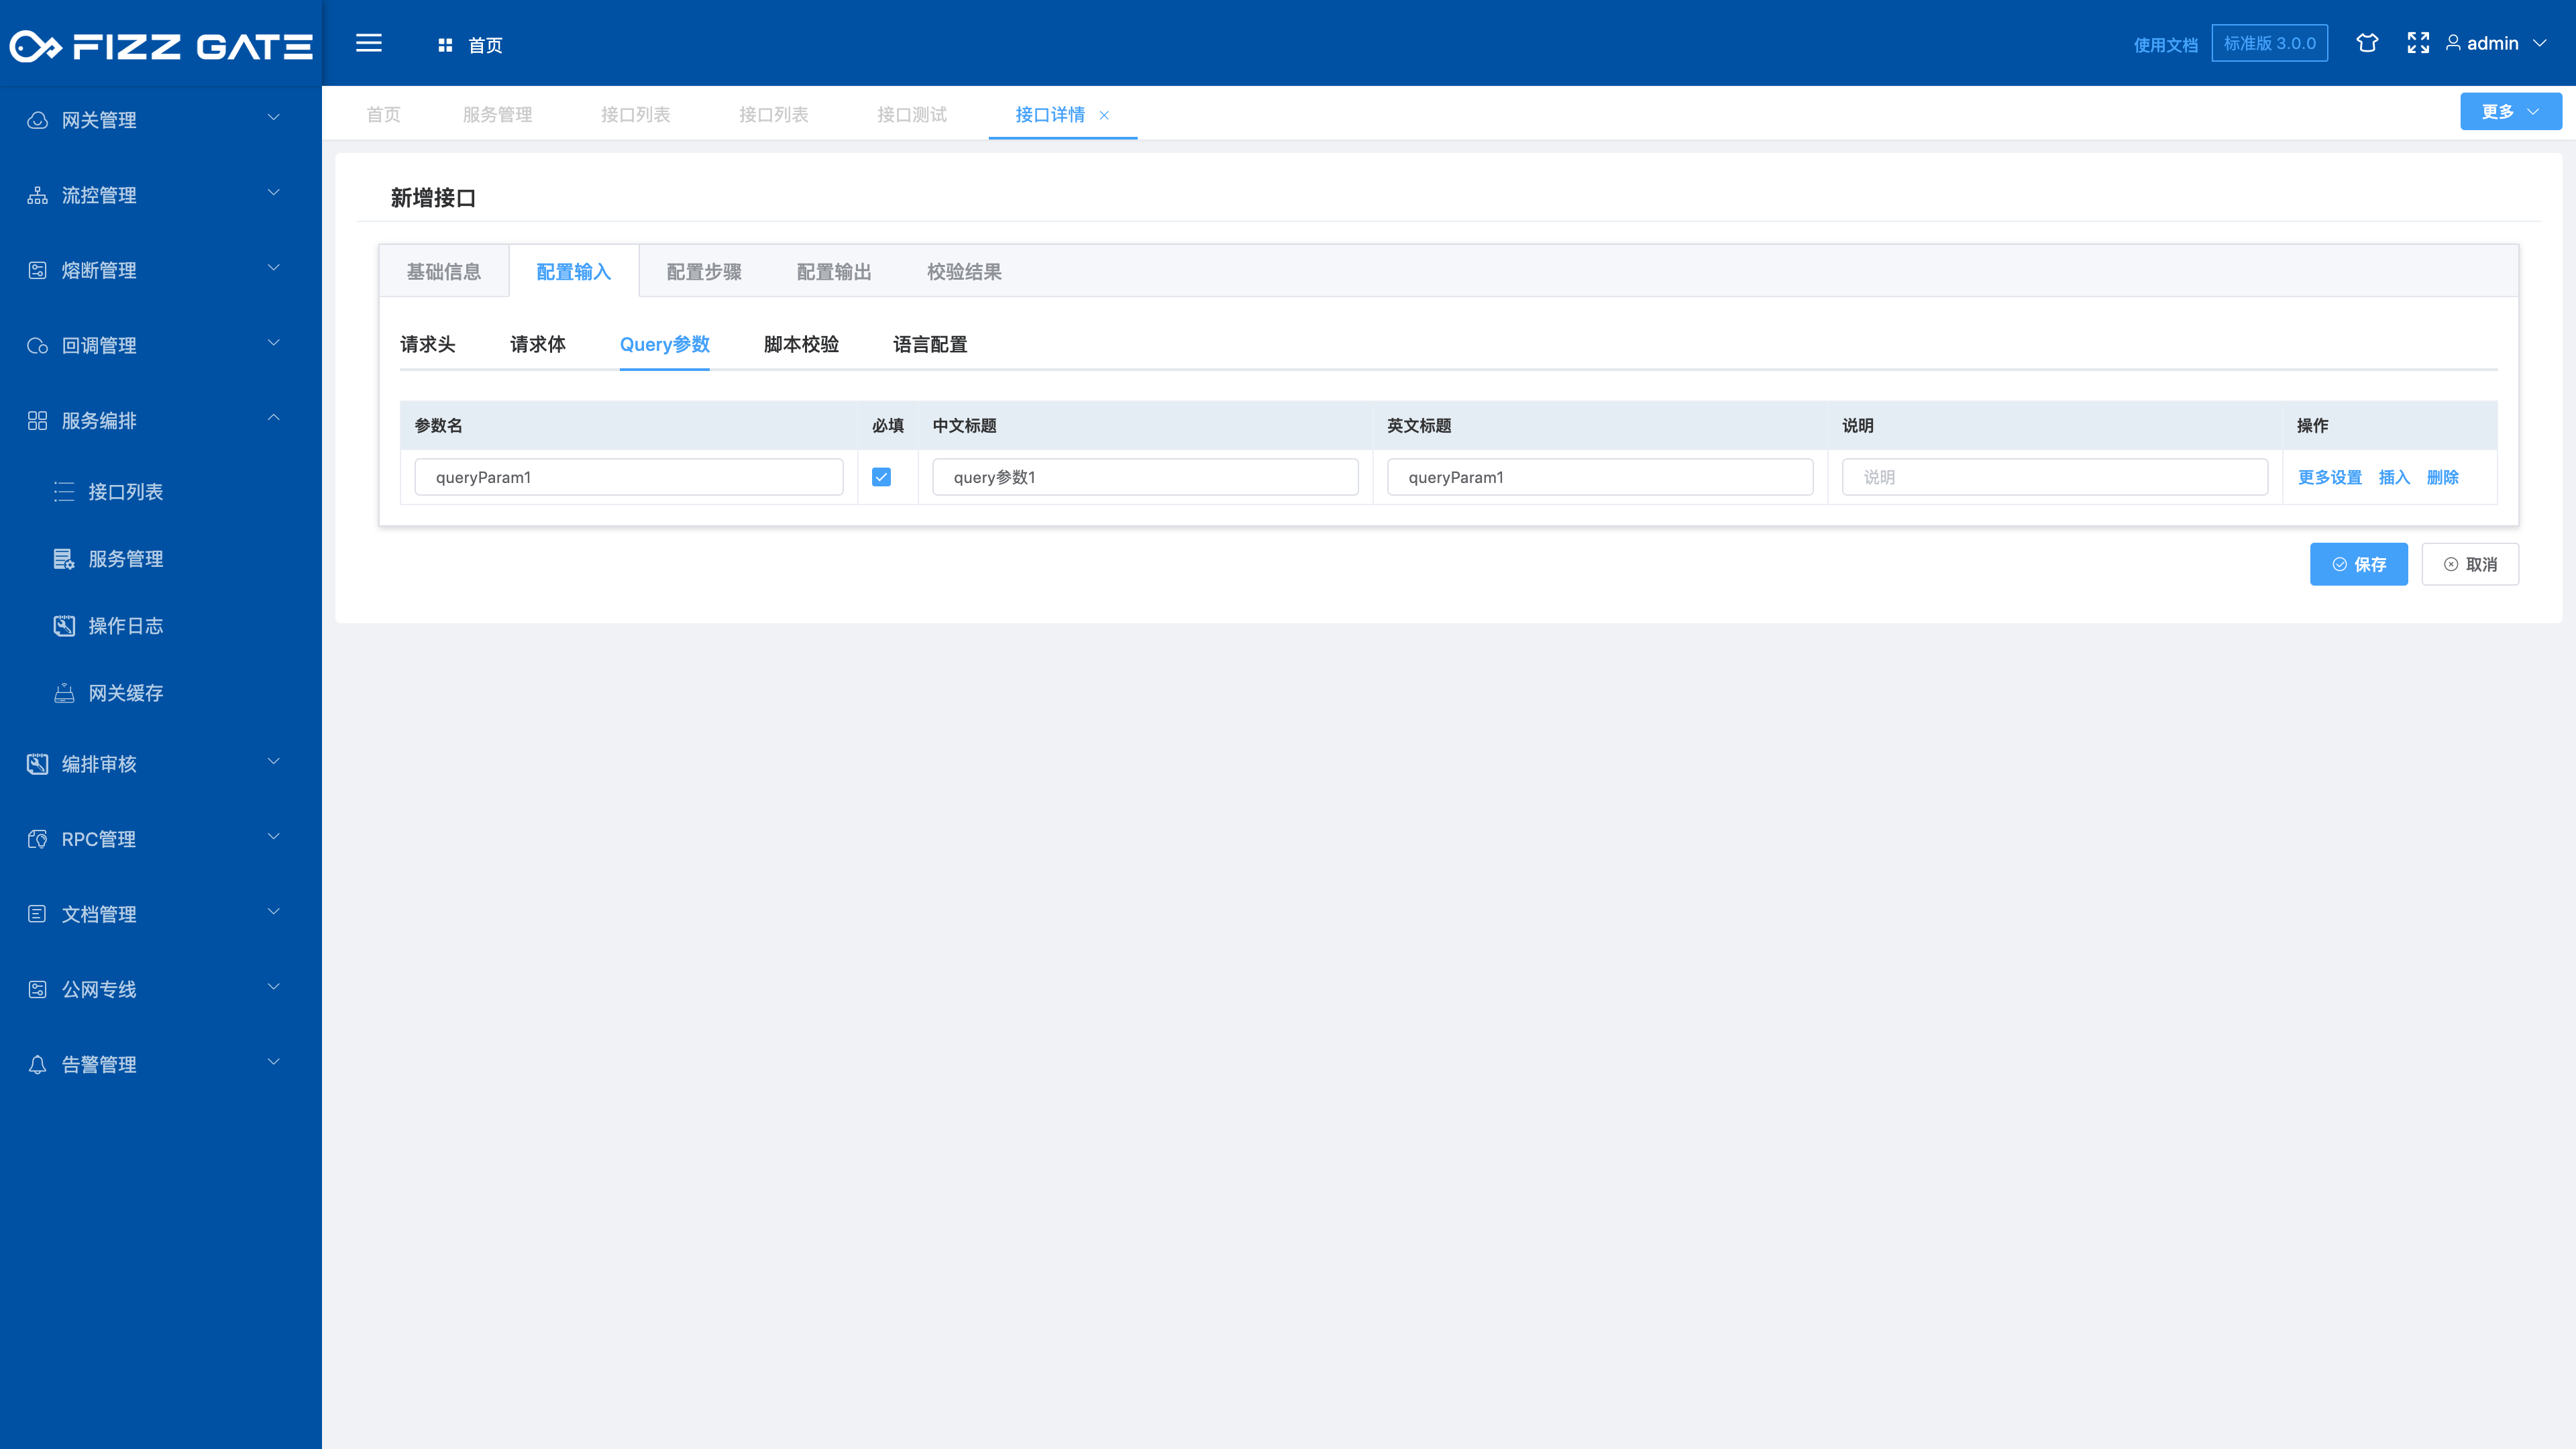
# Query parameters
Define the Query parameters of the aggregate interface.
For example:
{
   "type": "object",
   "properties": {
     "queryParam1": {
       "type": "string",
       "title": "query parameter 1",
       "titleEn": "queryParam1"
     }
   },
   "required": [
     "queryParam1"
   ]
}
The above example defines the required Query parameter queryParam1.
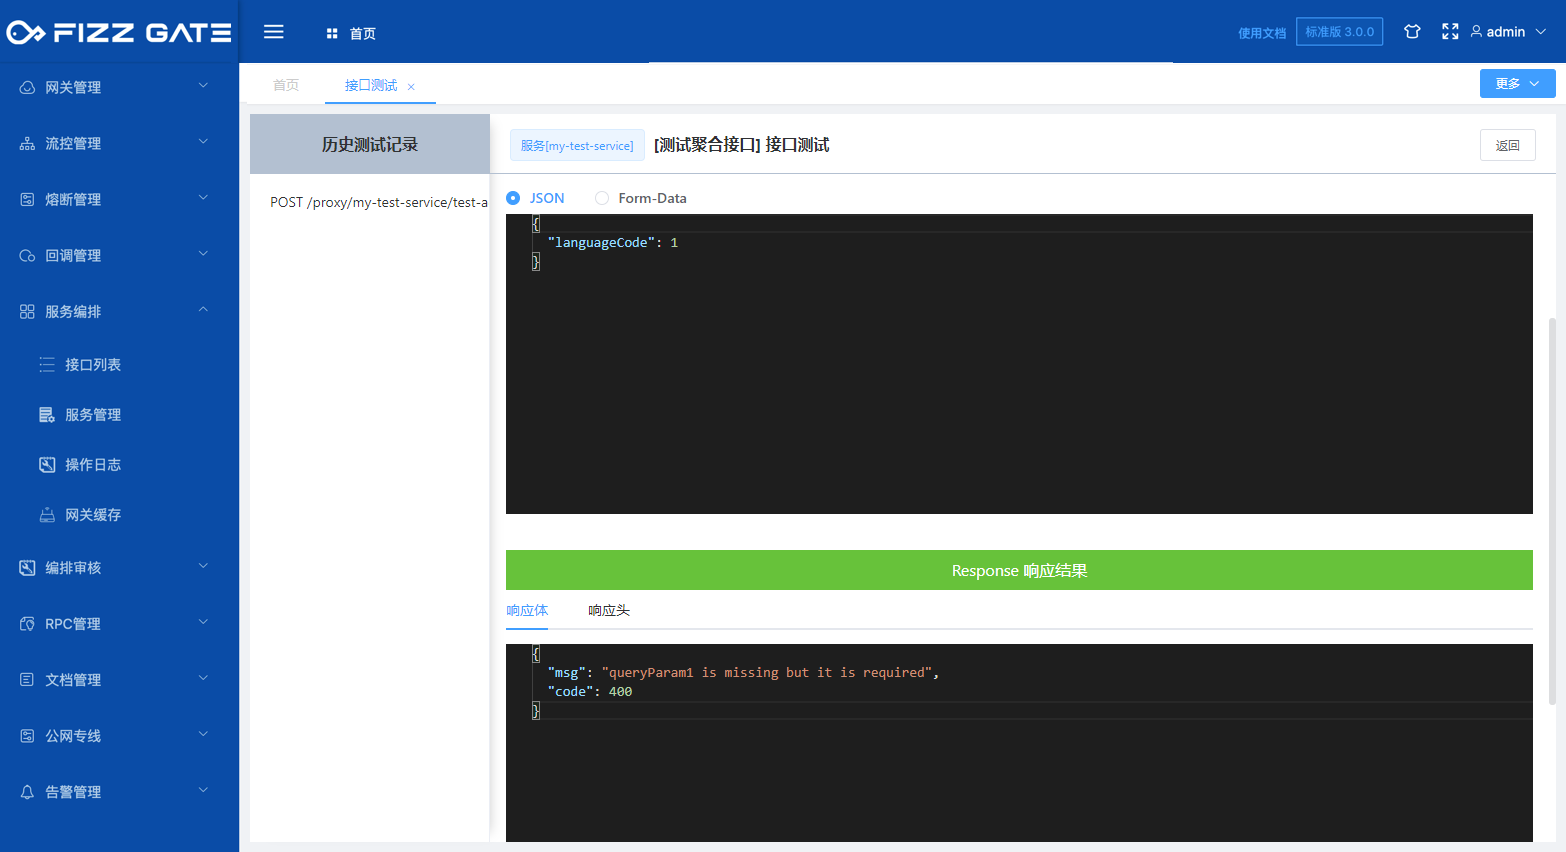
The title field is used to prompt when verification fails. For example, if the Query parameter is not passed when requesting the interface, it will prompt "query parameter 1 cannot be empty" (the error prompt output is configured through the verification result, please see the following introduction for details), such as As shown in the figure.

When the language configuration is defined (for details, please see the introduction to language configuration later) option is in English, the titleEn field will be used to prompt when verification fails. For example, if the Query parameter is not passed when requesting the interface, it will prompt "queryParam1 is missing but it is required" (the error prompt output passes the verification result configuration, details Please see the introduction below), as shown in the figure.
# Script verification
For verification scenarios that cannot be covered by the JSON Schema specification, you can use scripts to process input parameters more flexibly.
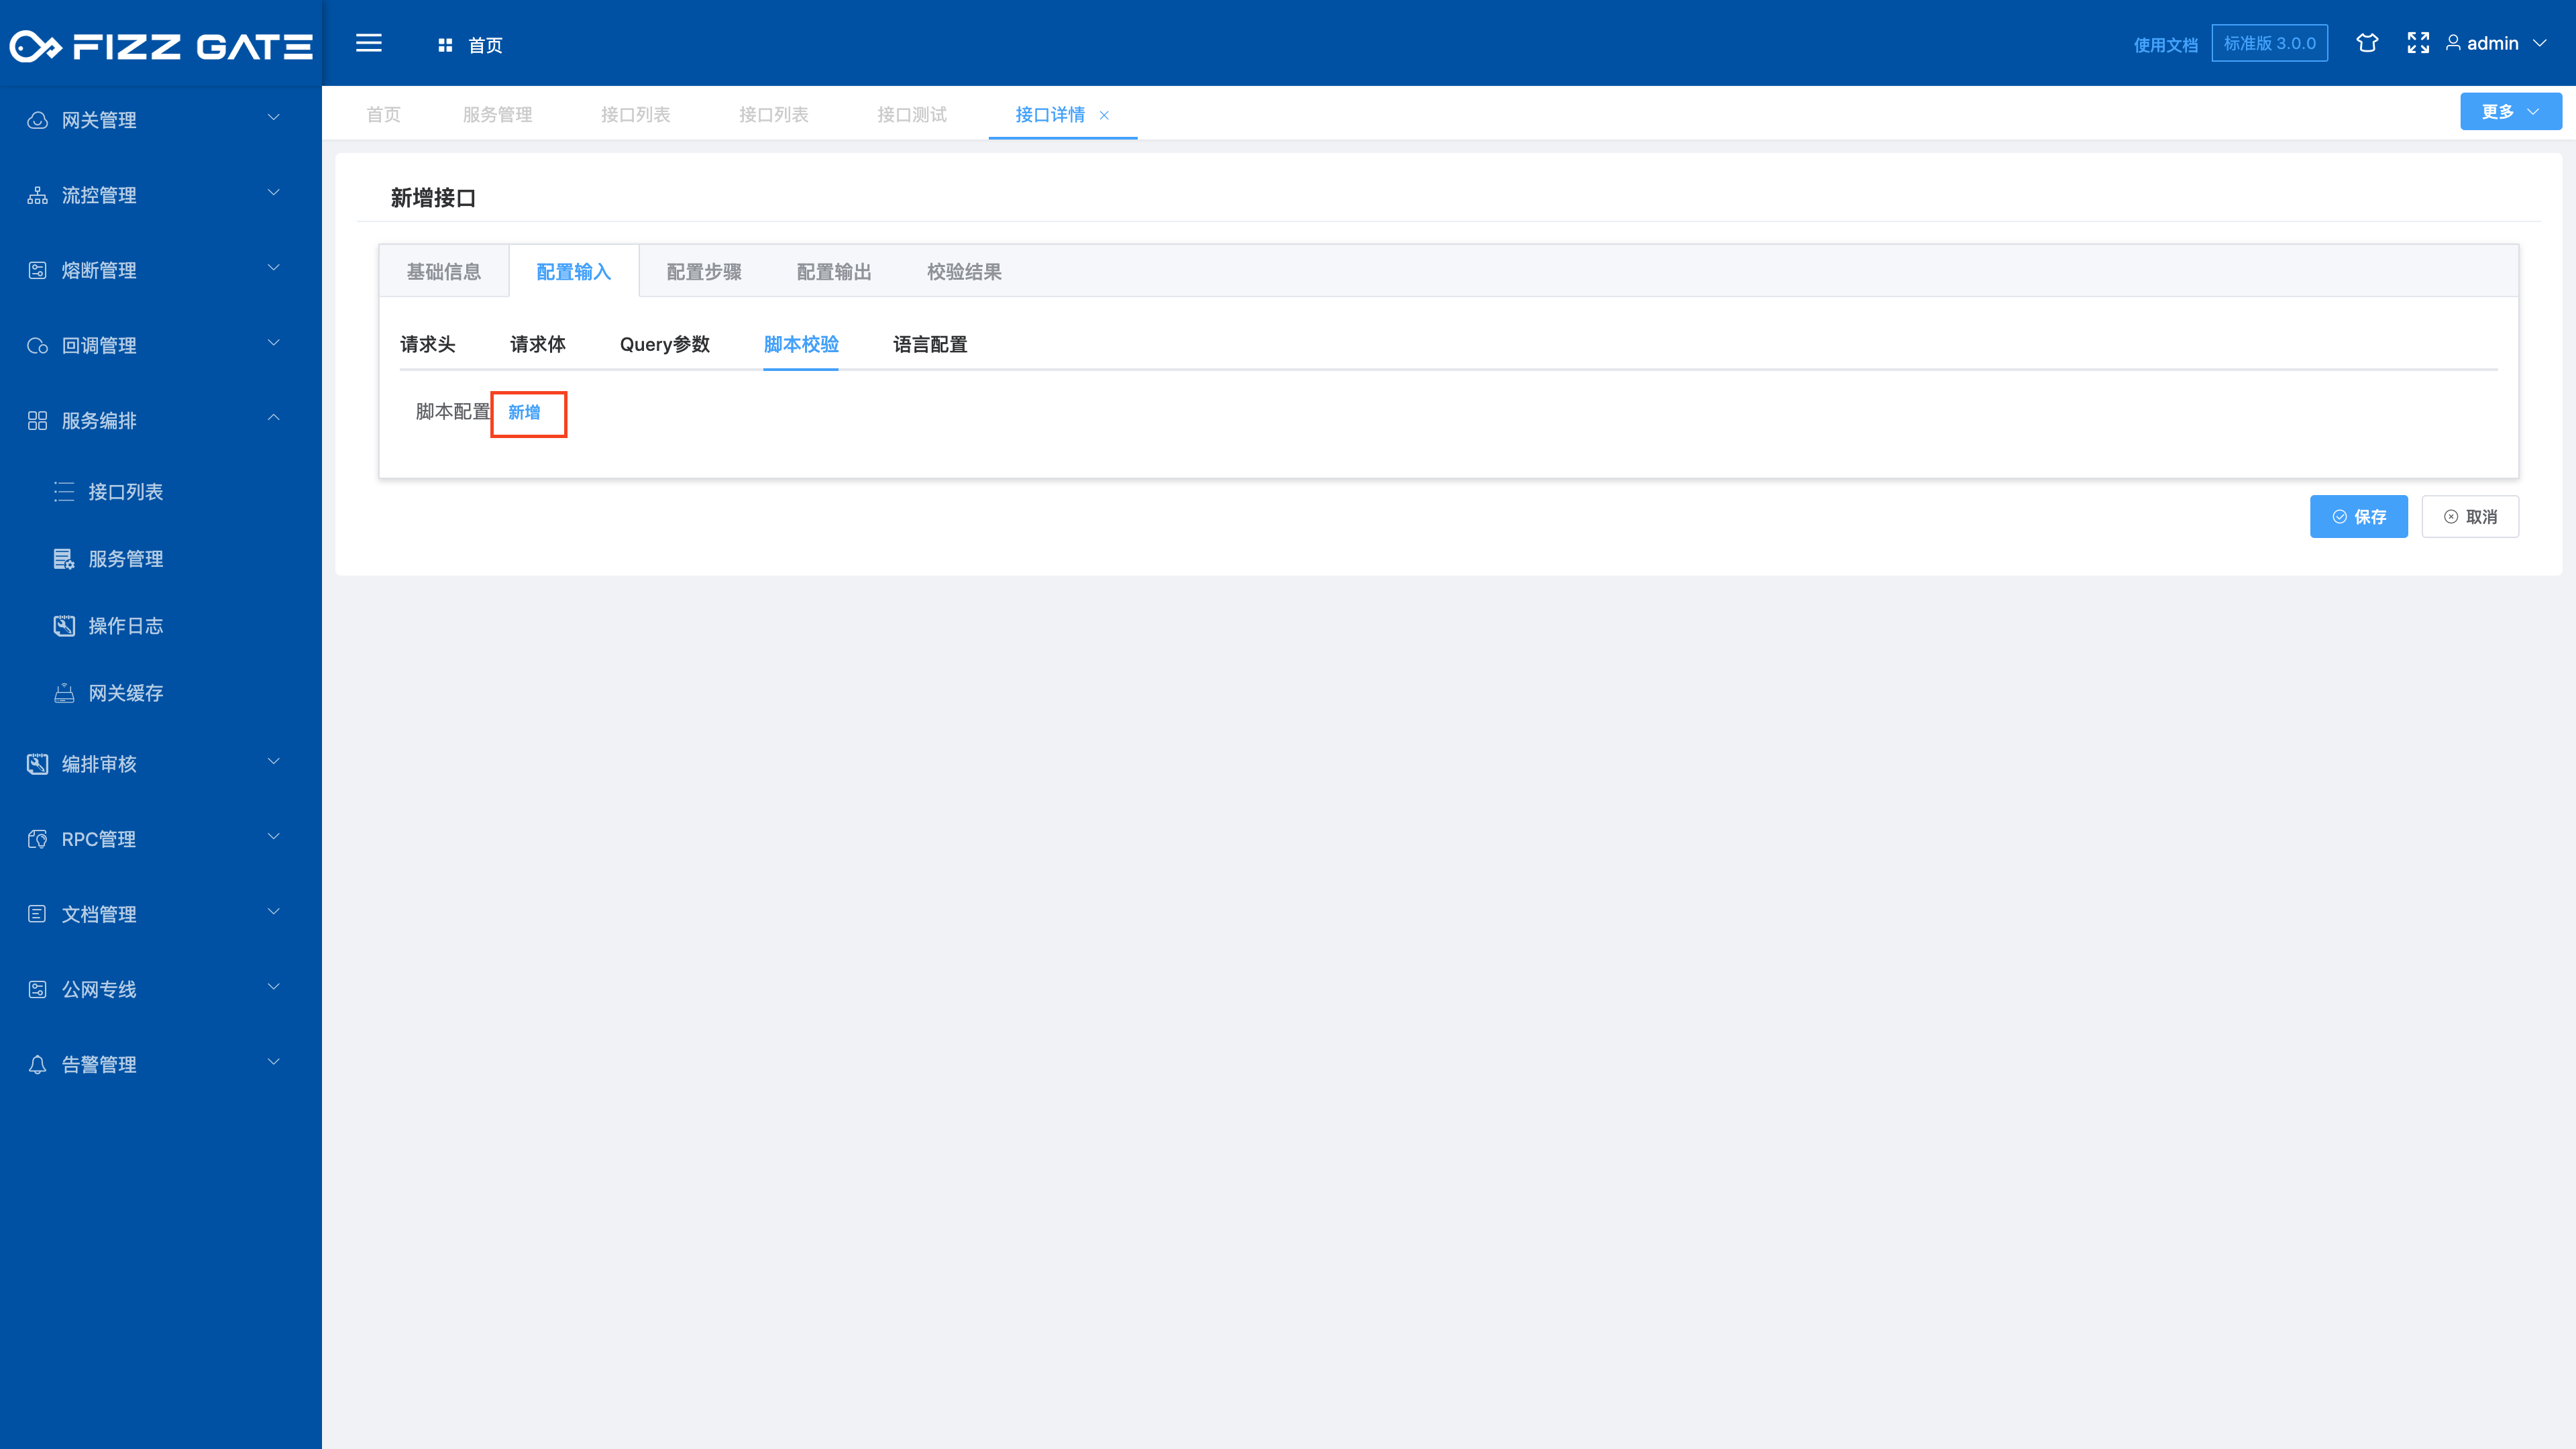
After clicking the Add button, the script configuration window pops up, as shown in the figure.
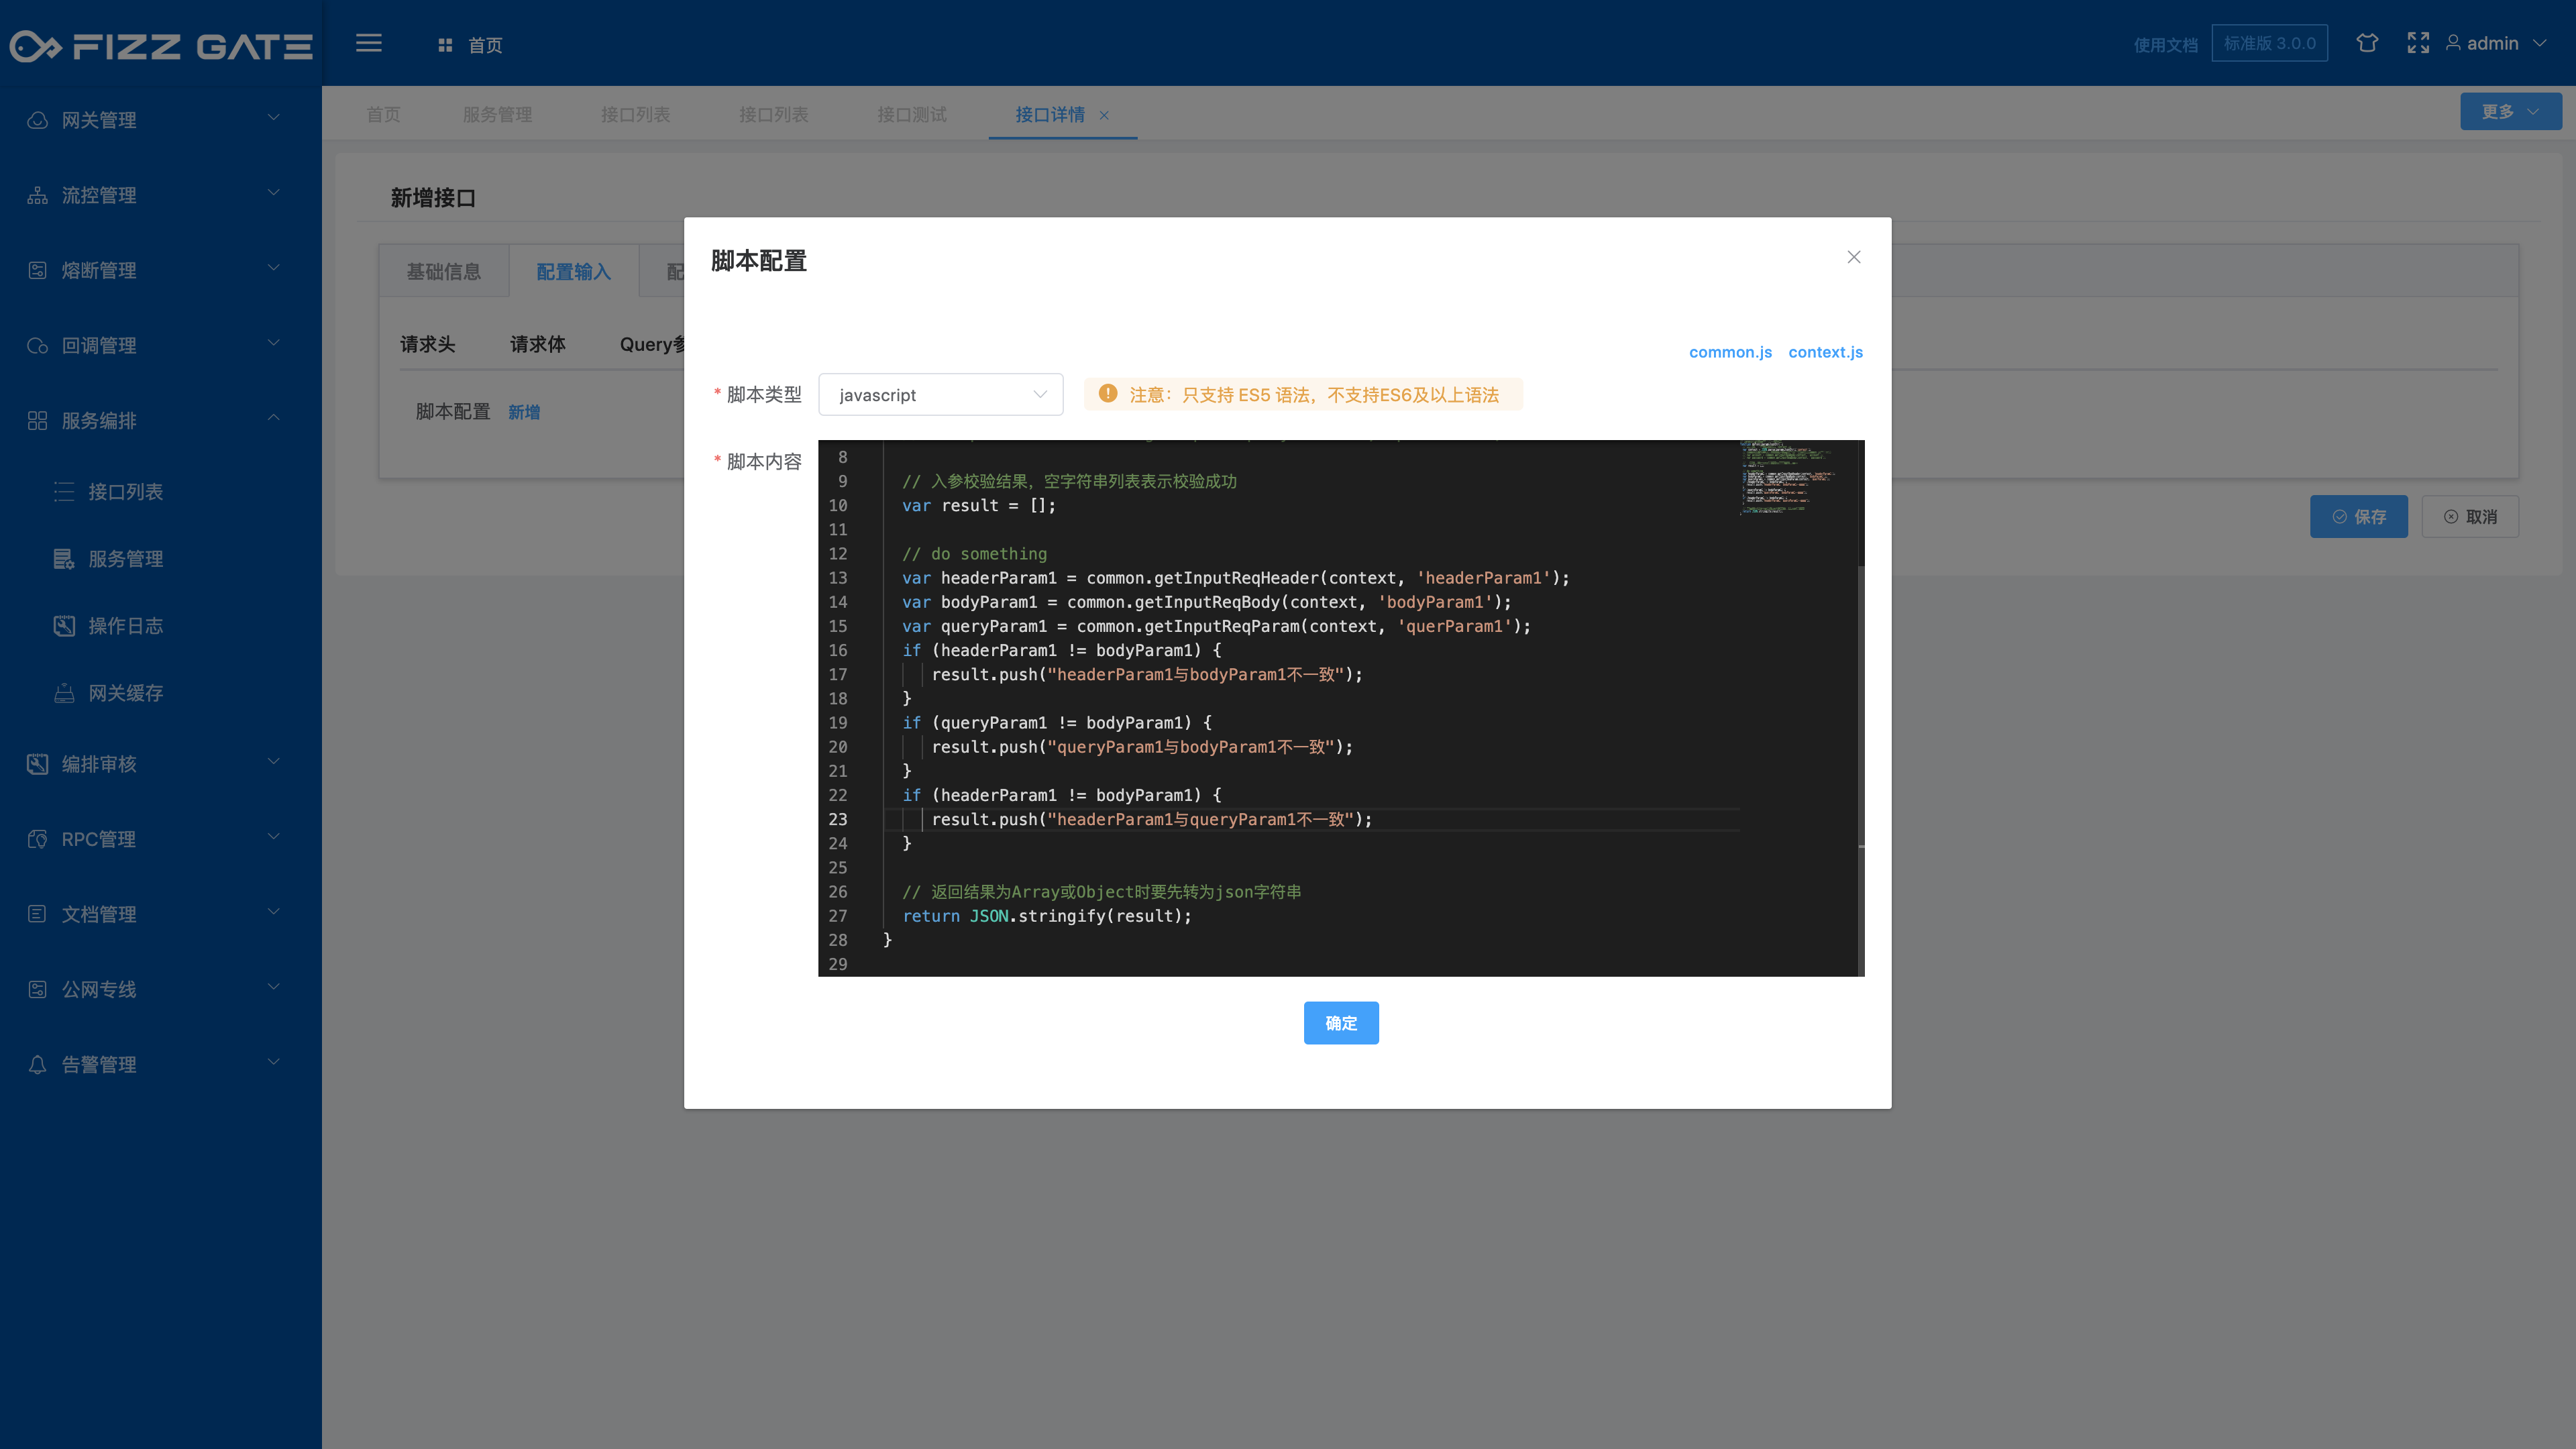
Script type: optional javascript|groovy, required;
Script content: Input parameter verification script written in the selected script type language, required.
For example:
//The javascript script function name cannot be modified
function dyFunc(paramsJsonStr) {
   //Context, please refer to context.js for data structure
   var context = JSON.parse(paramsJsonStr)['context'];
   // common is a built-in context convenient operation tool class. For details, please refer to common.js; for example:
   // var data = common.getStepRespBody(context, 'step2', 'request1', 'data');

   // do something
   var headerParam1 = common.getInputReqHeader(context, 'headerParam1');
   var bodyParam1 = common.getInputReqBody(context, 'bodyParam1');
   var queryParam1 = common.getInputReqParam(context, 'queryParam1');
   var result = new Array();
   if (headerParam1 != bodyParam1) {
     result.push("headerParam1 is inconsistent with bodyParam1");
   }
   if (queryParam1 != bodyParam1) {
     result.push("queryParam1 is inconsistent with bodyParam1");
   }
   if (headerParam1 != queryParam1) {
     result.push("headerParam1 is inconsistent with queryParam1");
   }

   // When the return result is Array or Object, it must be converted into a json string first.
   return JSON.stringify(result);
}
The above example uses JavaScript to write parameter verification and restricts the input parameters headerParam1, bodyParam1, and queryParam1 to be consistent. If they are inconsistent, an error message will be prompted (the error message output is configured through the verification result, please see the following introduction for details), such as As shown in the figure.

# Language configuration
By default, the aggregation interface uses Chinese to respond to verification failure prompts. Different prompt languages can be selected through input parameters through configuration. Currently, Chinese and English prompts are supported (this has met our business usage scenarios, and partners with other language requirements can contact us to add them) .
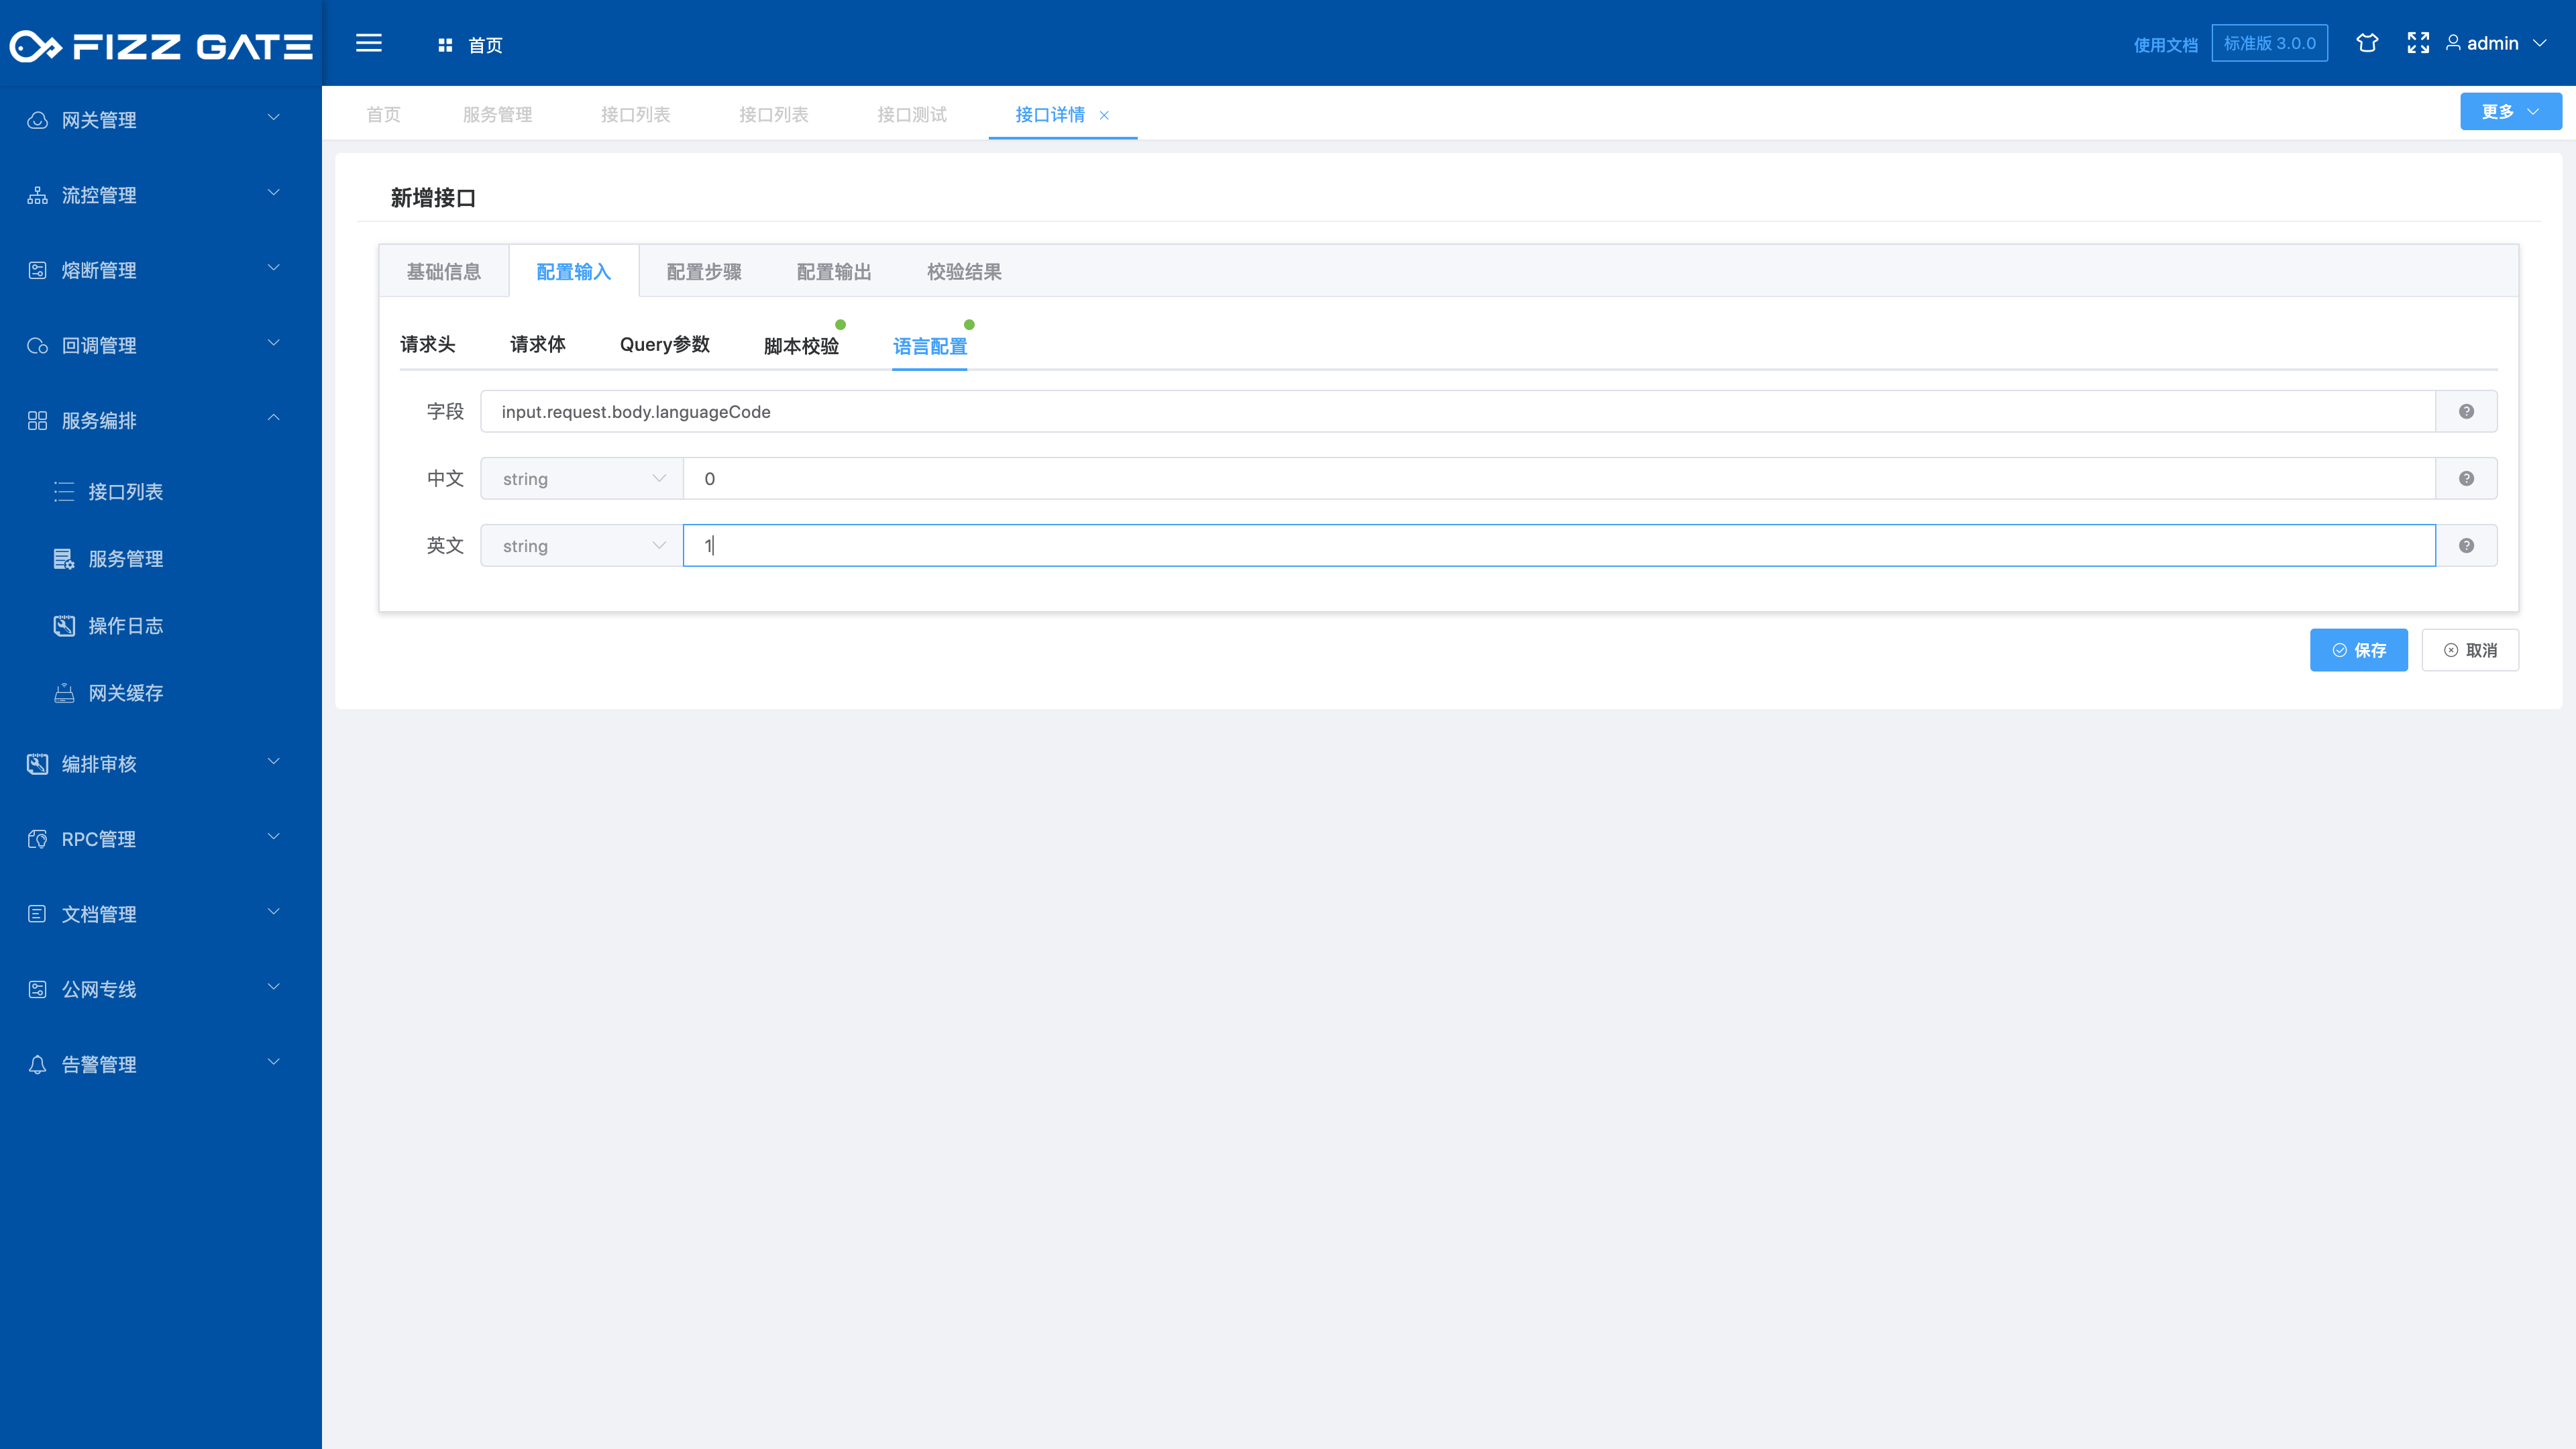
Field: input parameter field value, for example, input.request.body.languageCode uses the value of the request body parameter languageCode to determine which language to use;
Chinese: The mapping relationship between Chinese and the input parameter field value, for example, configure 0, and when the requested input parameter field value is 0, use the Chinese prompt to verify the result;
English: The mapping relationship between English and the input parameter field value. For example, configure 1. When the requested input parameter field value is 1, use English to prompt the verification result.
# Configuration steps
The aggregation interface calls the underlying service through multiple steps. Multiple steps are executed serially. Each step contains multiple requests (calls to the underlying service interface). Multiple requests in the same step are executed in parallel, and the last one is executed. step can obtain the execution result of the executed step. For more details, please see the introduction of the service orchestration article. The following describes the use of configuration steps.
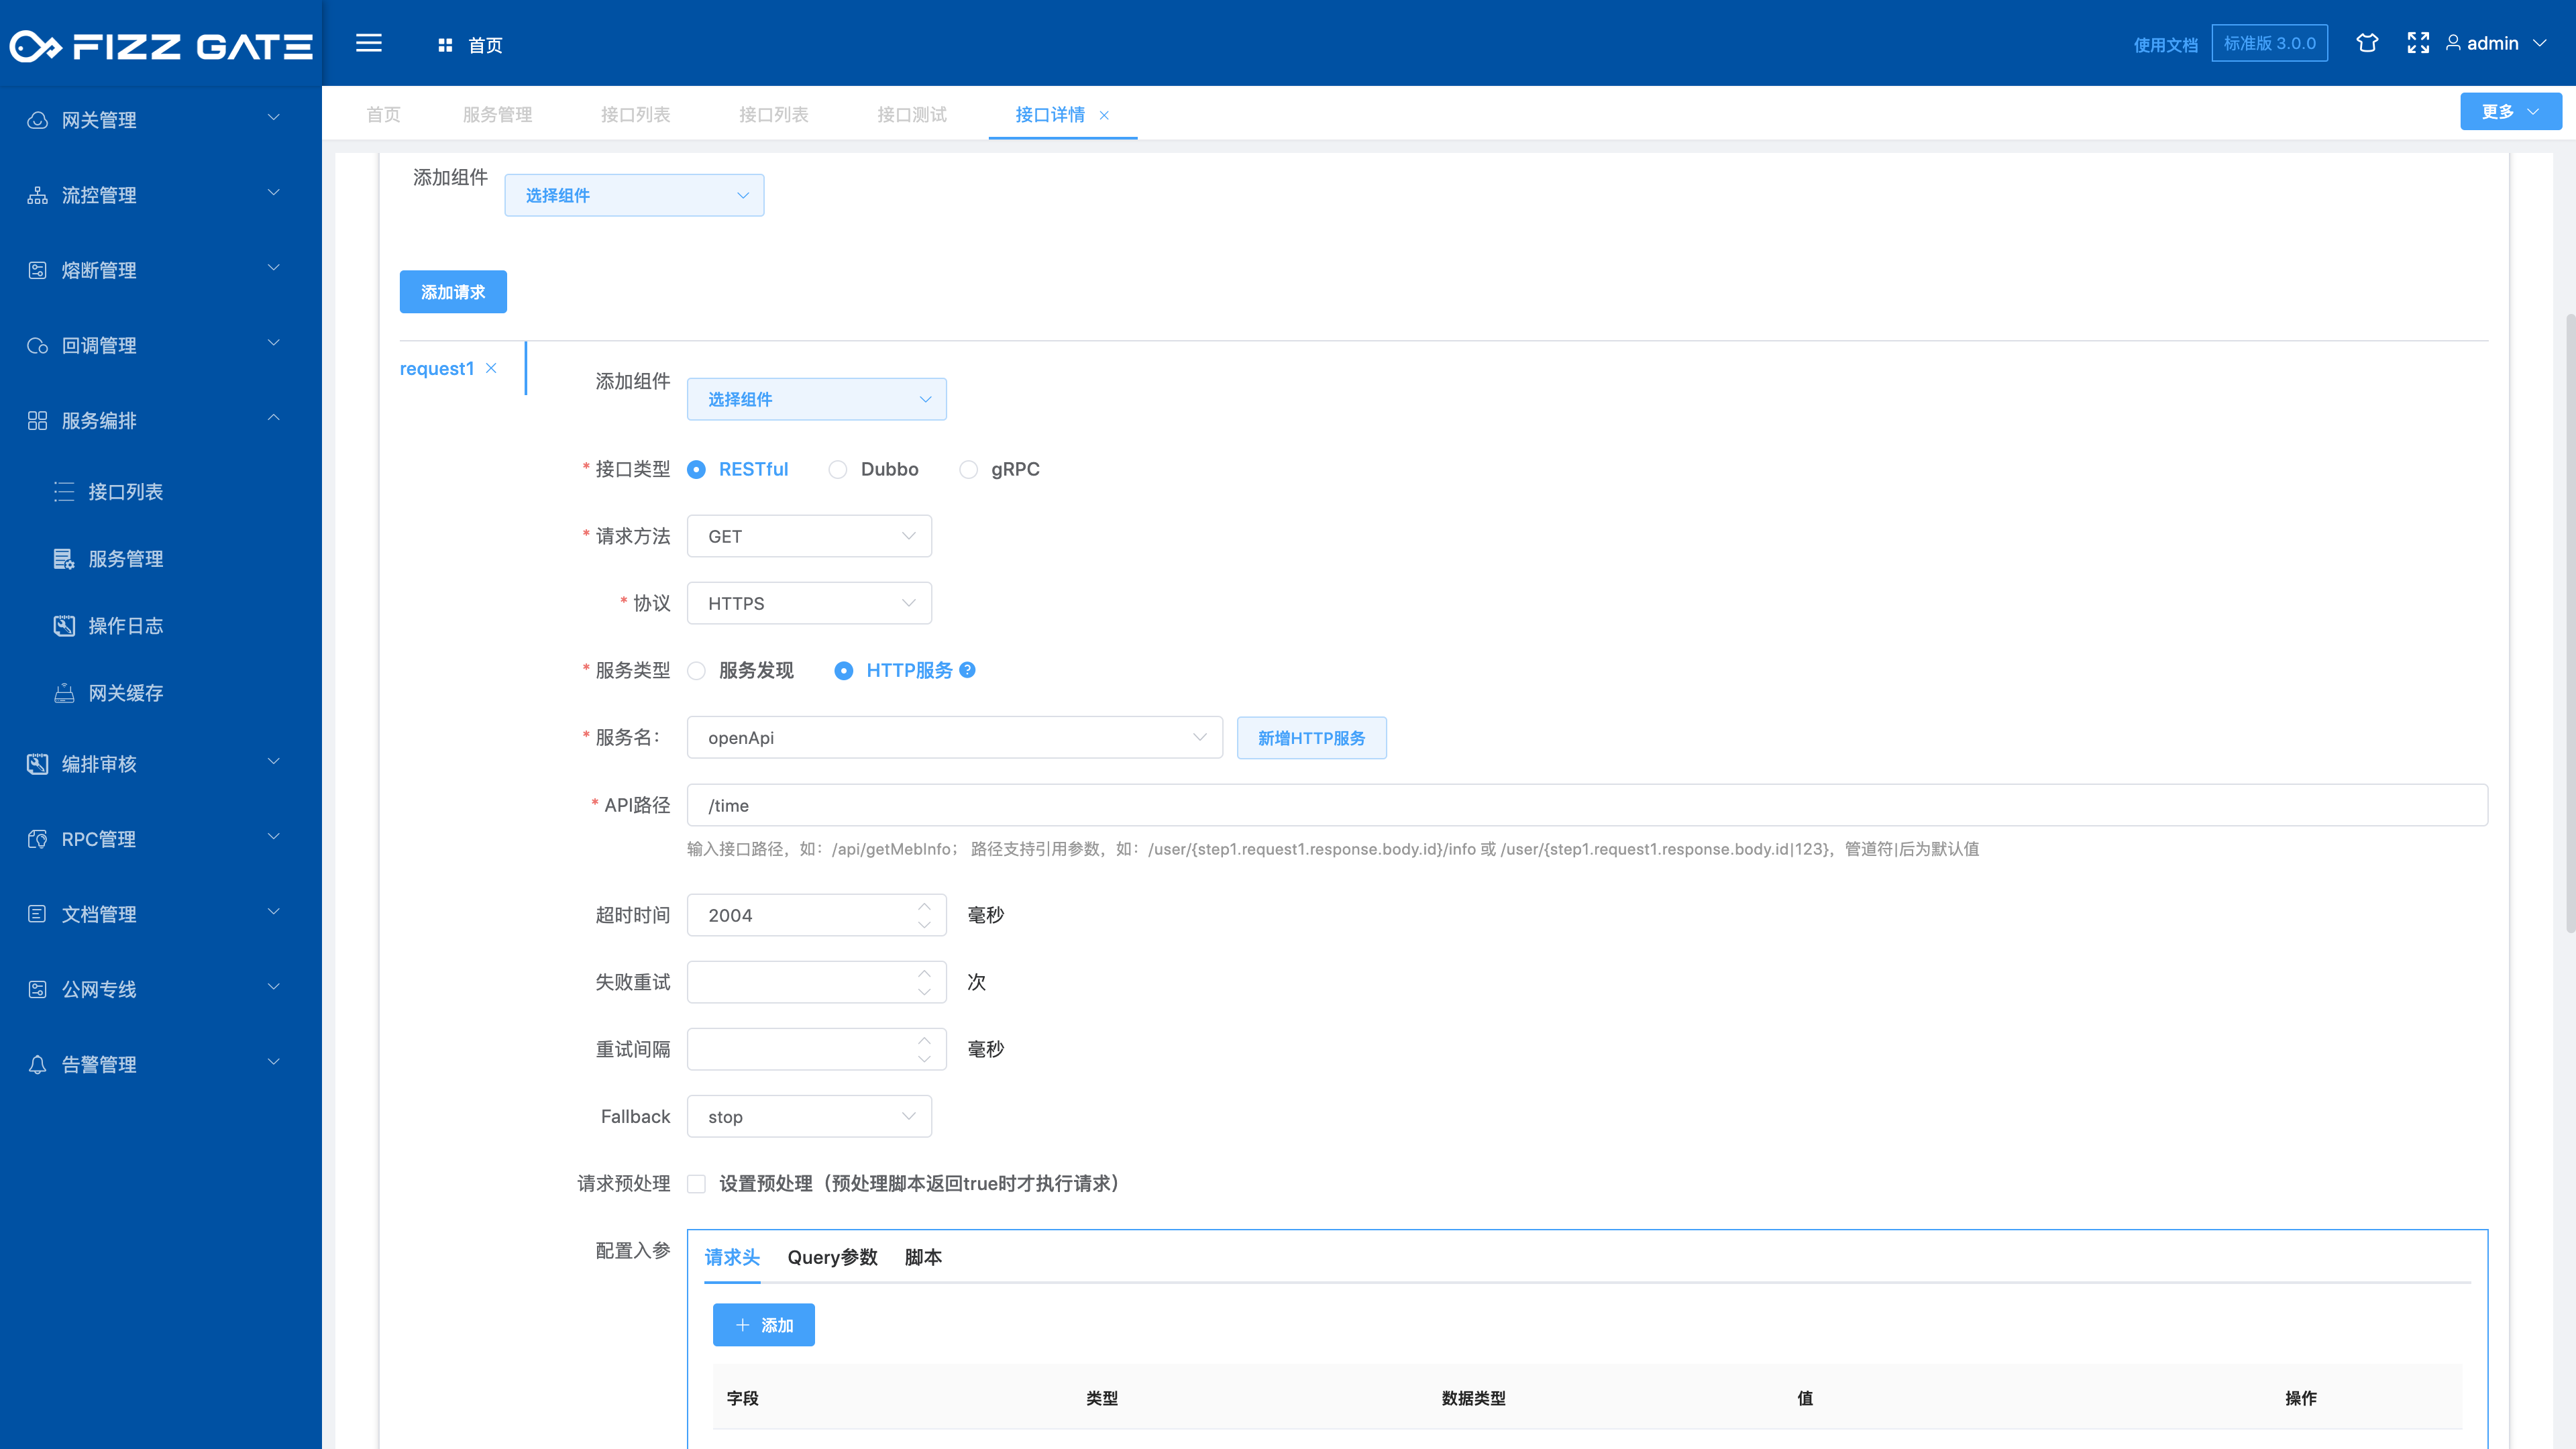
Whether to end after executing this step: After checking, the actual request will only respond with the result after executing this step, and will not execute subsequent steps. It is used for debugging;
Request method: request type for calling the underlying service interface, optional GET|POST, required;
Service name: Whether you choose service discovery or HTTP, you can select a group of servers by selecting the service name.
Timeout (milliseconds): The timeout for calling the underlying service interface. An exception is thrown when the timeout occurs. The unit is milliseconds;
Fallback: optional stop|continue, controls whether to continue to perform subsequent operations when calling the underlying service interface fails;
Request preprocessing: After checking, you can configure the preprocessing script. The underlying service interface will be called only when the preprocessing script returns true.
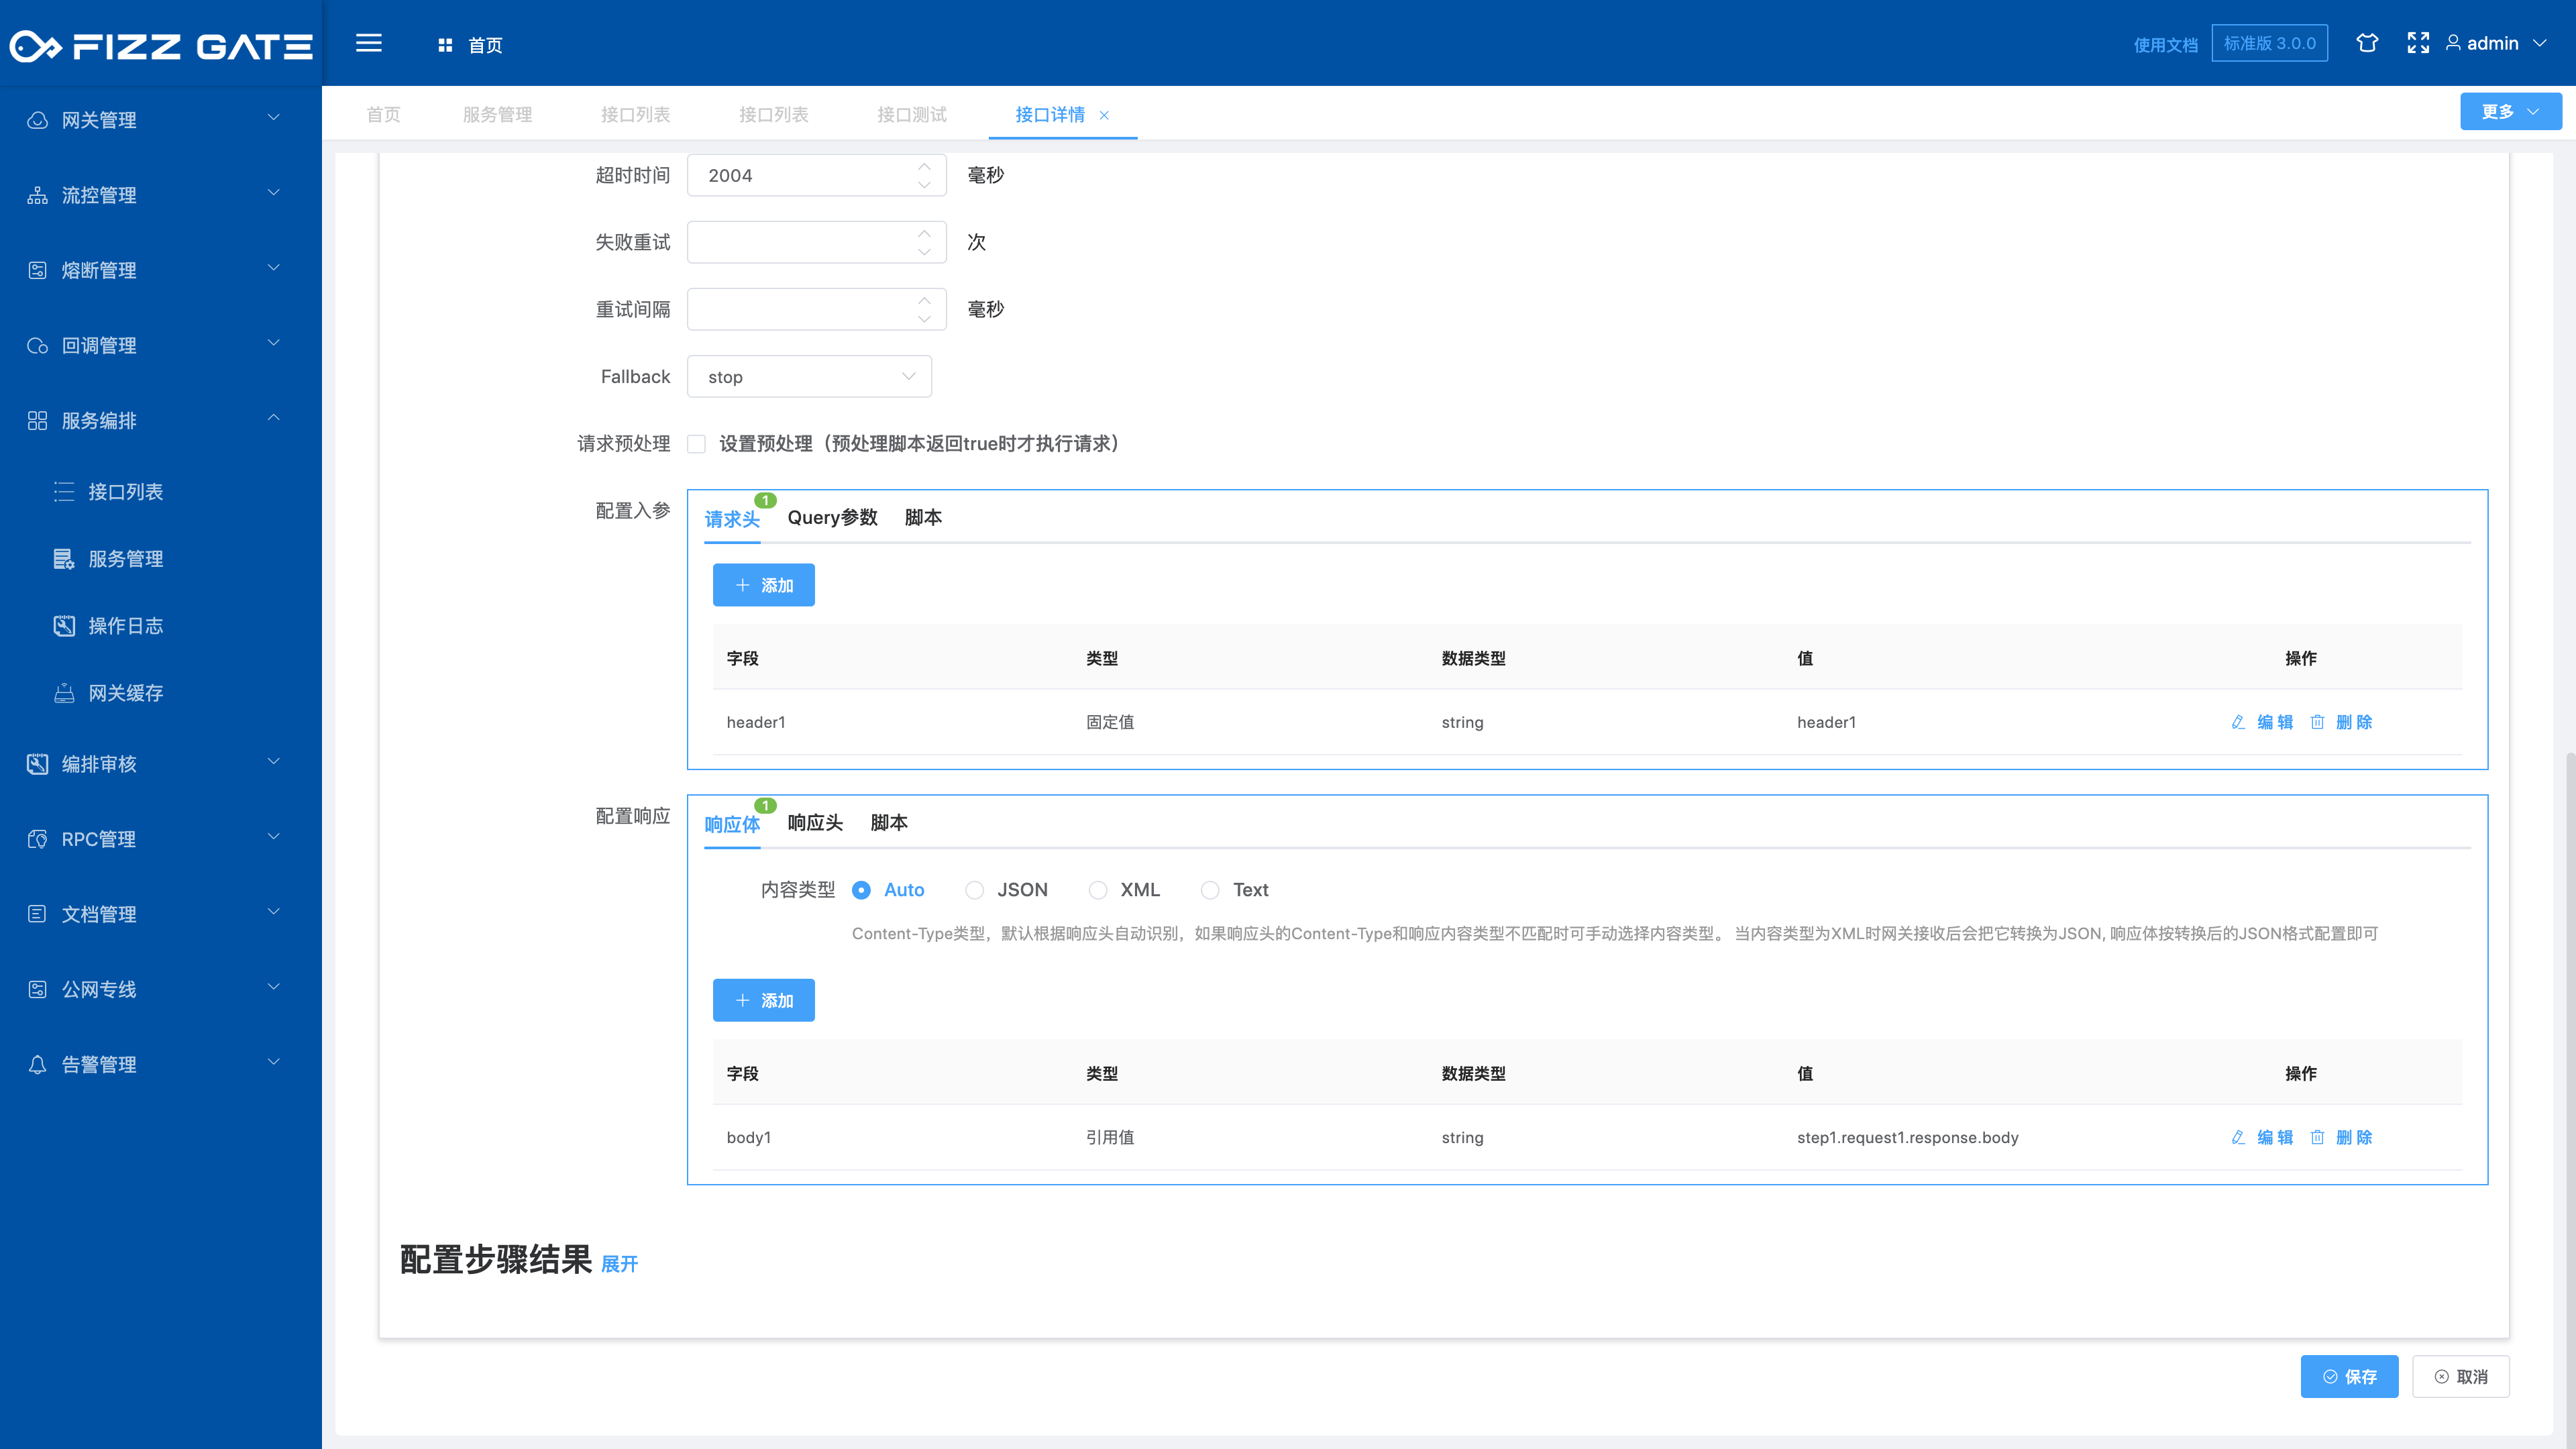
Configuration input parameters: configure the request parameters for calling the underlying service interface;
Configure response: Configure the response content for calling the underlying service interface.
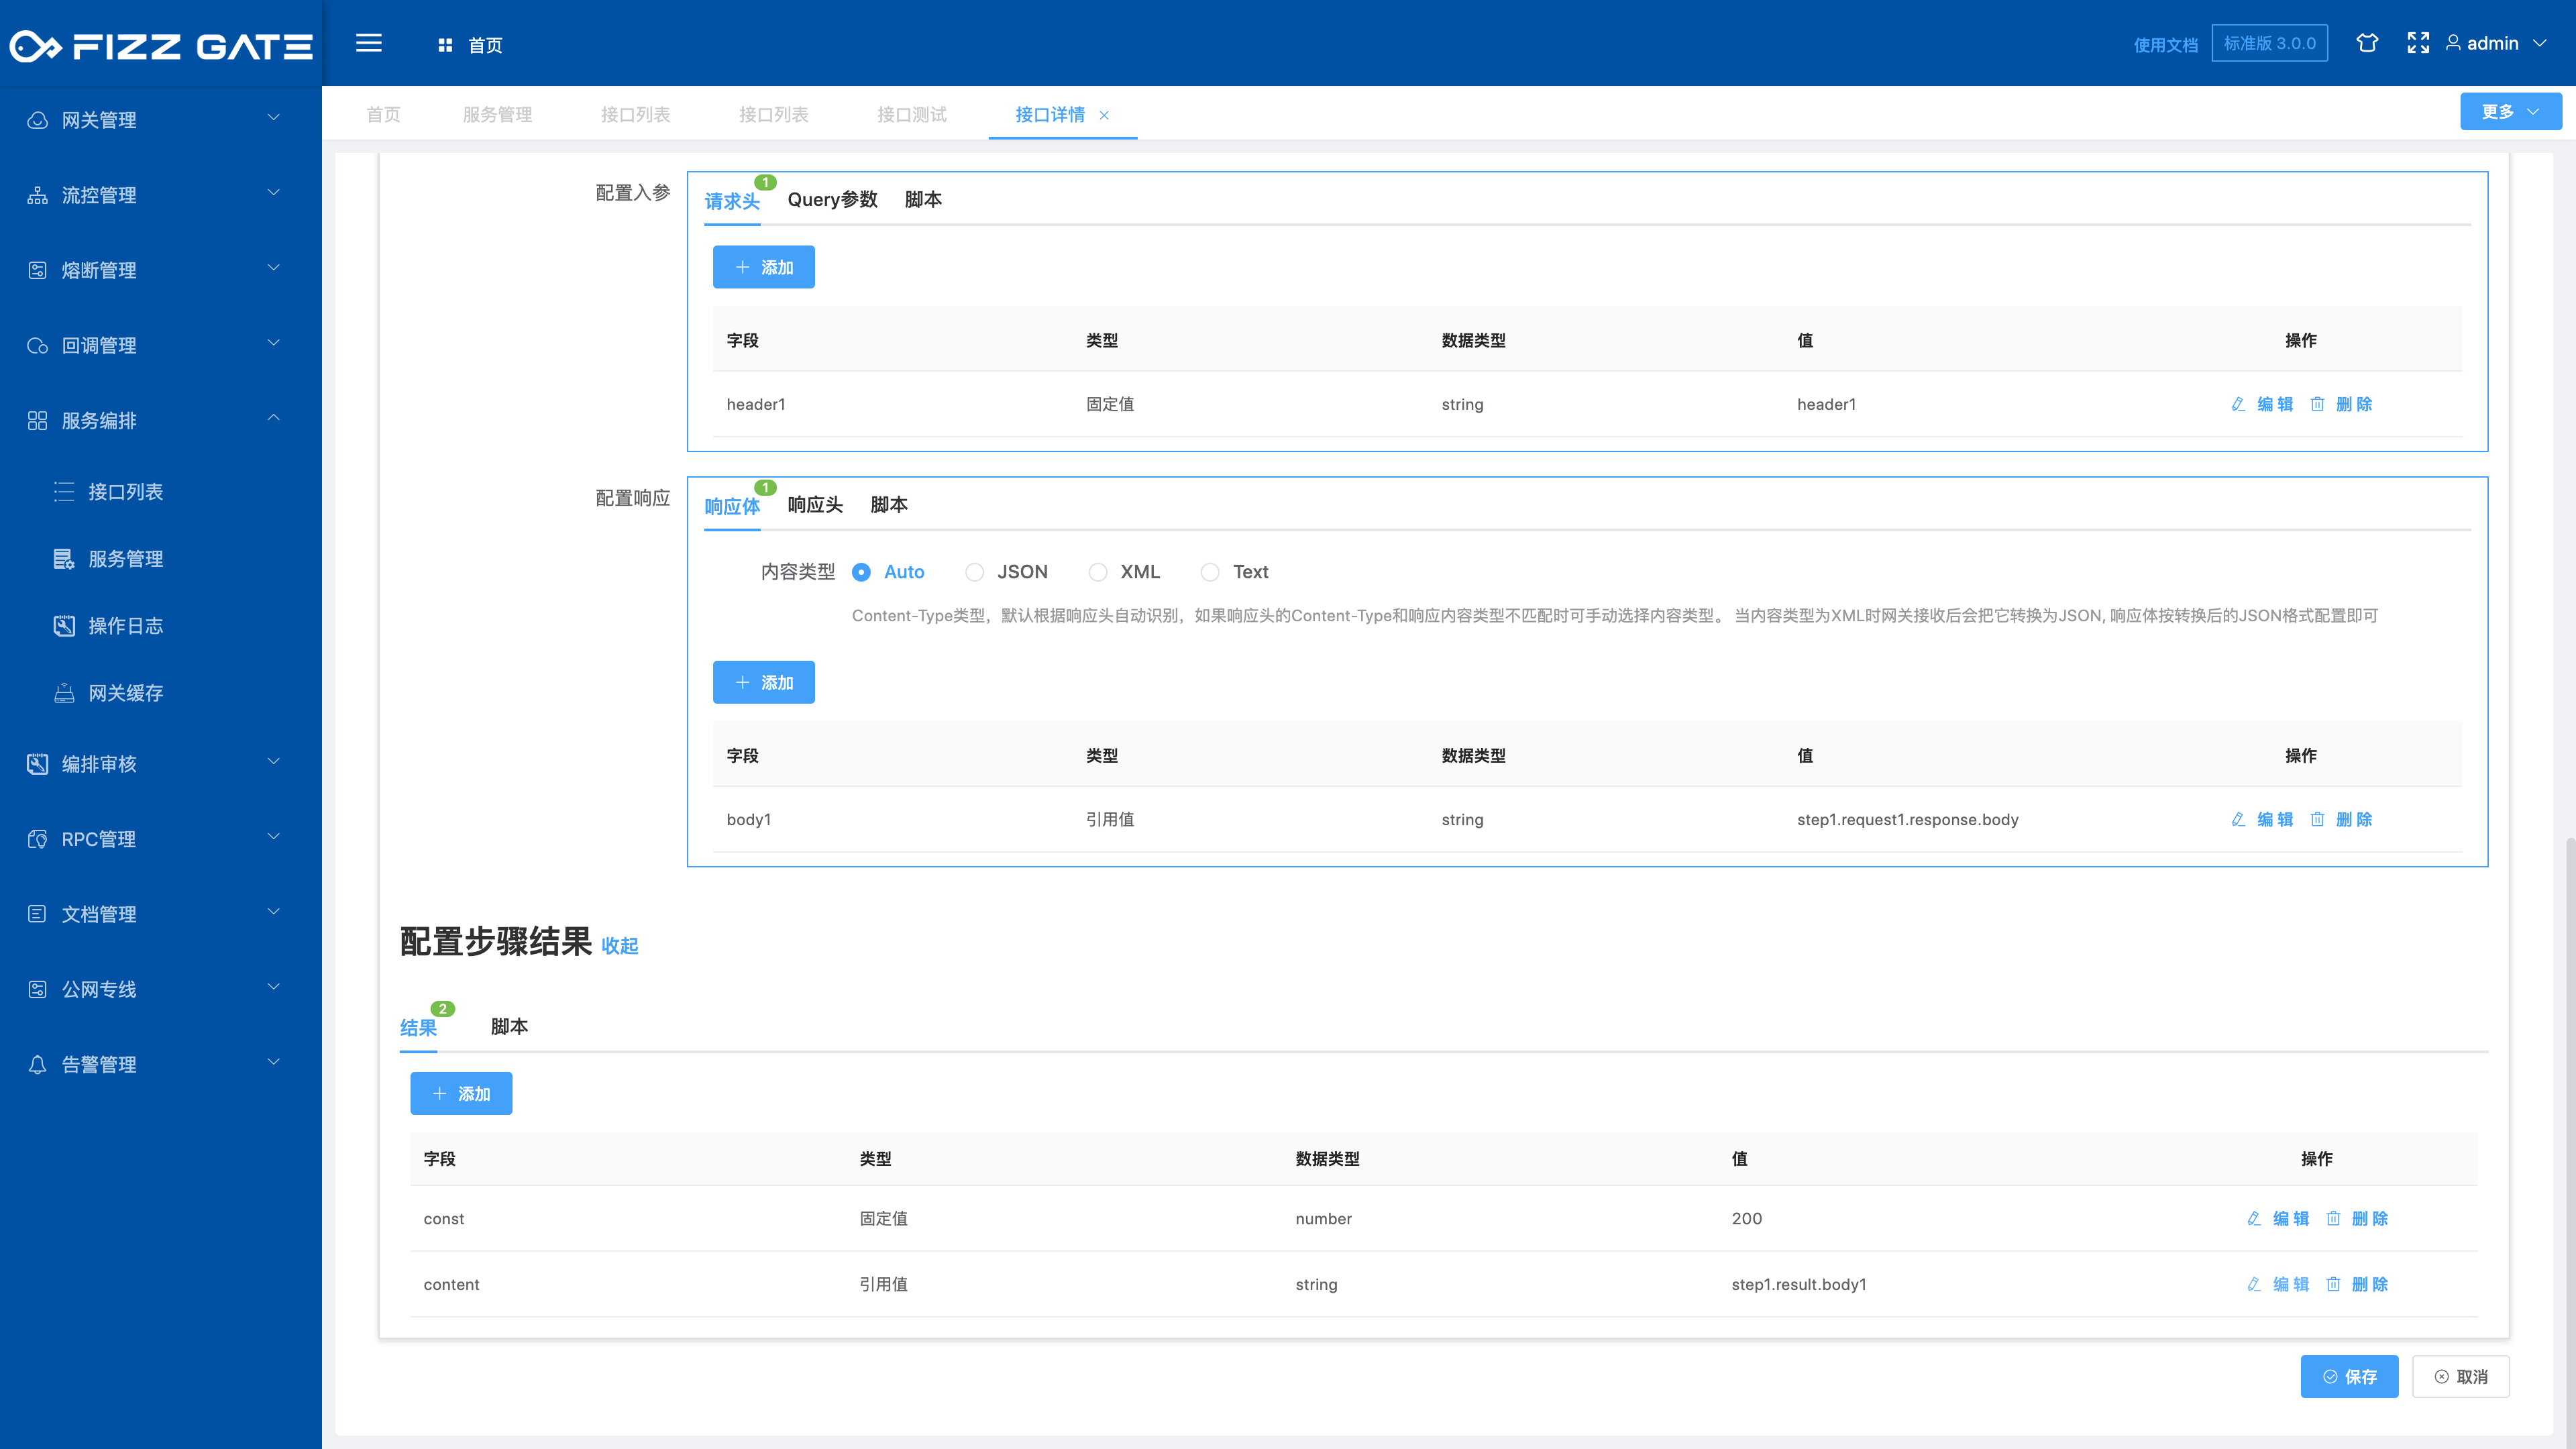
Configuration step result: Configure the response content after the step execution is completed.
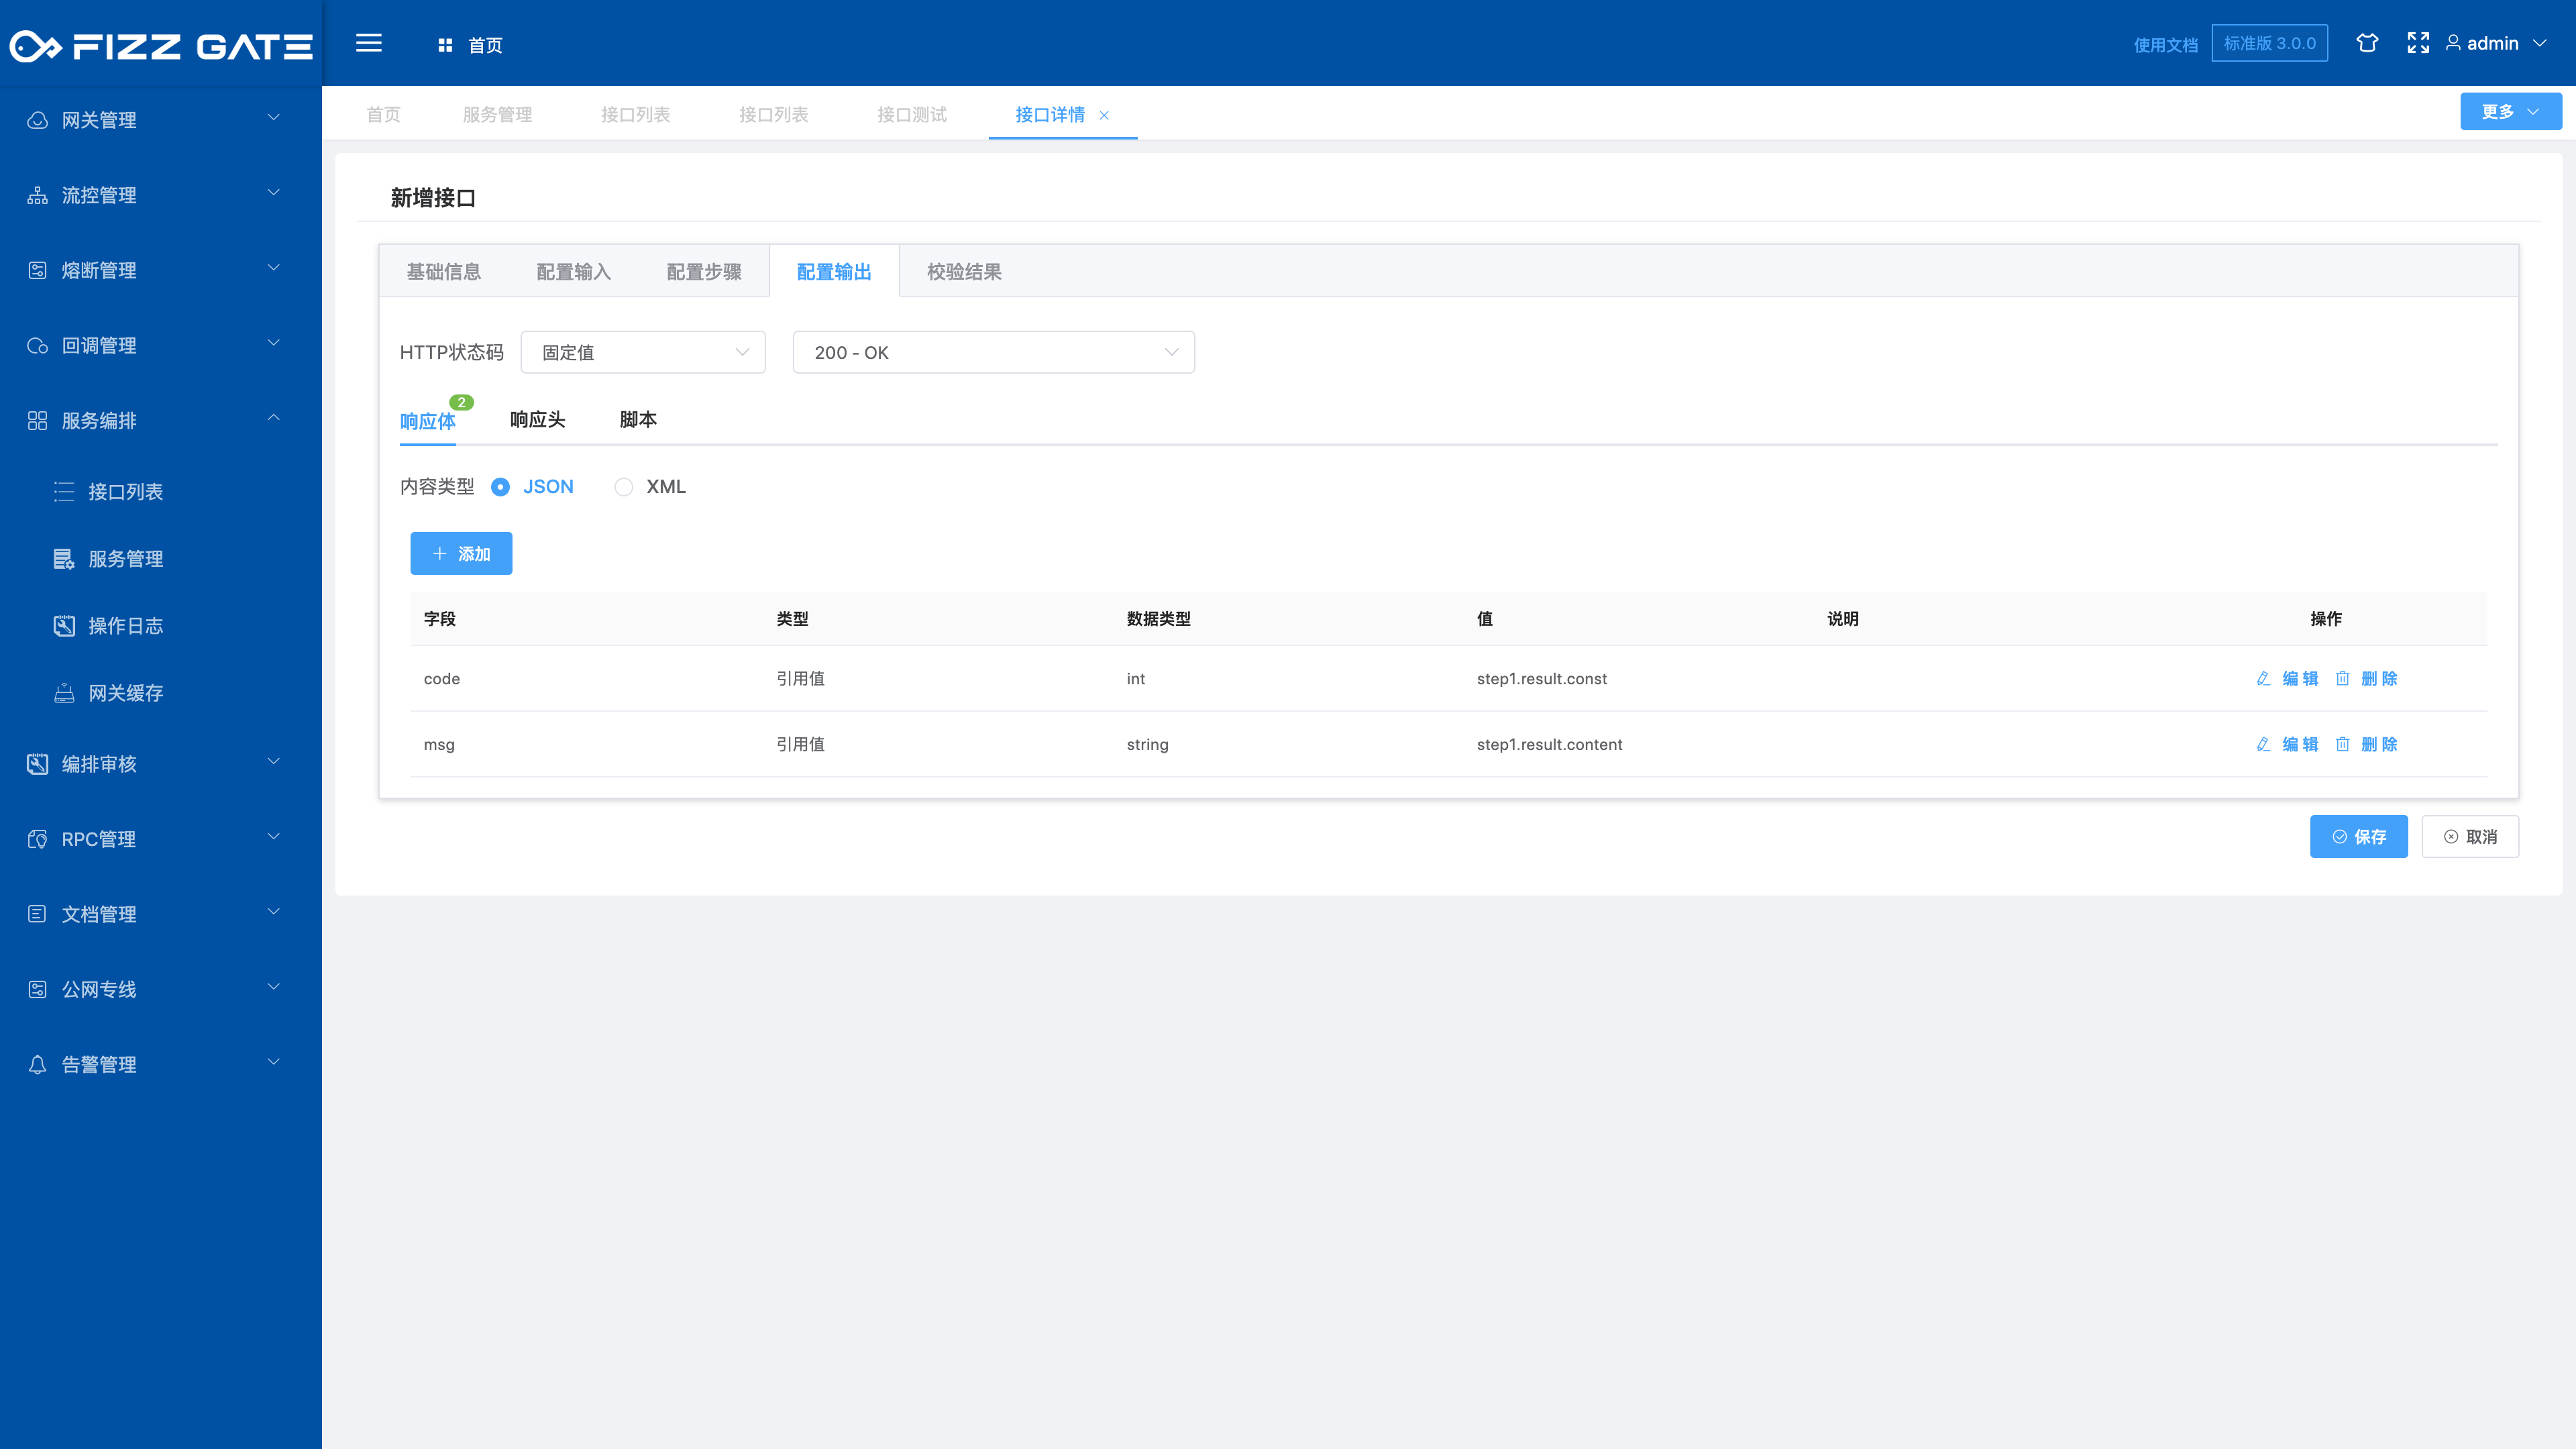
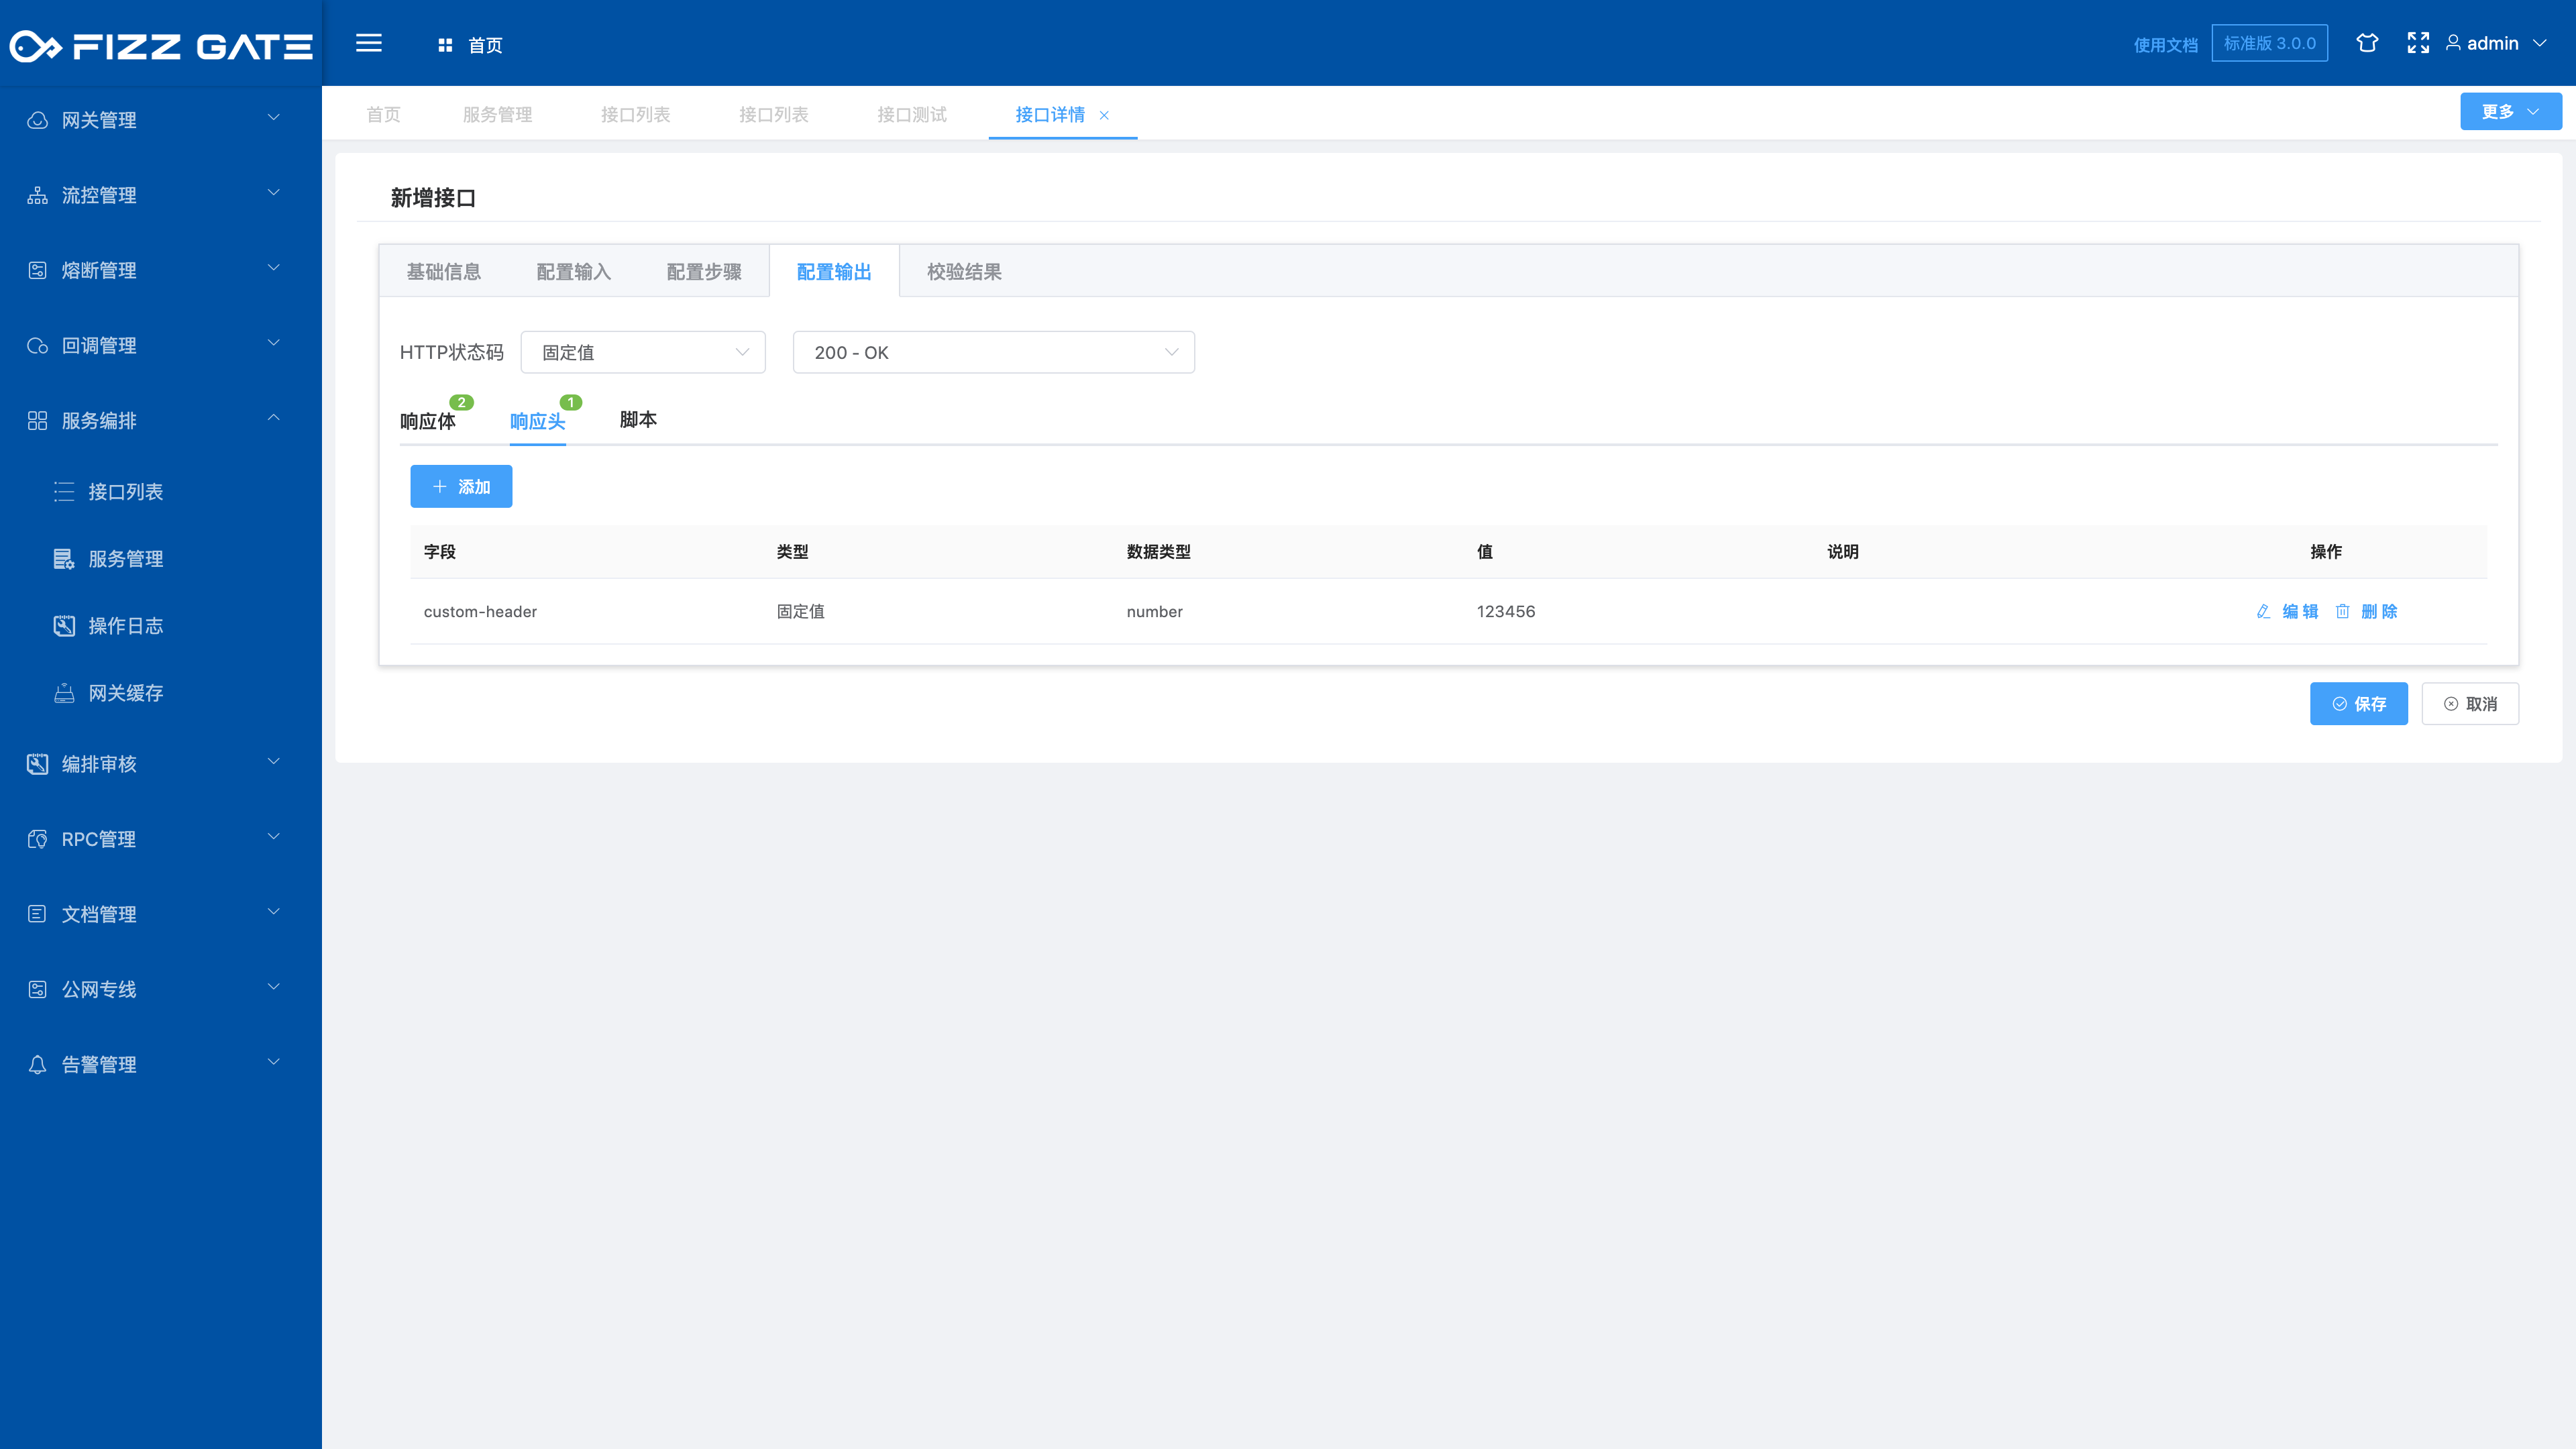
# Configure output
Configure the response content of the aggregation interface call completion. Simple response fixed values and response reference values can be configured in the response body and response header configuration. Responses that require logical processing to obtain results can be flexibly processed through script configuration, as shown in the figure.
# Verification results
Configure the response content after the aggregation interface input parameter verification fails. In the response body and response header configuration, you can configure simple response fixed values and response reference values. Responses that require logical processing to obtain results can be flexibly processed through script configuration, as shown in the figure shown.
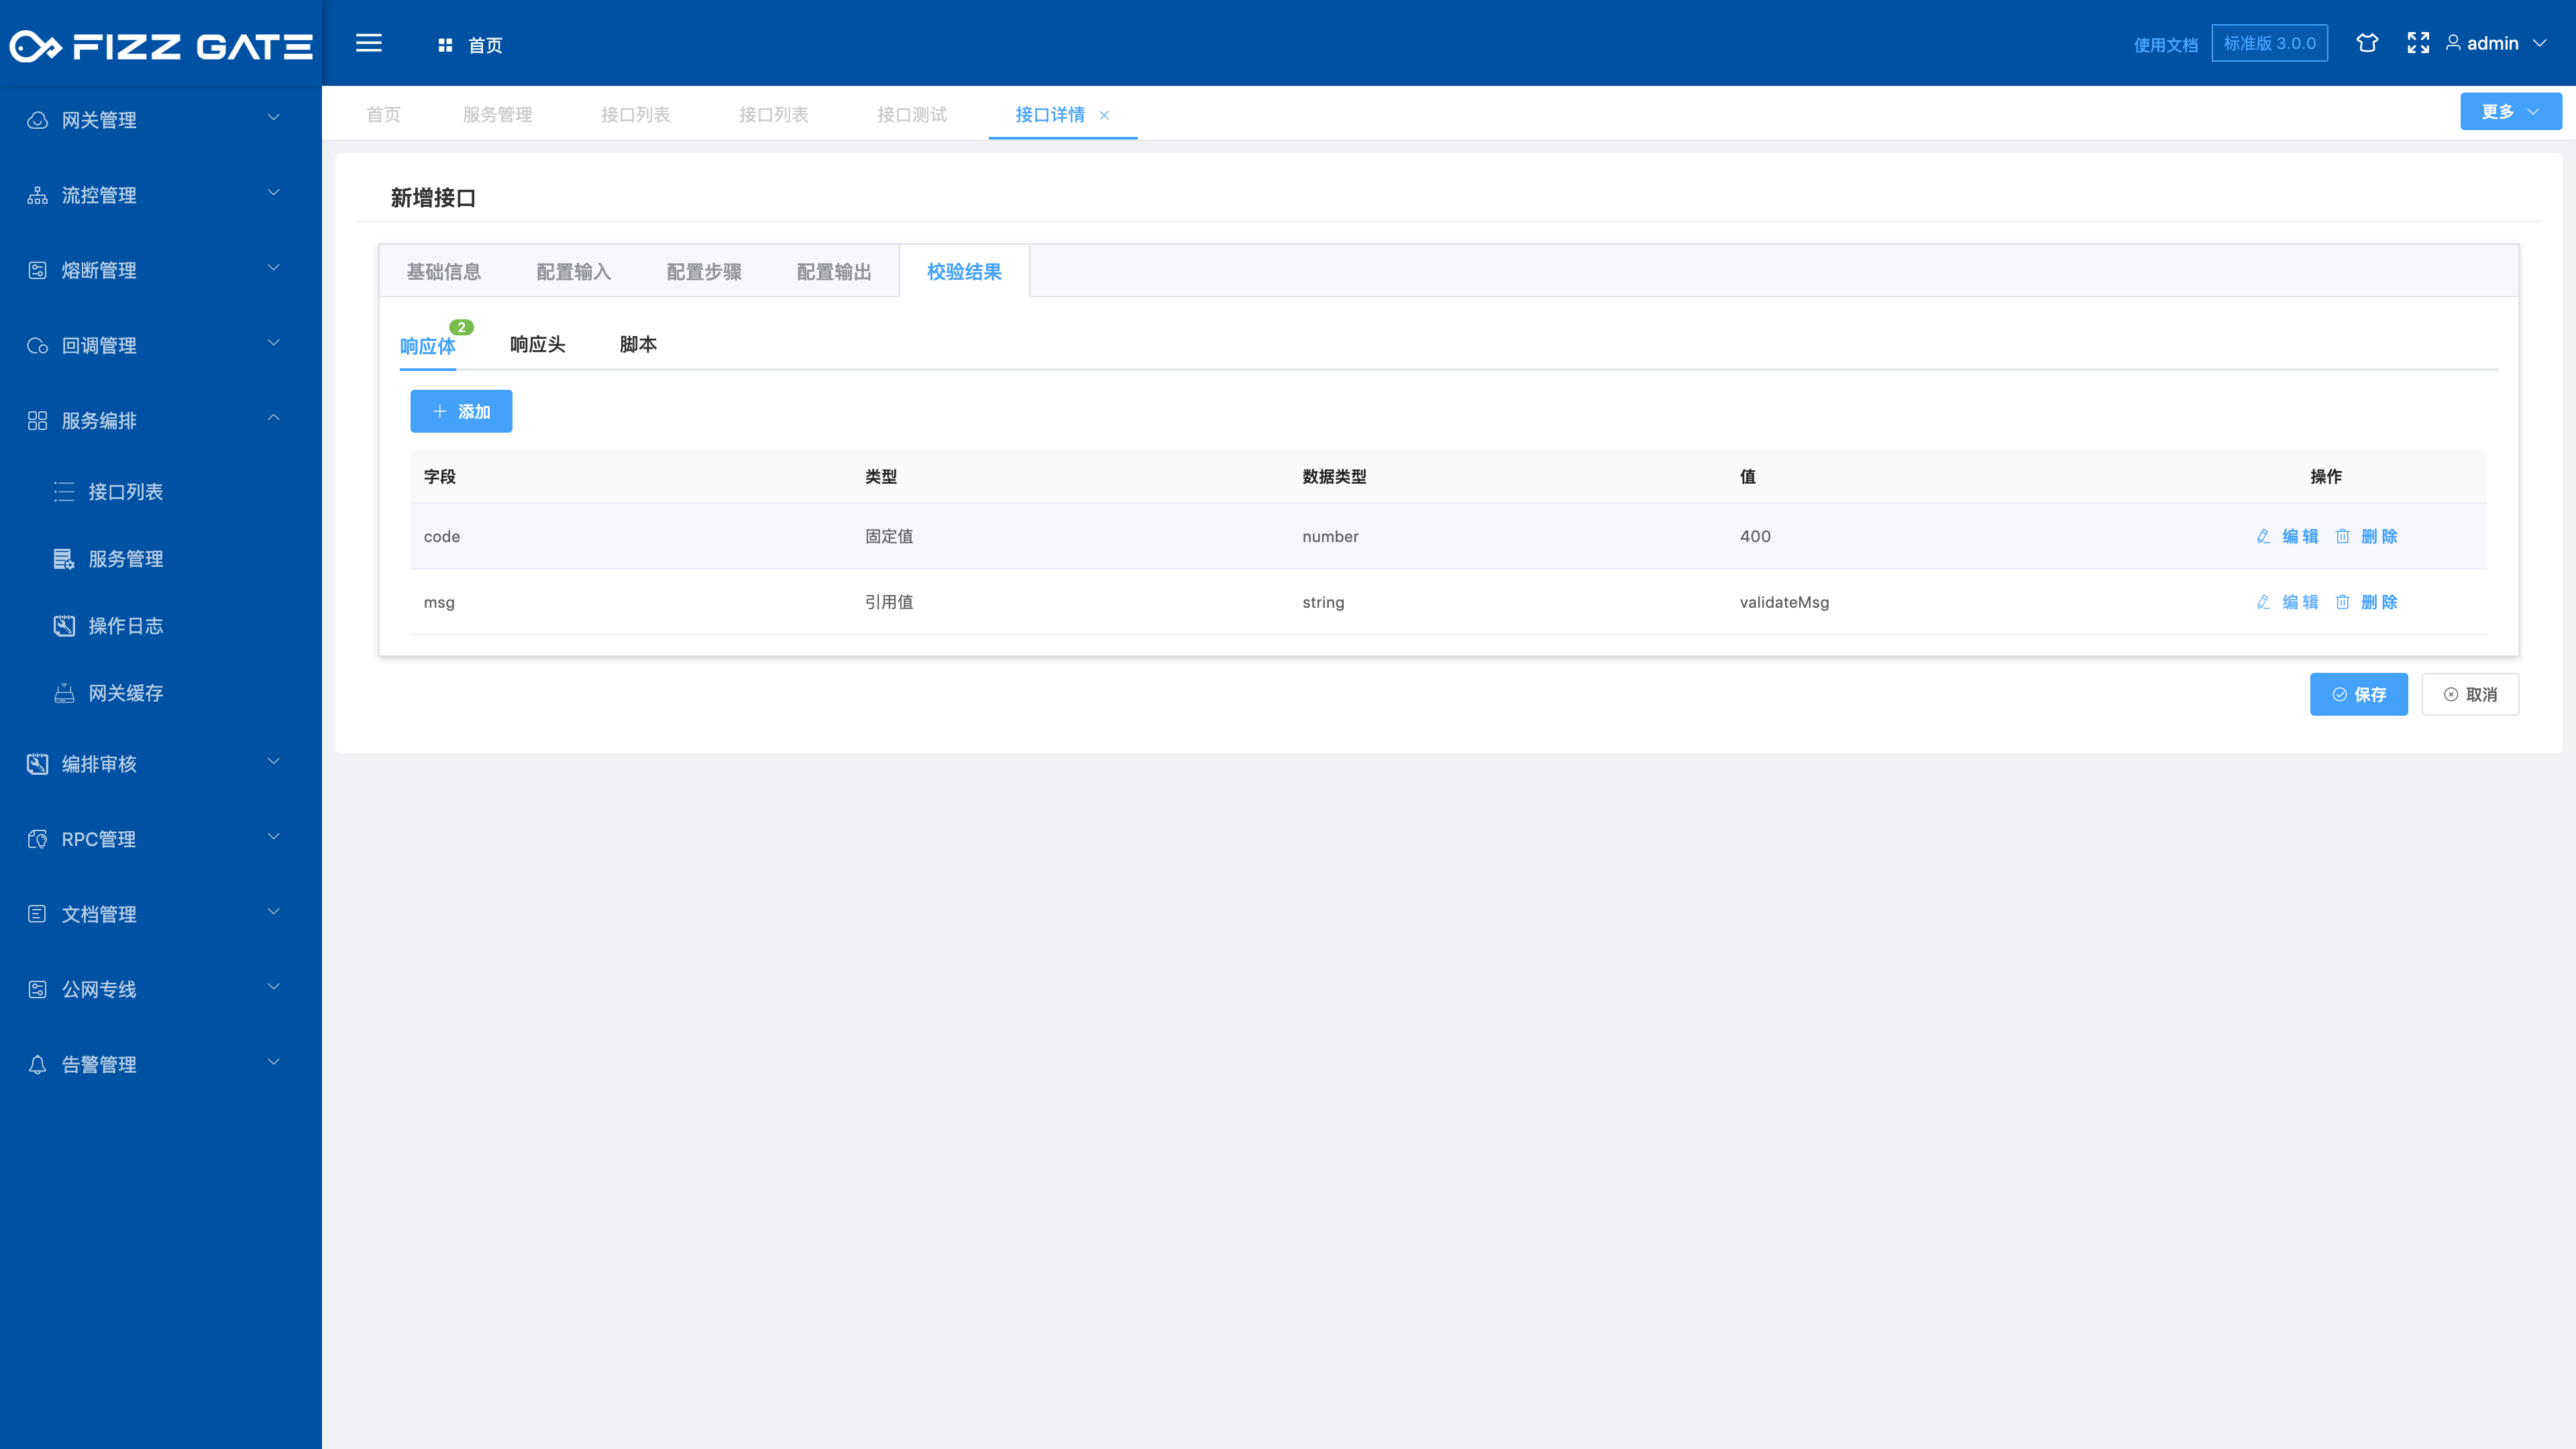
The verification result has a dedicated reference value validateMsg, which is used to store the parameter verification error message.
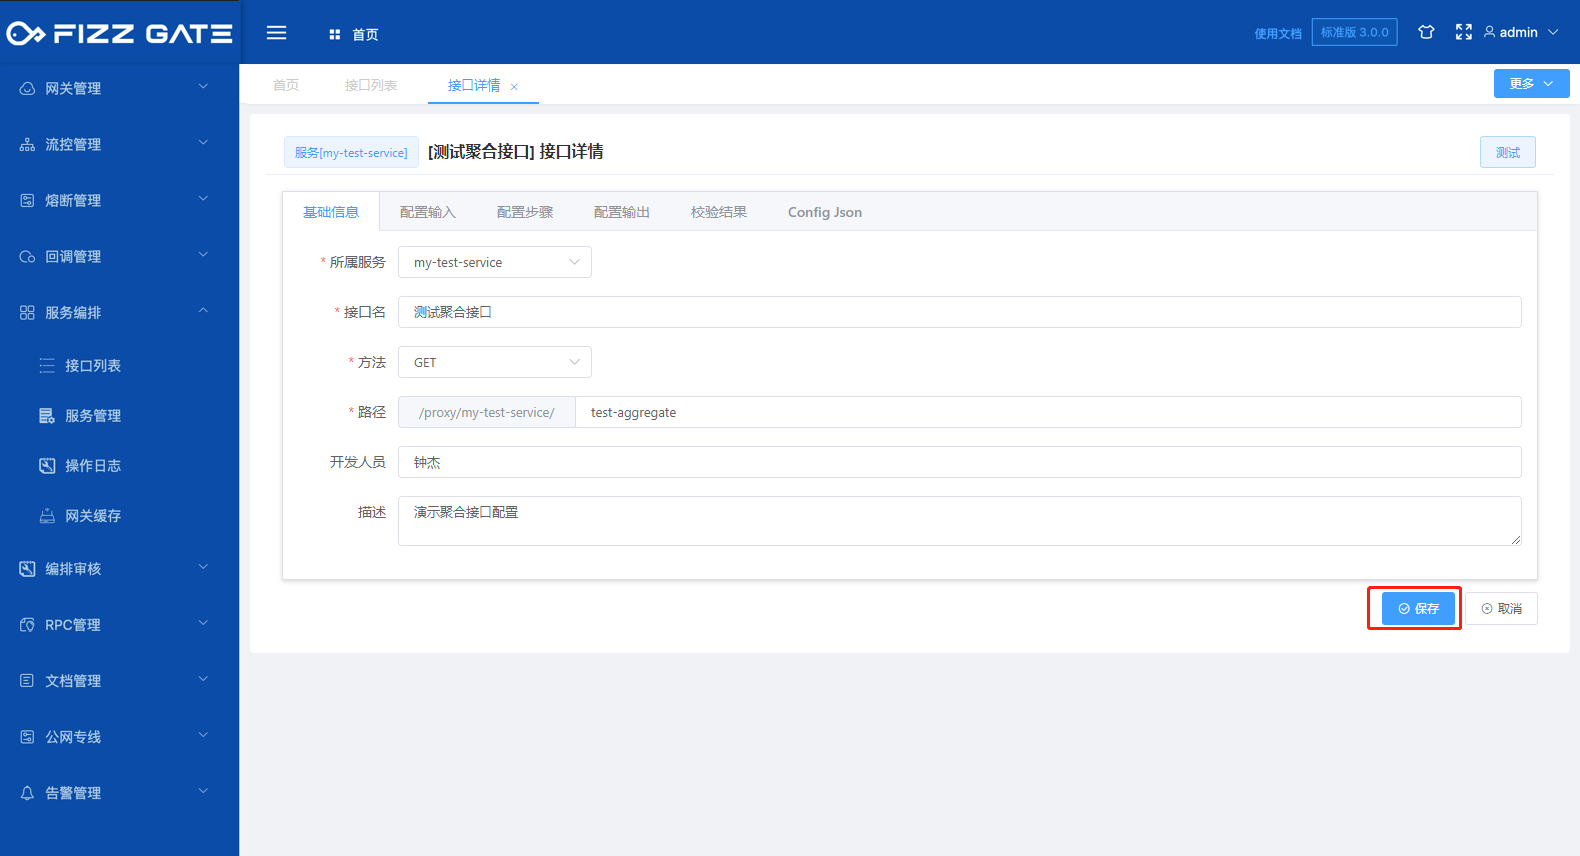
# Save interface
After all configurations are completed, click the Save button to complete the configuration of the aggregate interface.

# Export interface
The export function exports the aggregation interface in the form of a configuration file. The exported file can be re-imported into the system through the import function. When our system is divided into multiple environments, we can use the export-import function to achieve rapid synchronization of the aggregation interface. The export function is introduced below.
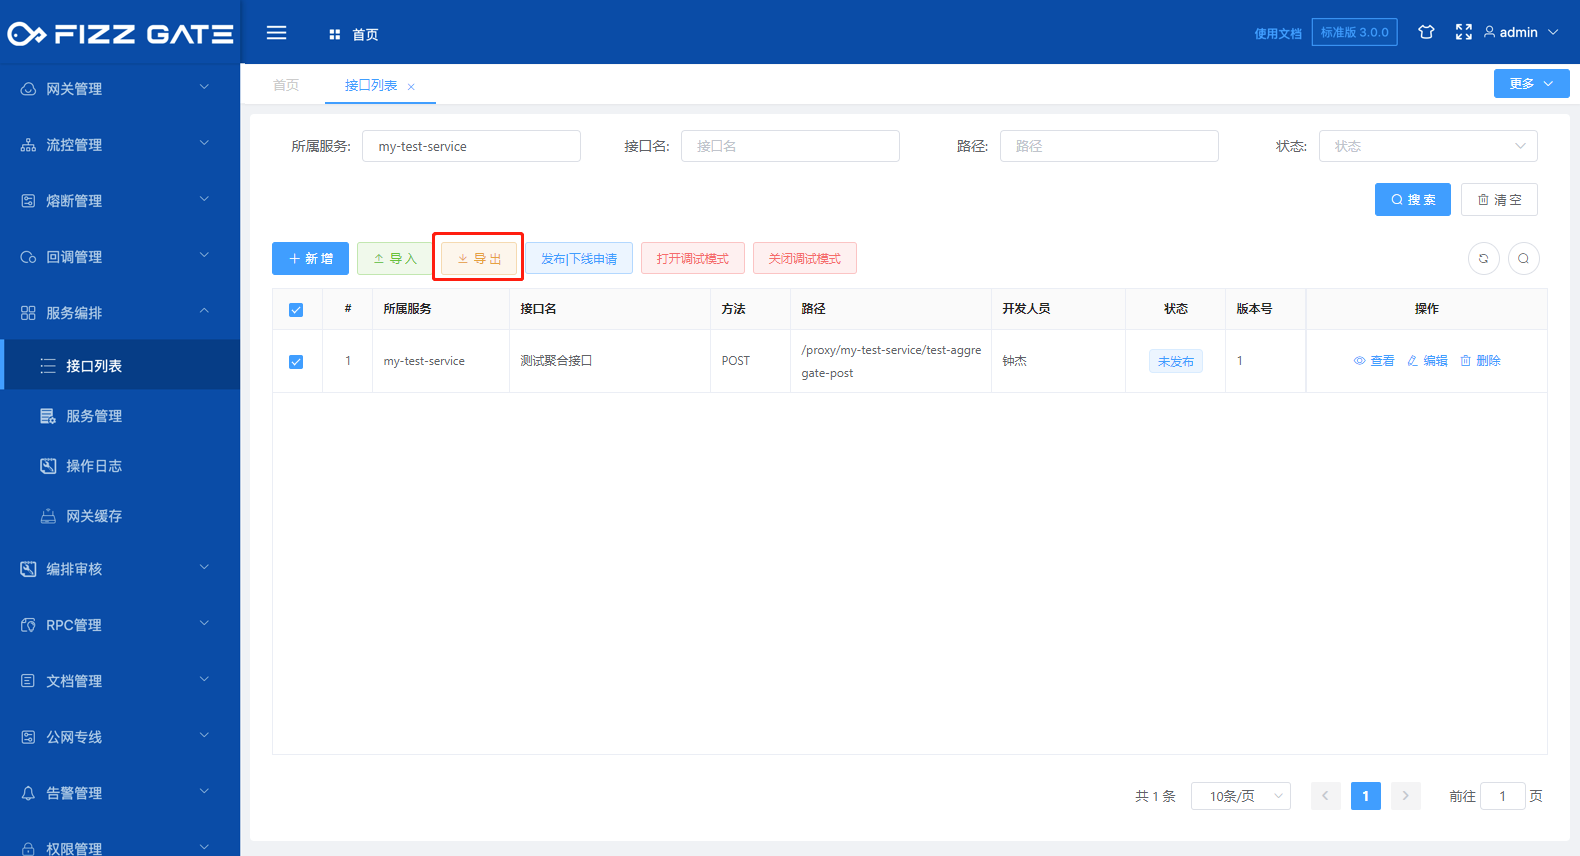
Check the interface you want to export, and click the Export button to pop up a confirmation window, as shown in the figure.
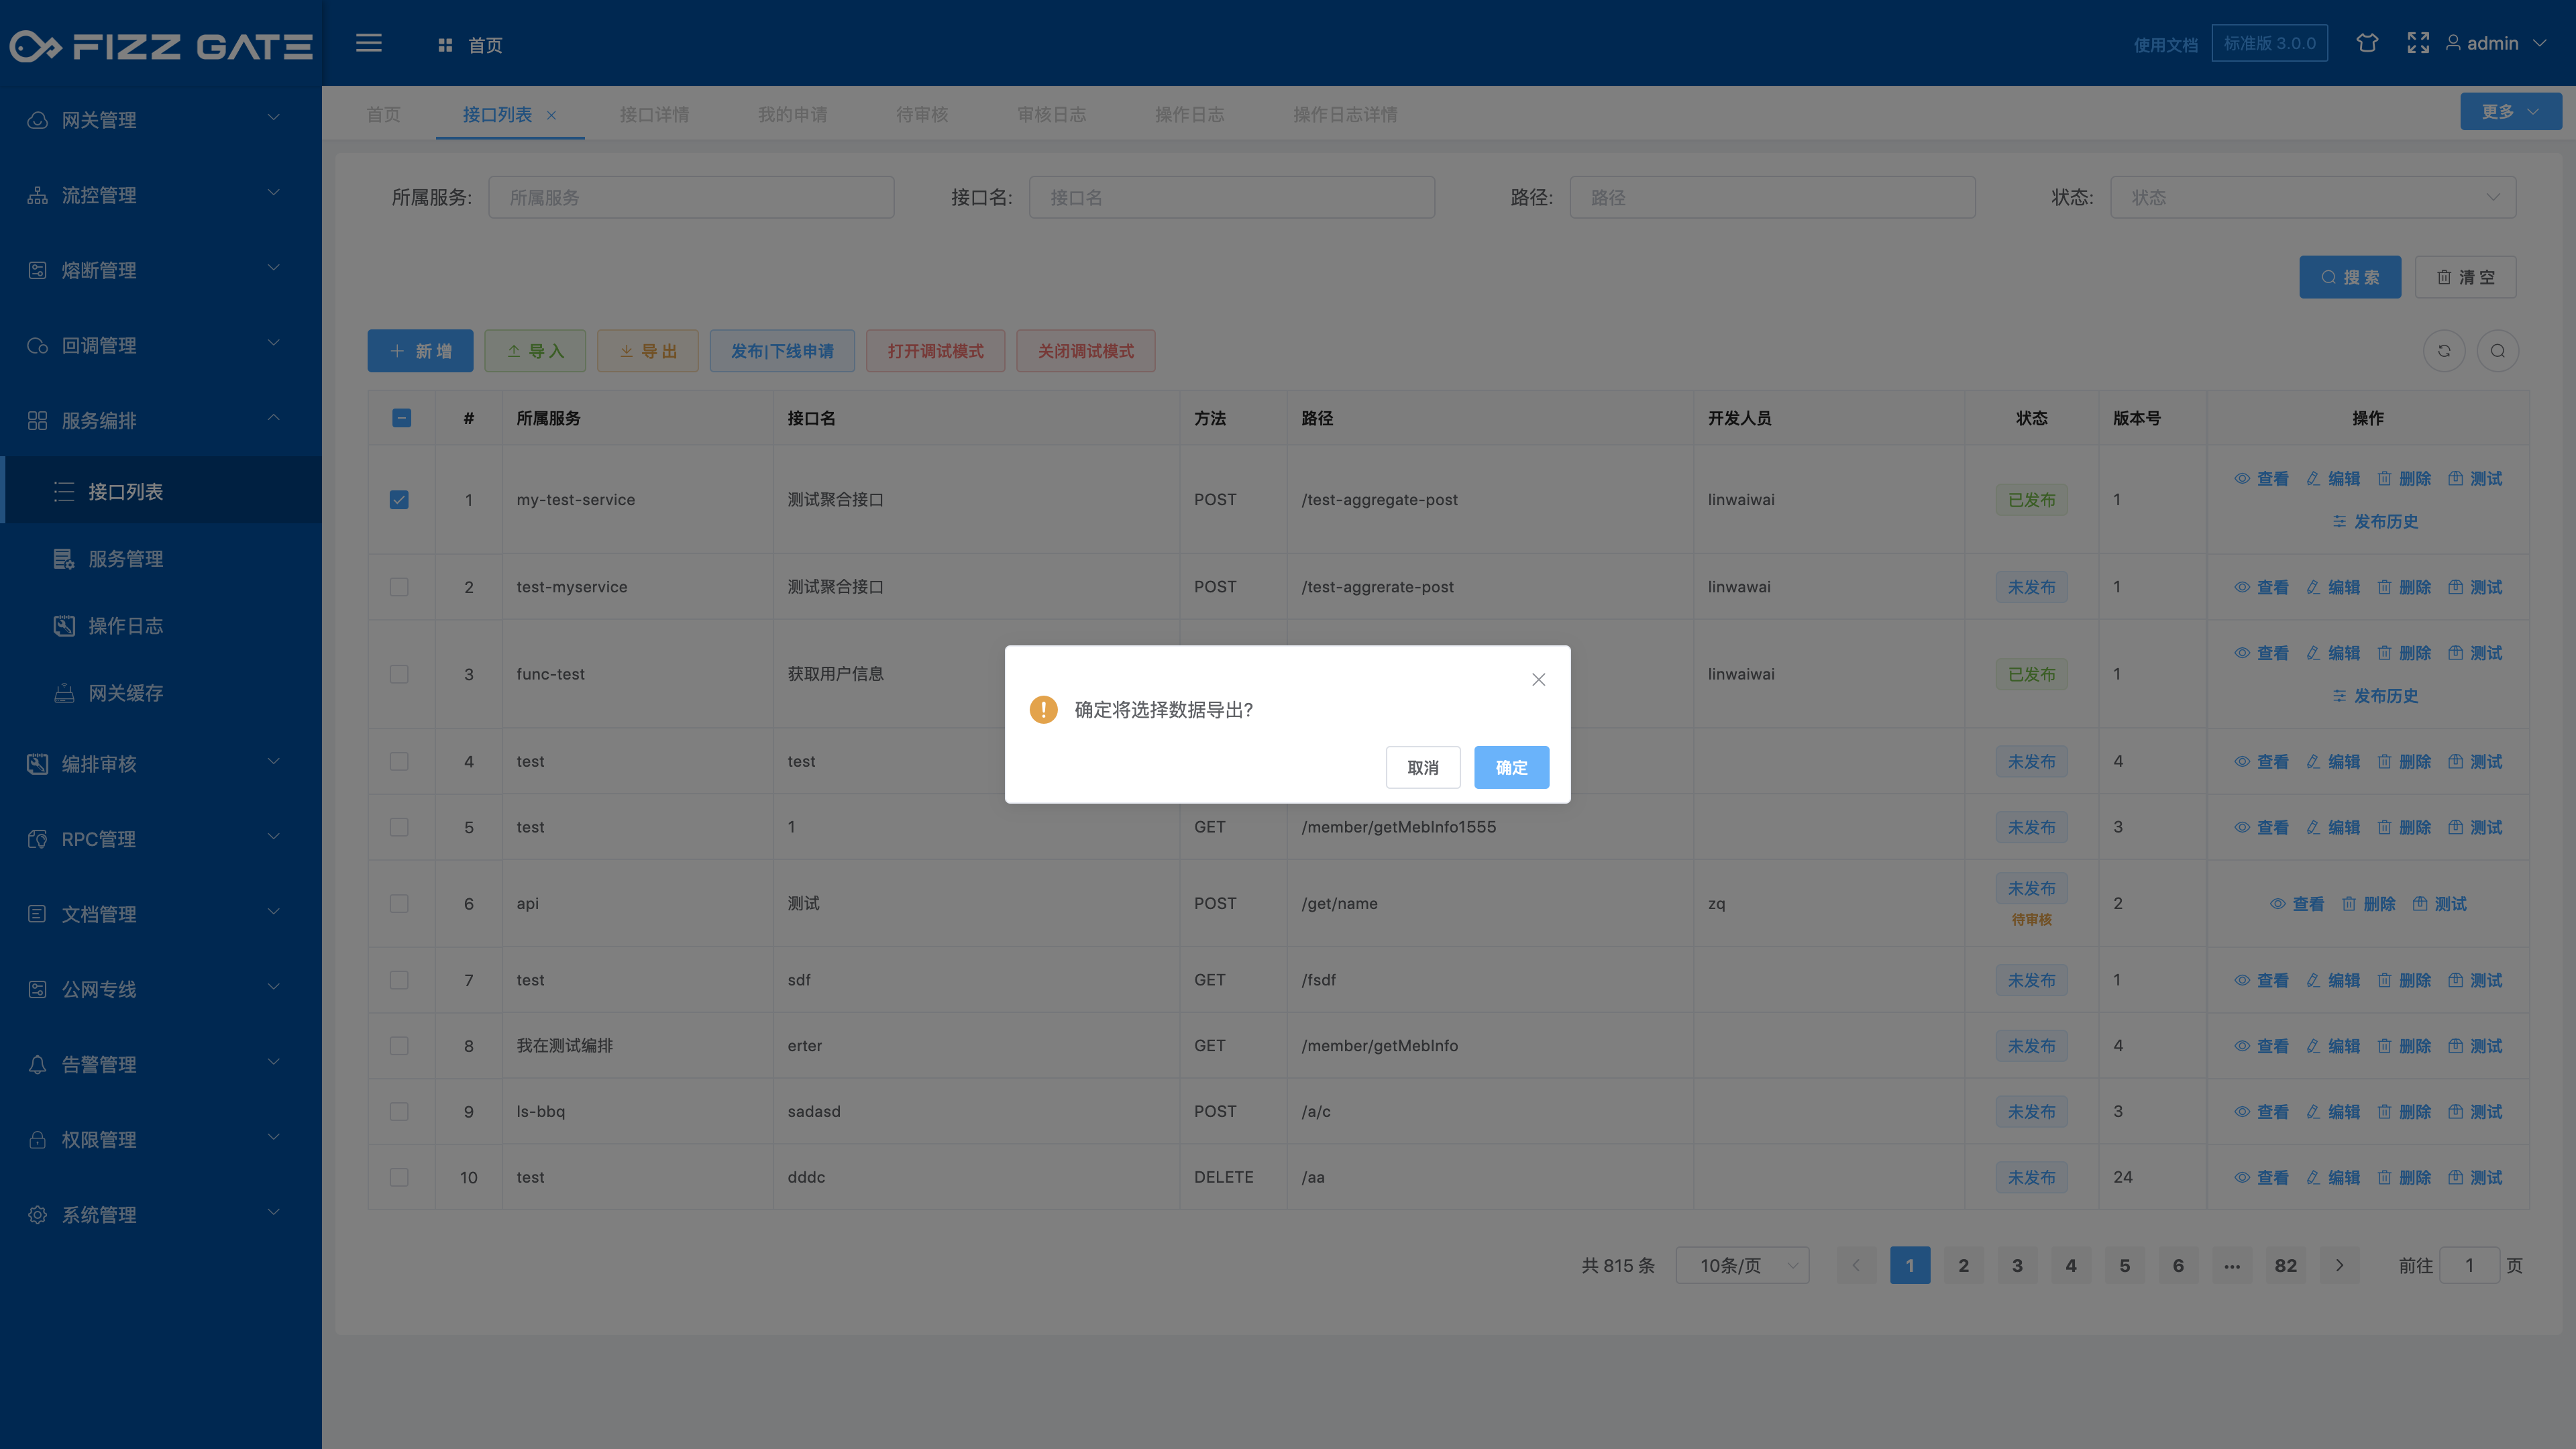
Click the OK button and the browser saves the configuration file, as shown in the figure.

# Import interface
The import function converts the aggregation interface in the configuration file into background persistent storage. The imported file can be obtained through the export function or converted from the prepared aggregation configuration JSON file (contact us for the conversion tool). When our system is divided into multiple environments, we can use the export and import function to achieve rapid synchronization of the aggregate interface. The export function is introduced below.

Click the Import button to pop up the import configuration window, as shown in the figure.
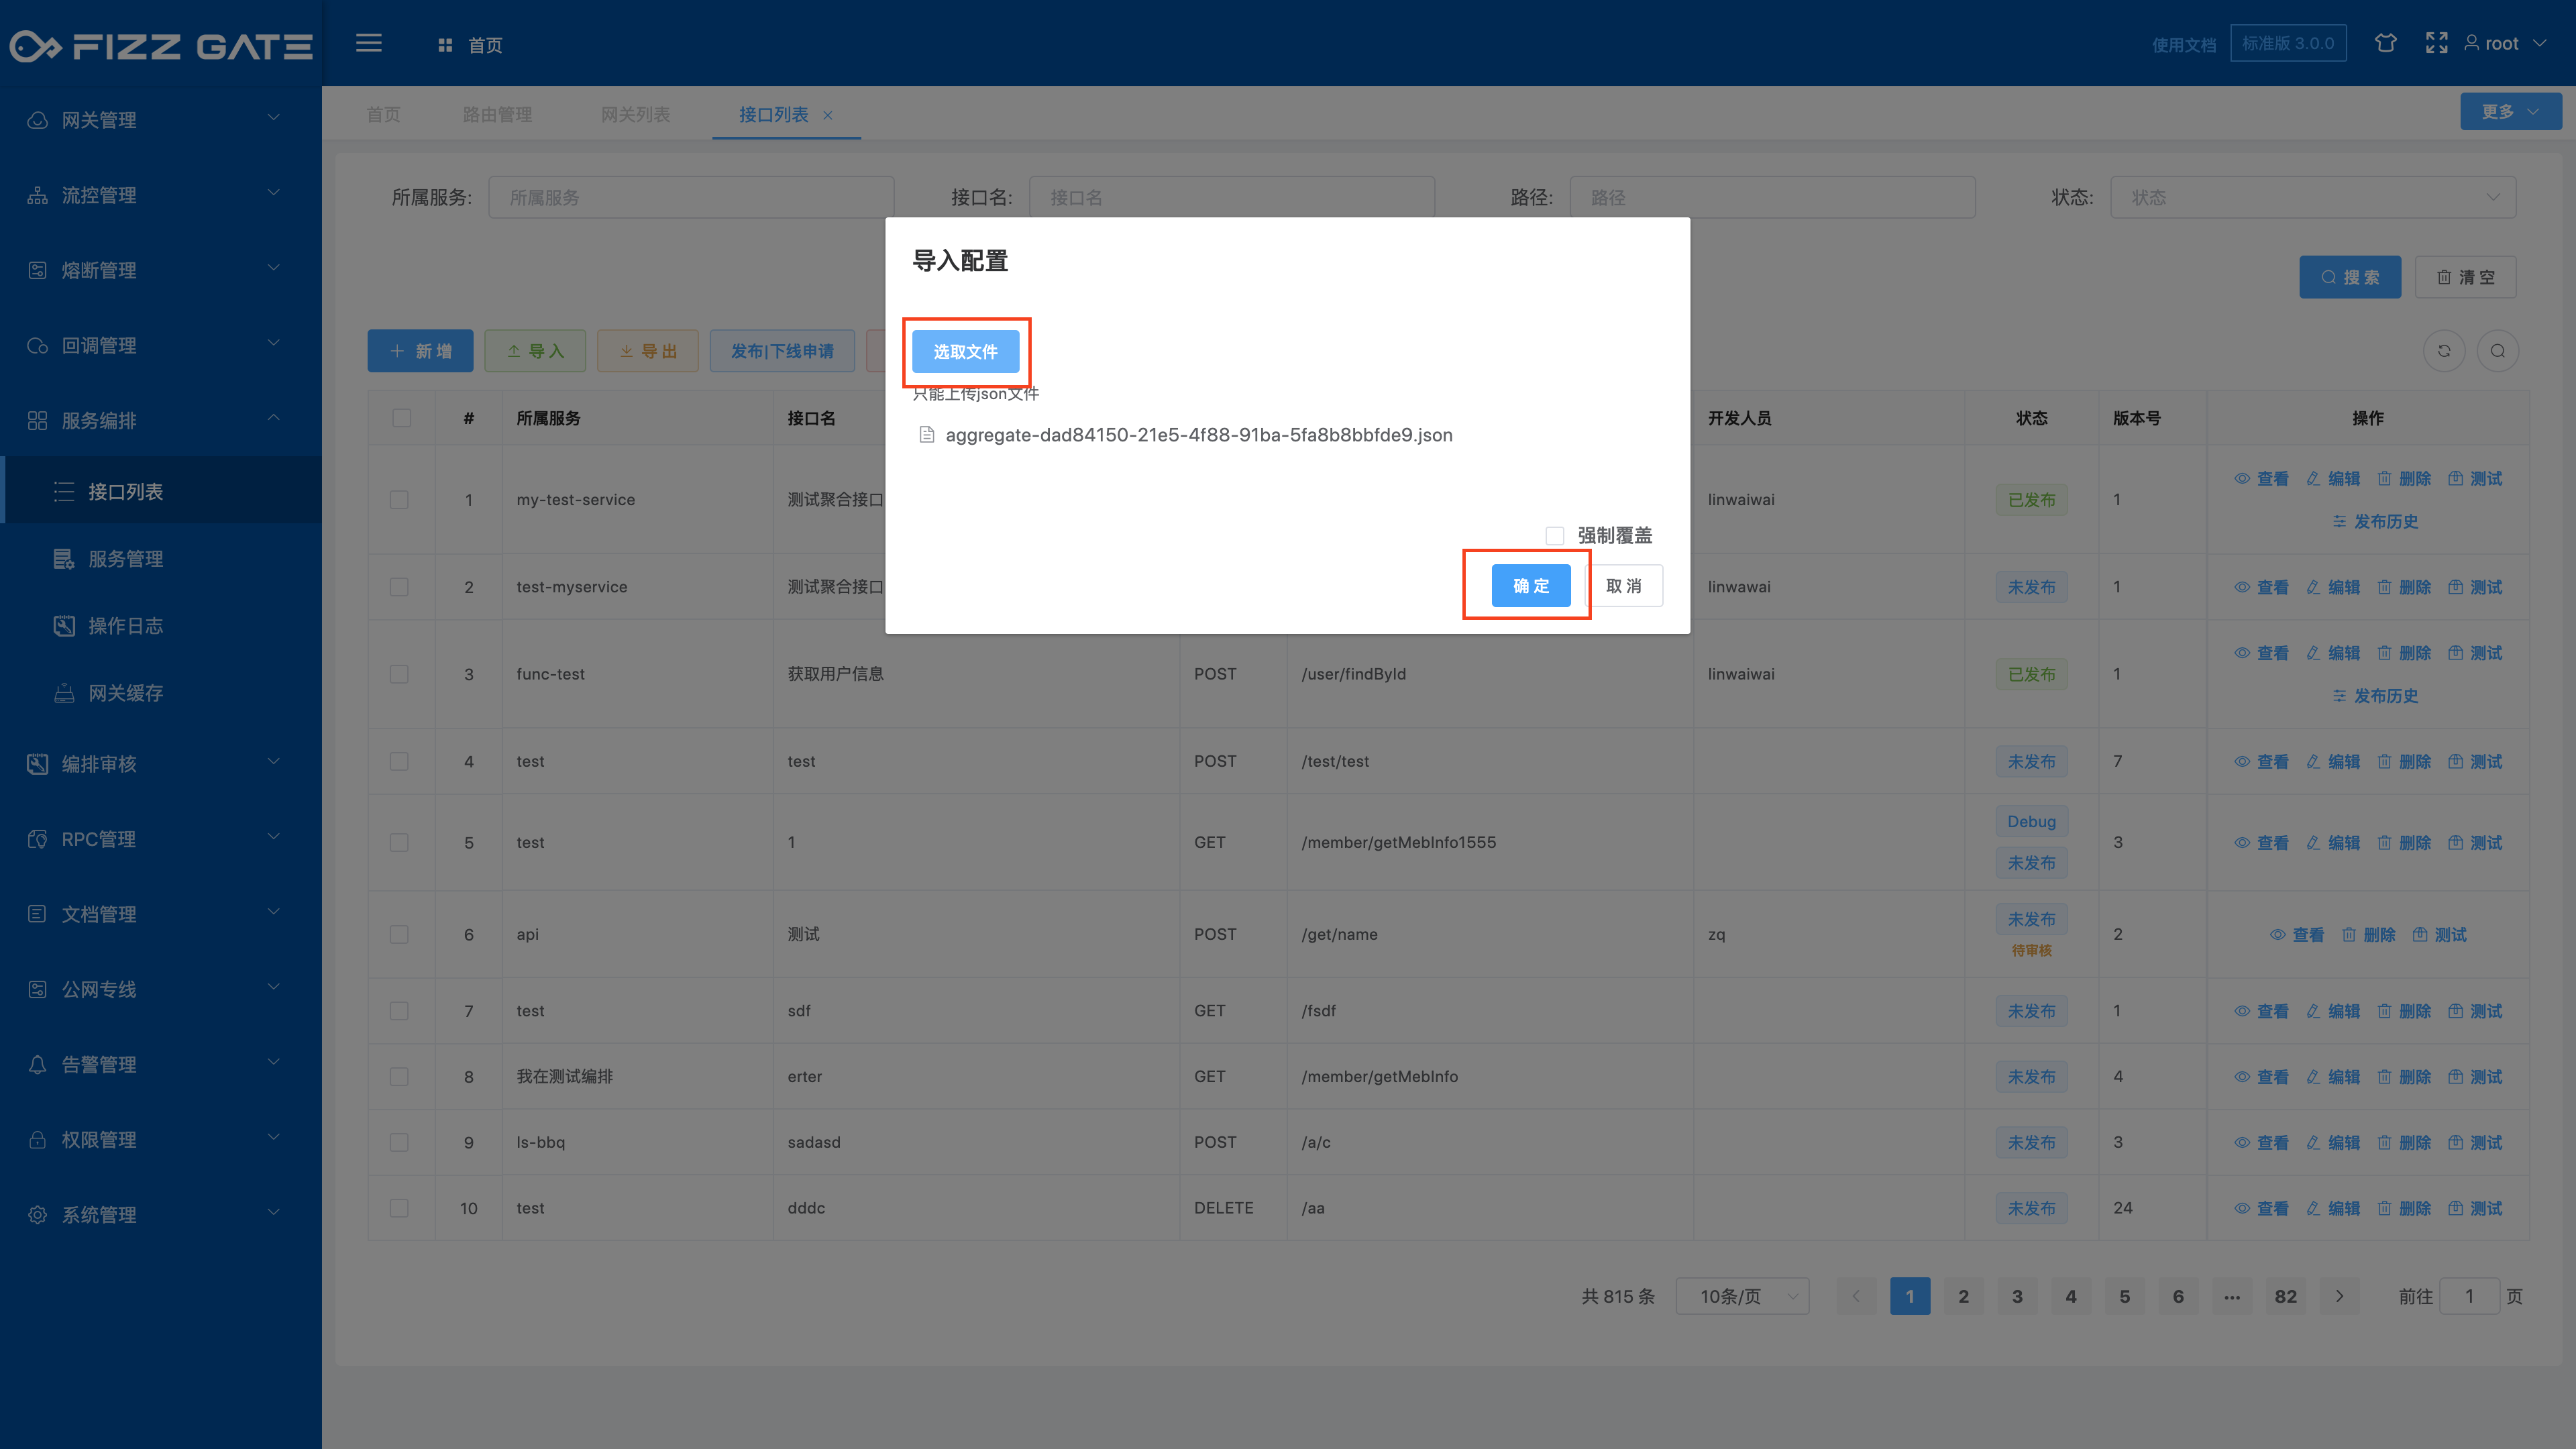
Click the Select File button and select the configuration file to be imported;
Forced coverage: An aggregate interface can be uniquely determined by request type (GET|POST) and request path (/proxy/{service}/{apiPath}). When the aggregate interface already exists, the aggregate interface will be ignored if this option is not checked. Import, when this option is checked, the existing aggregate interface configuration will be overwritten;
Click the OK button to import the aggregate interface configuration.
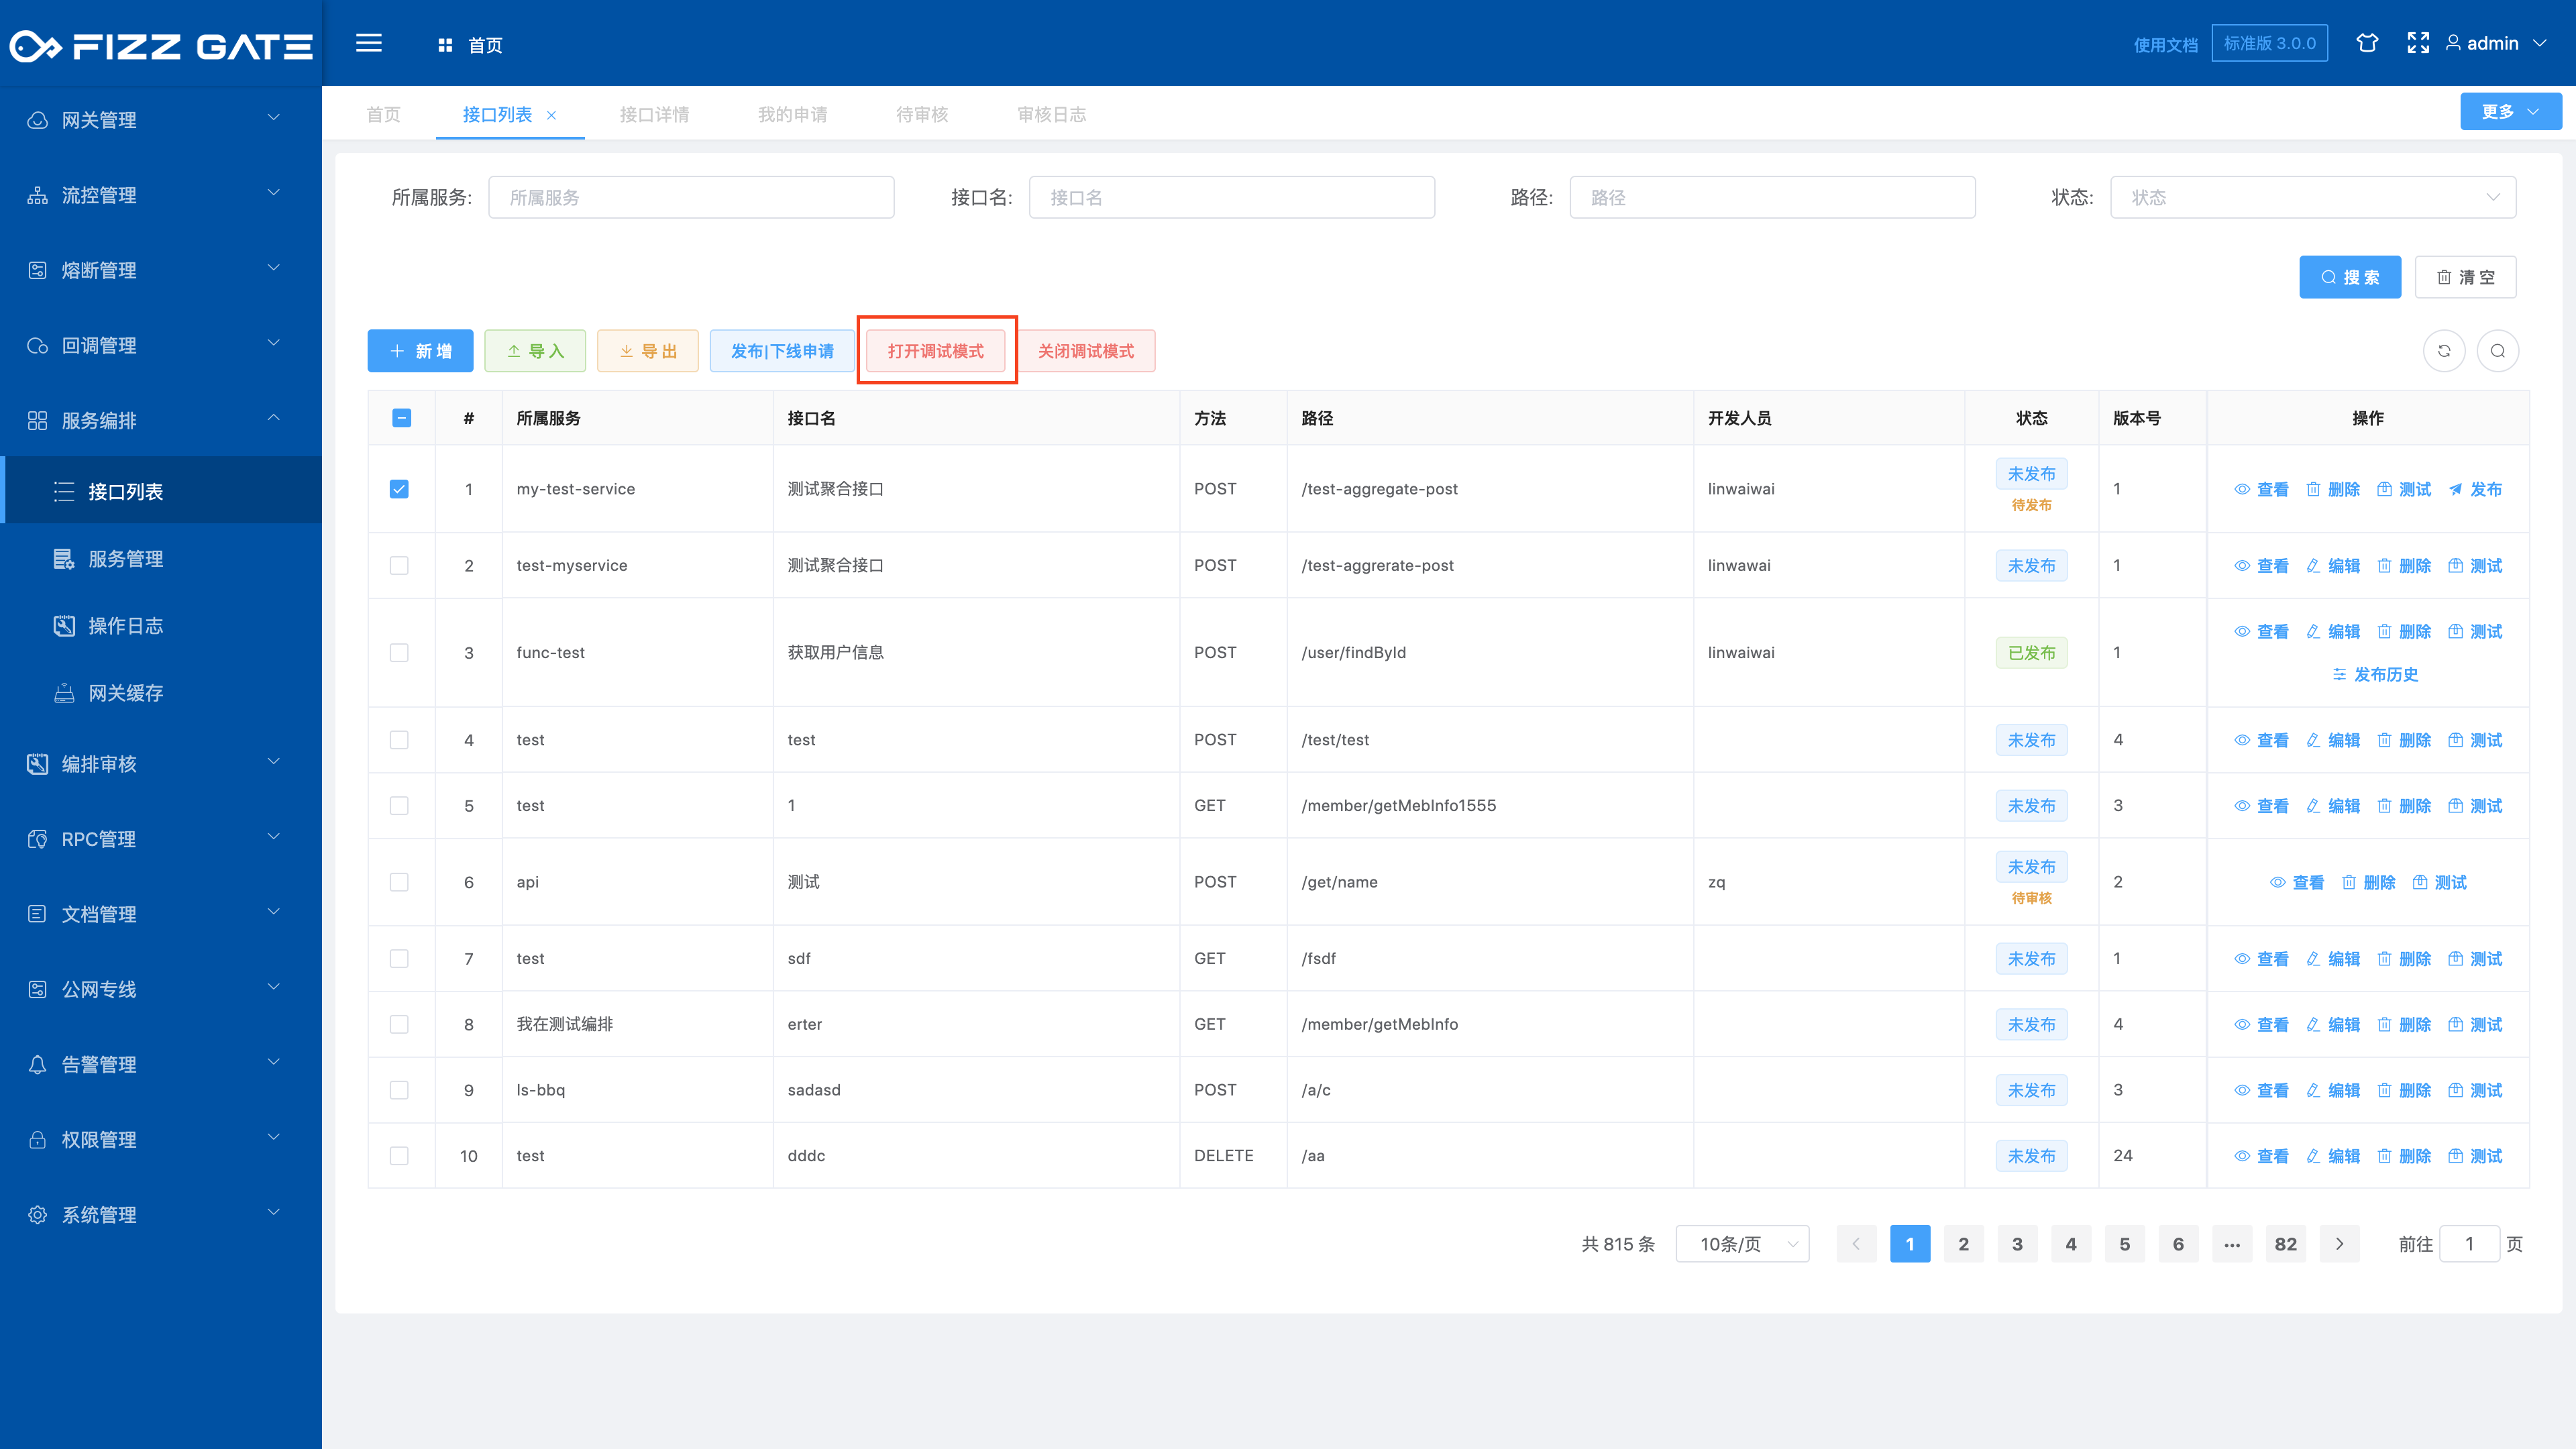
# Debug mode
The debug mode is used for debugging during the interface development process. When the debug mode is turned on, the FizzGate integration platform will print the request response information of the aggregate interface calling the underlying service interface as well as the time consumption, aggregate results, and step context to the log. Through the log You can clearly understand the actual implementation of the aggregate interface. The debugging mode will affect the performance of the gateway. Therefore, it is not recommended to turn on the debugging mode in the production environment. When the debugging is completed, turn off the debugging mode promptly to avoid printing too many logs and causing a waste of resources. The following describes the use of debugging mode.
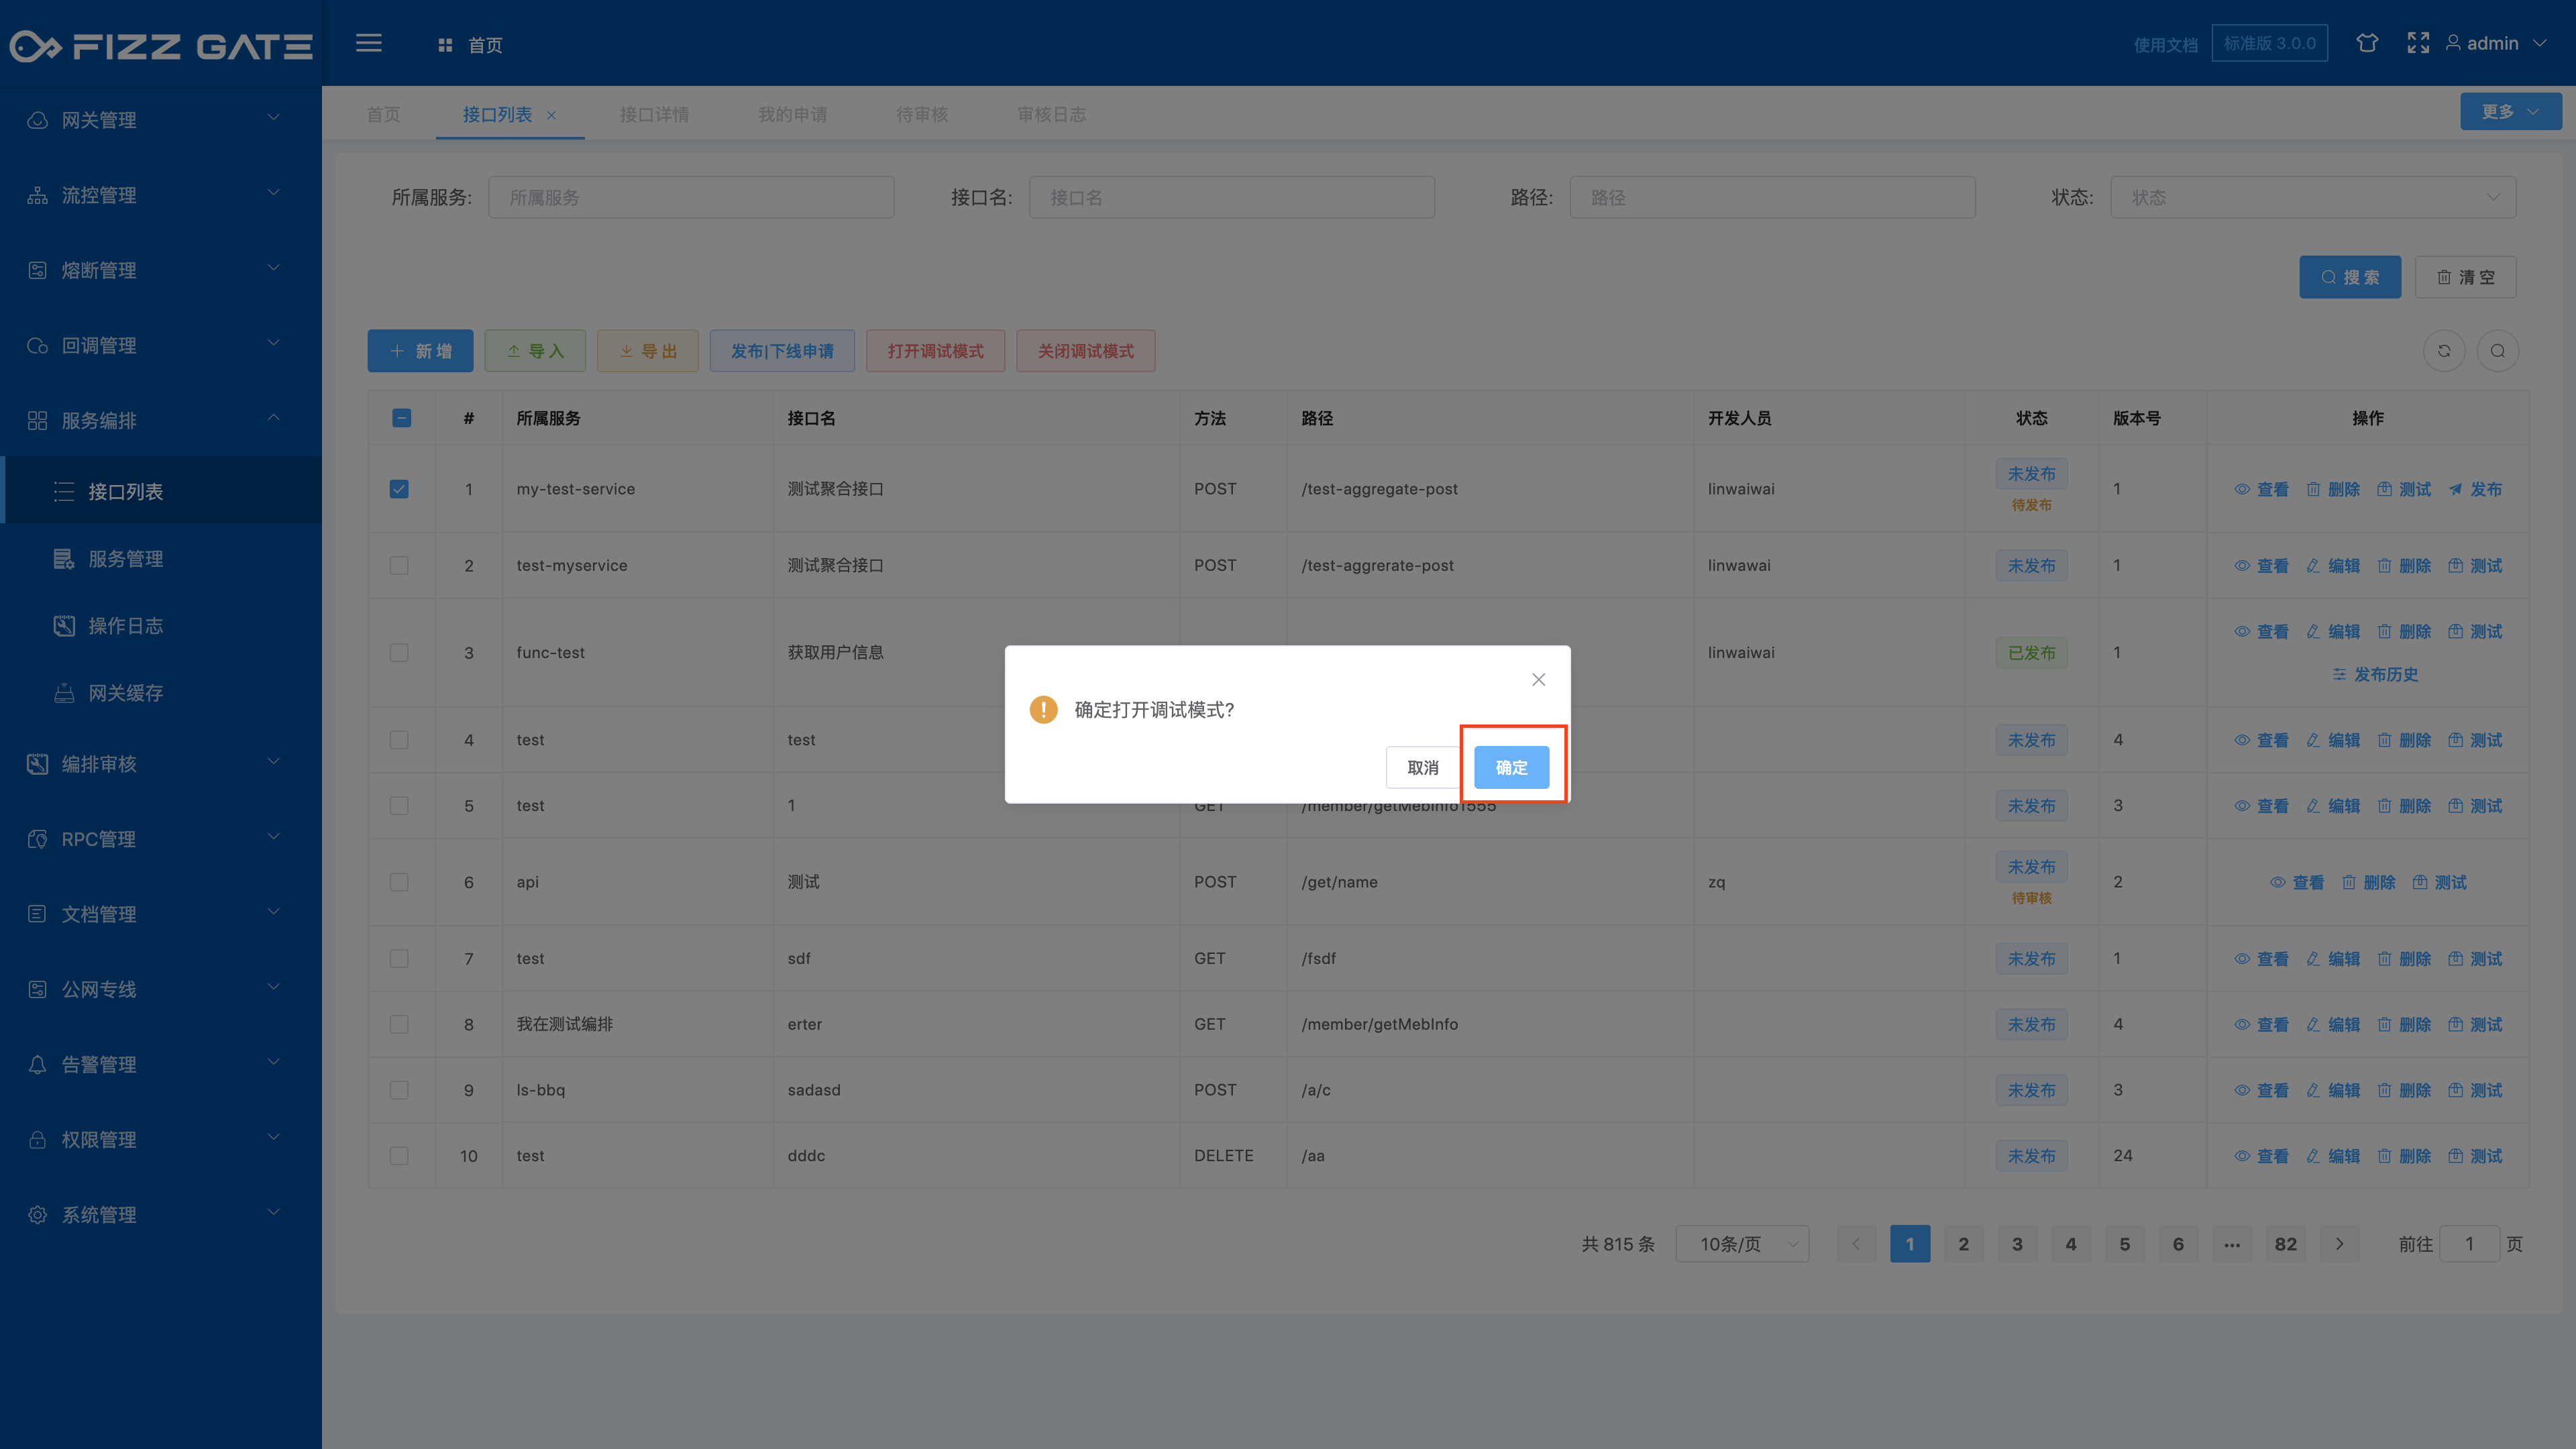
Check the interface you want to turn on debugging mode, and click the Turn on debugging mode button to pop up a confirmation window, as shown in the figure.
Click the OK button to confirm turning on debugging mode.
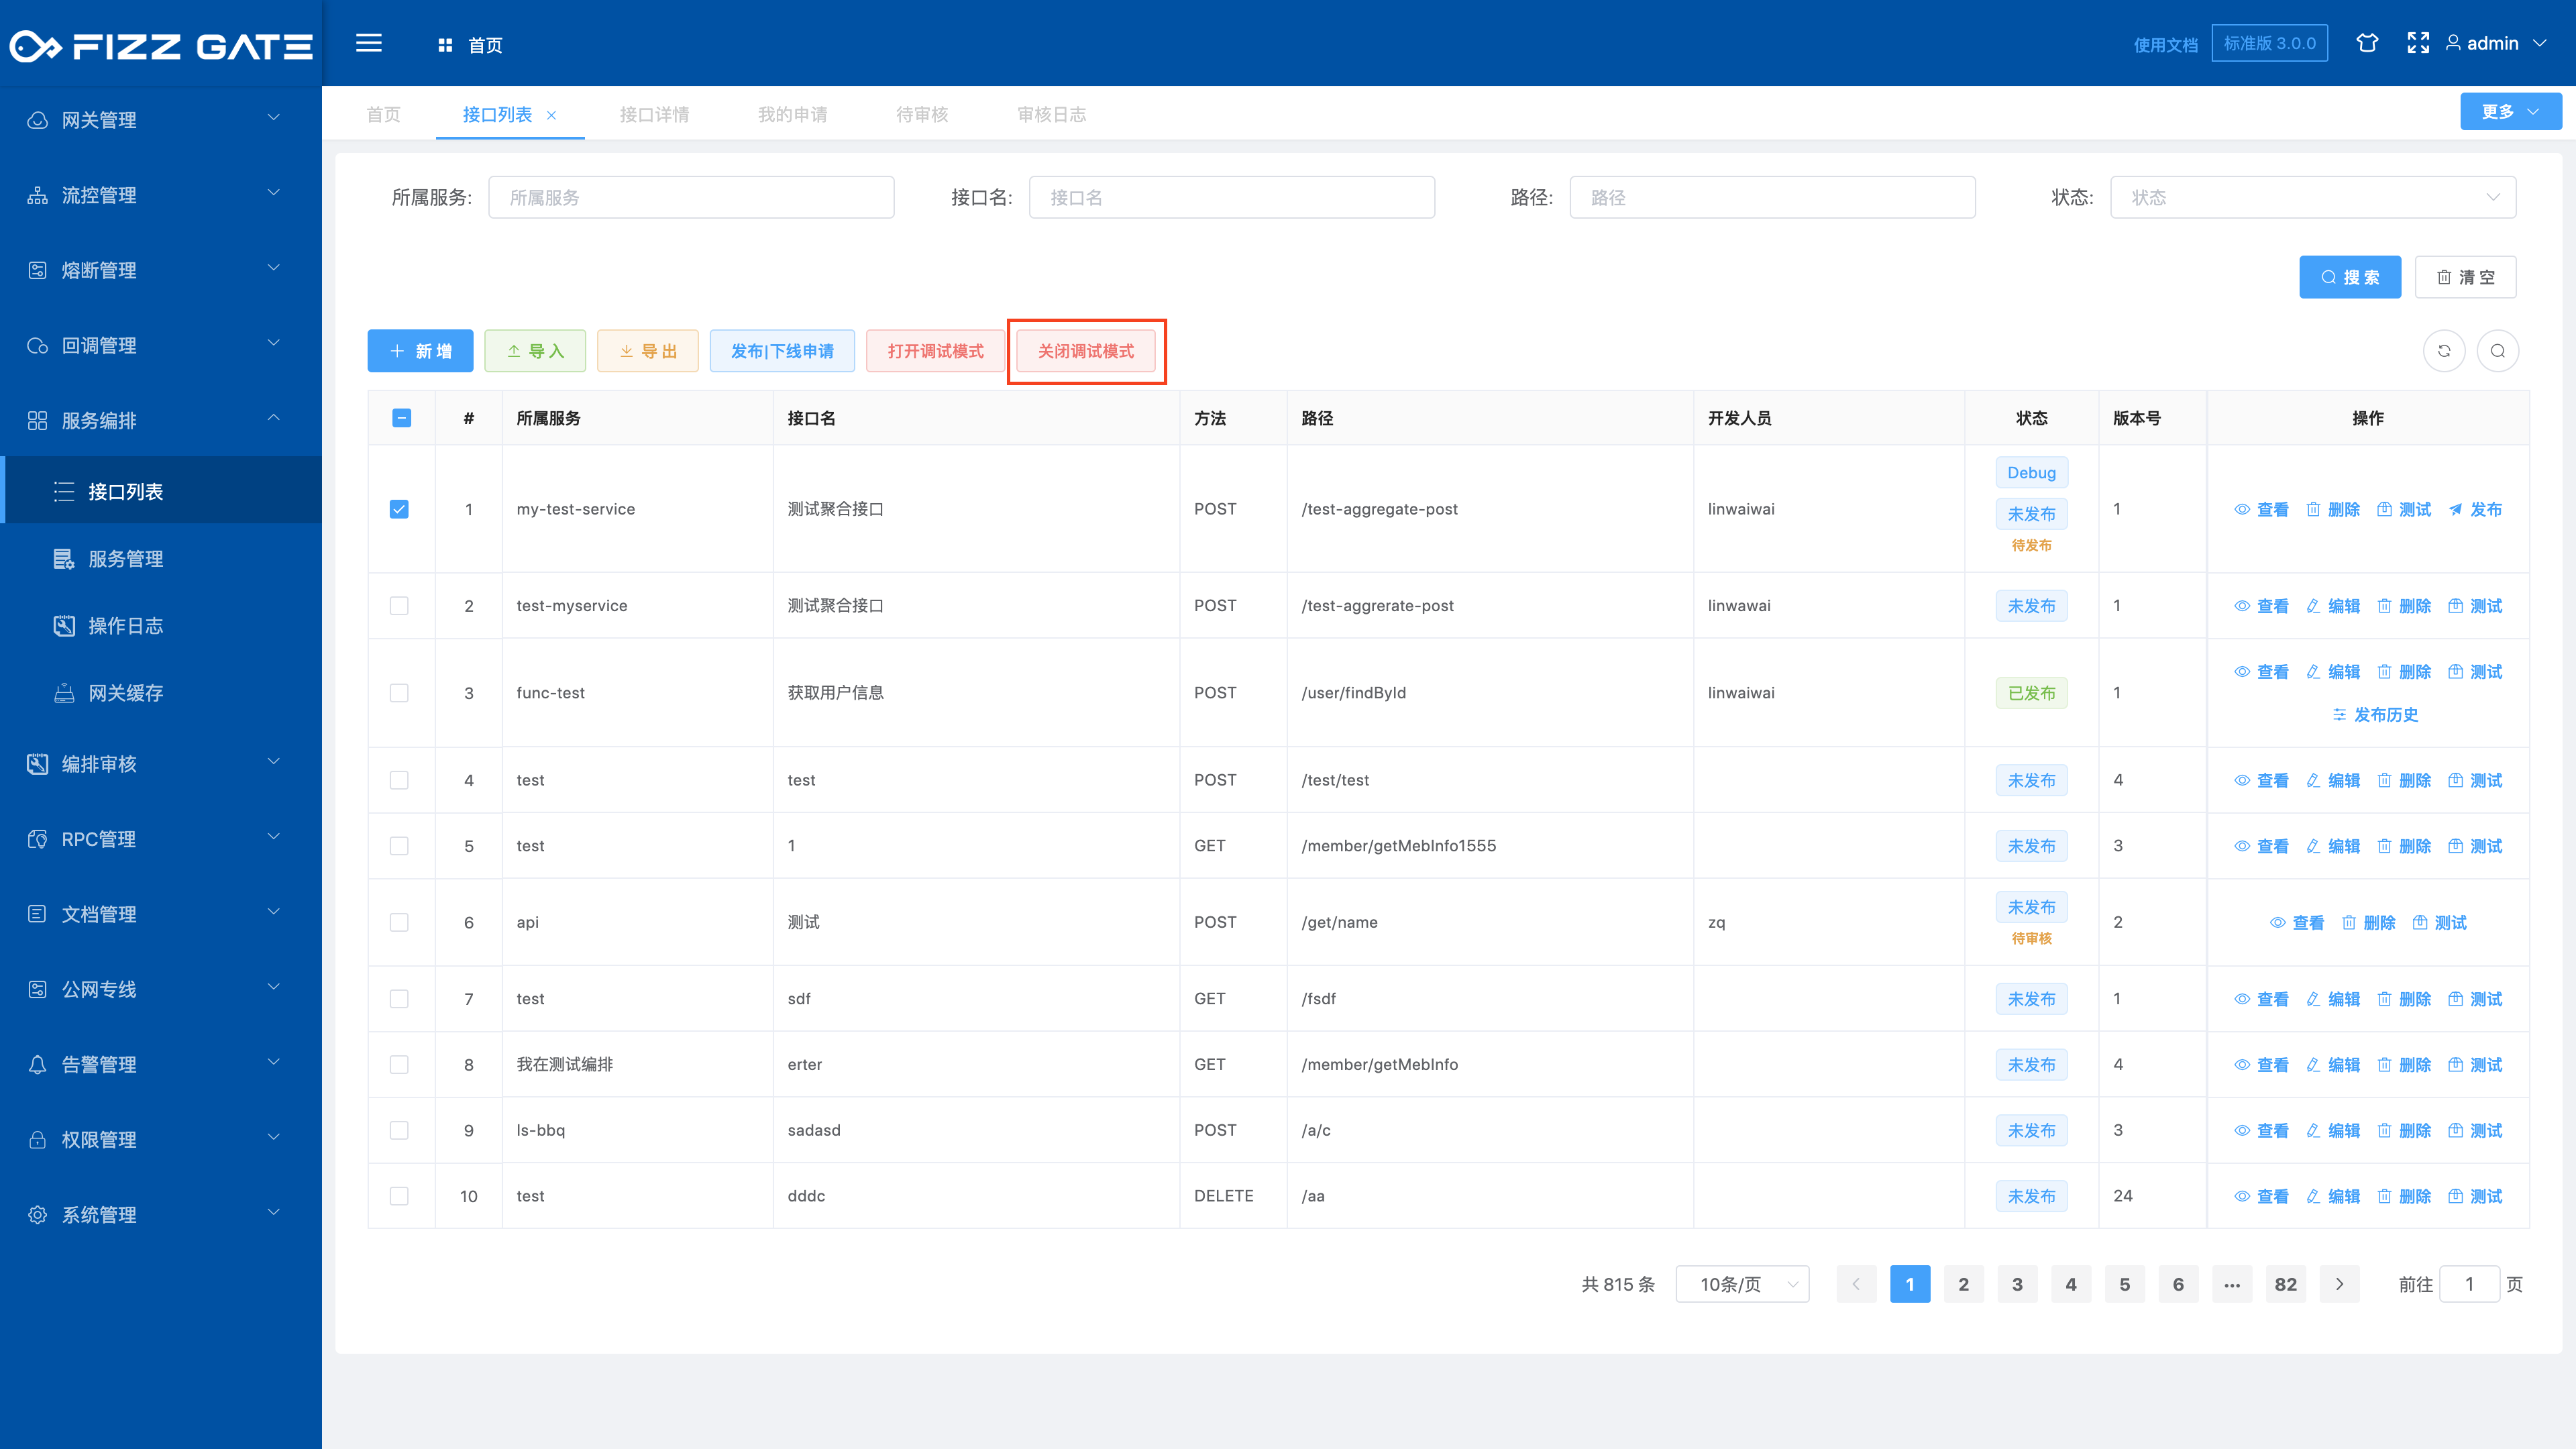
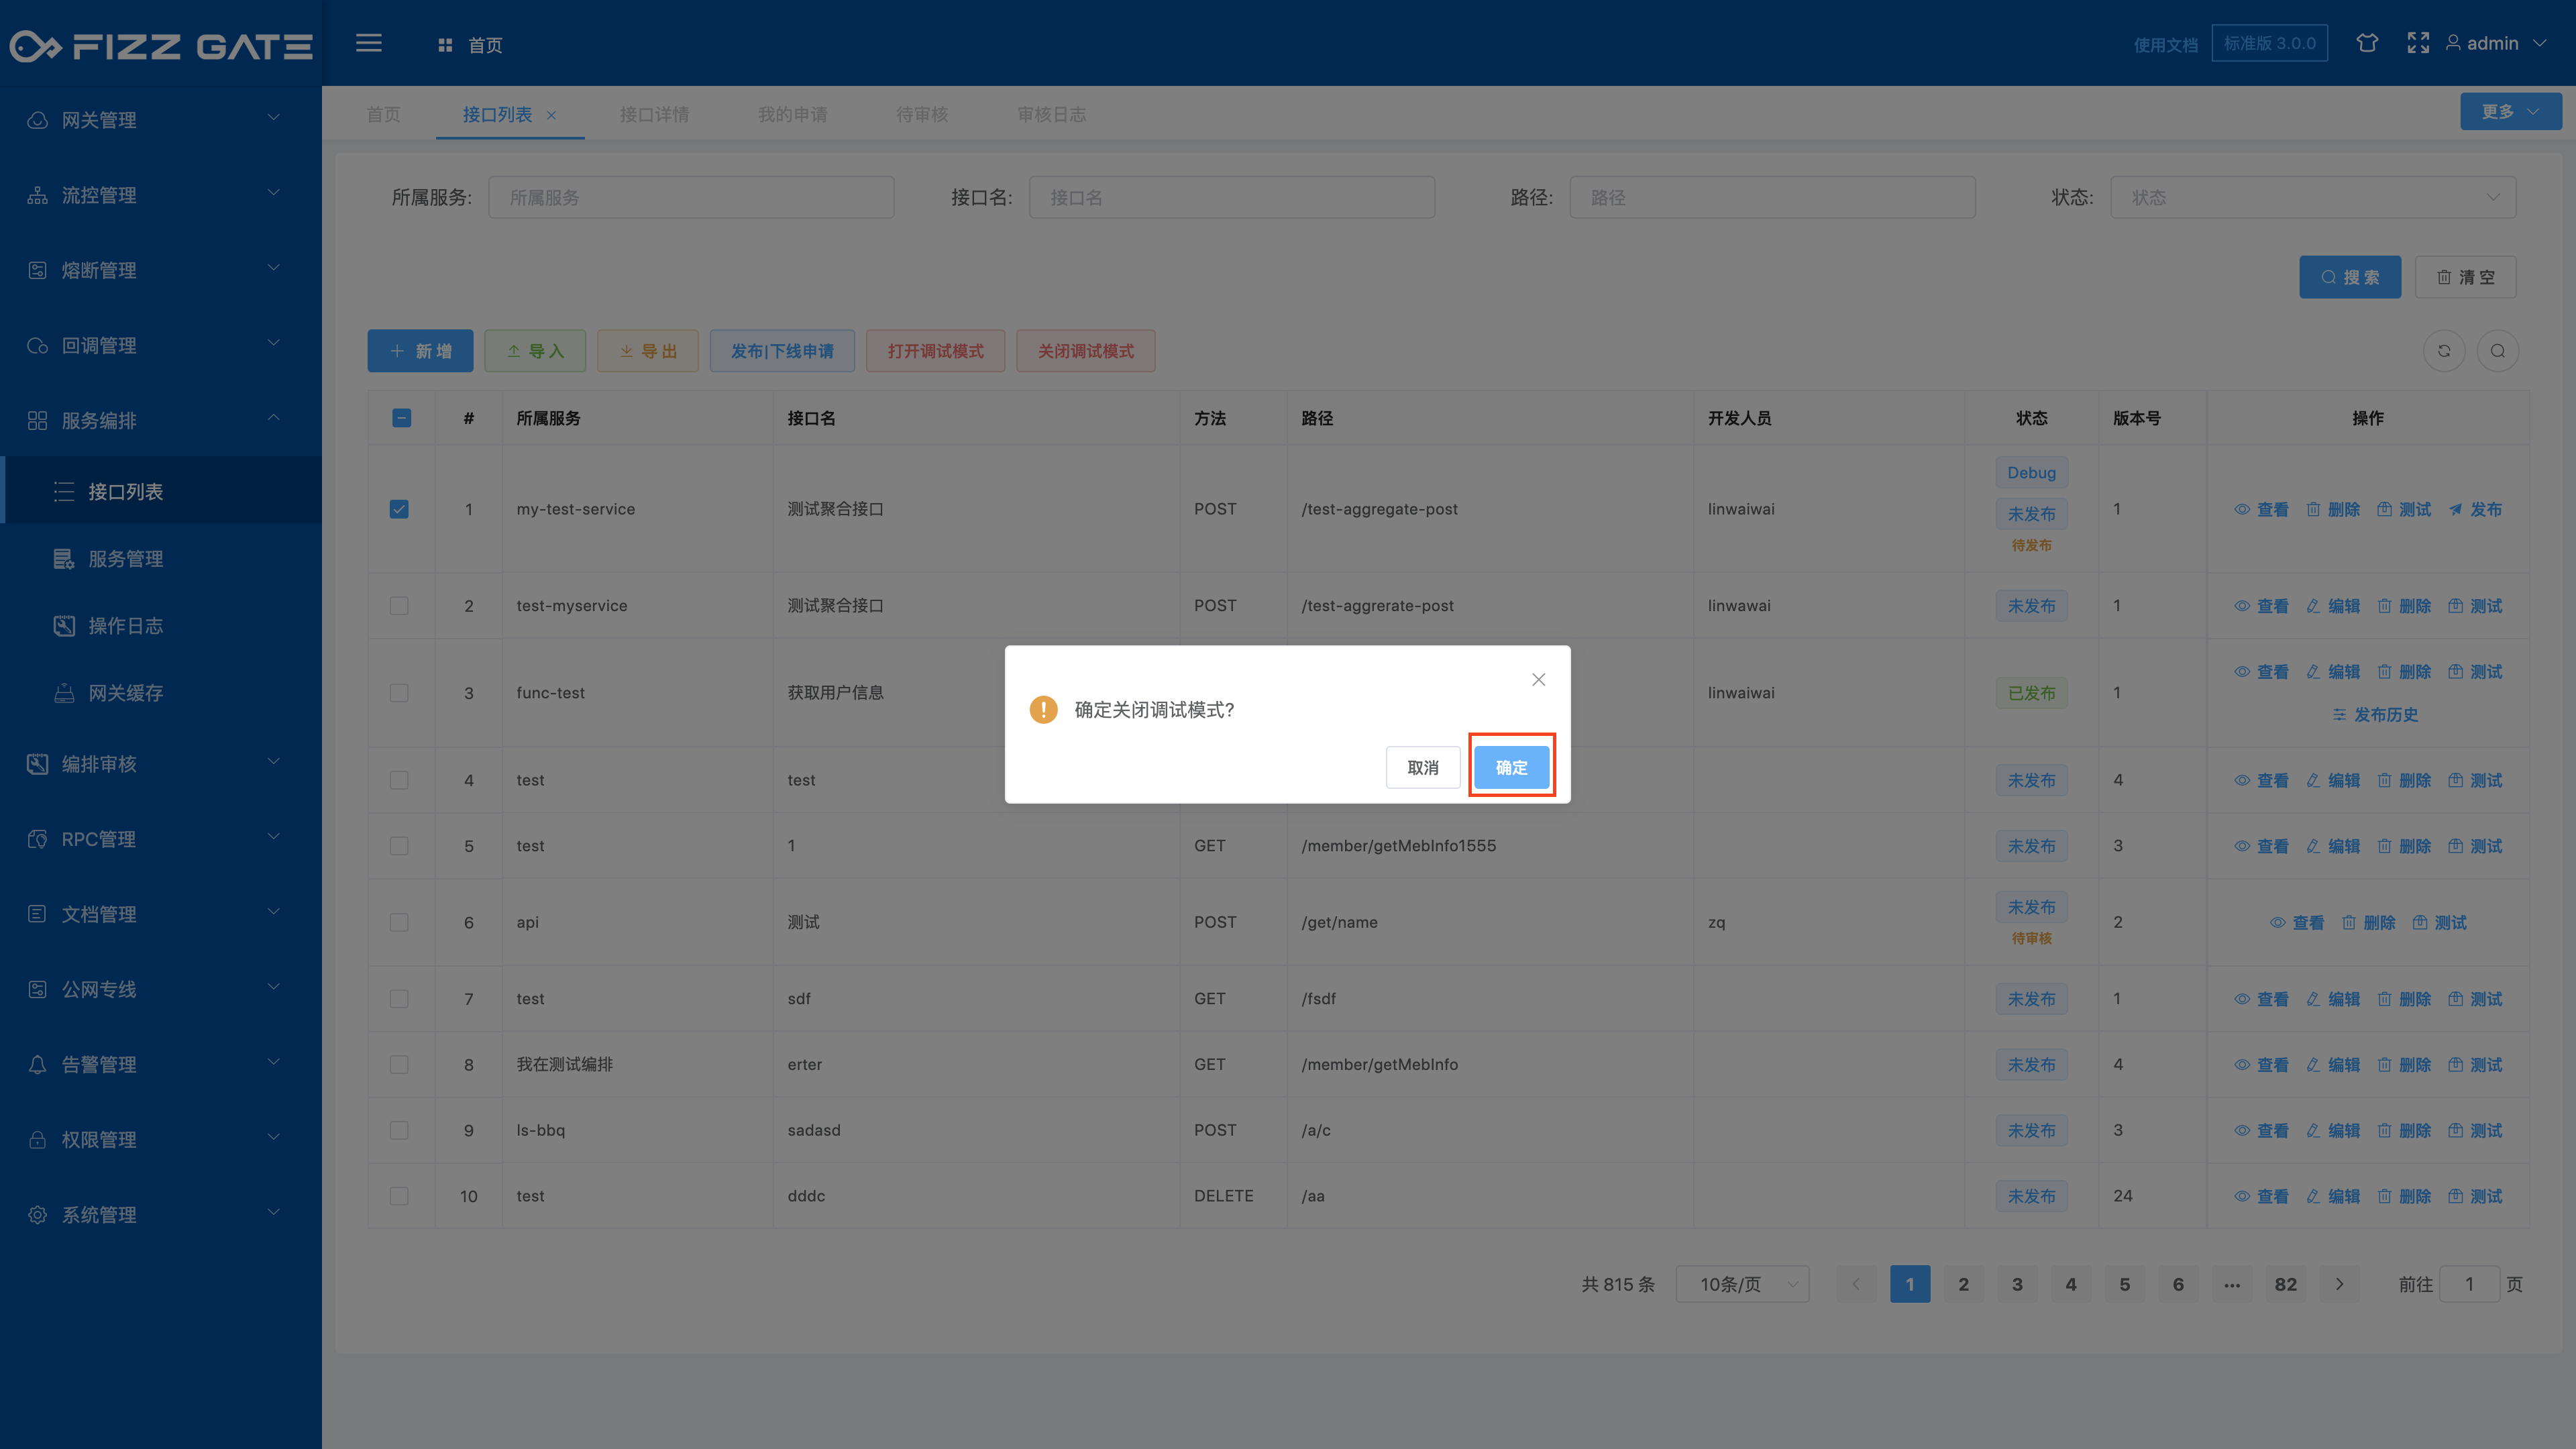
Check the interface for which you want to turn off debugging mode, and click the Turn off debugging mode button to pop up a confirmation window, as shown in the figure.
Click the OK button to confirm turning off debugging mode.
# Edit interface
Click the Edit button to pop up the editing window, as shown in the figure.

# Delete interface
Click the Delete button to pop up the deletion confirmation window, as shown in the figure.


Click the OK button to delete the interface. The interface in the published state cannot be deleted and must be offline before deletion can be performed.
# Release|Offline application
Publish|Offline application is used to publish or offline the aggregation interface. Only through Only after review by the reviewer can the applicant perform the release|offline operation to avoid misoperations and ensure the security of the interface.
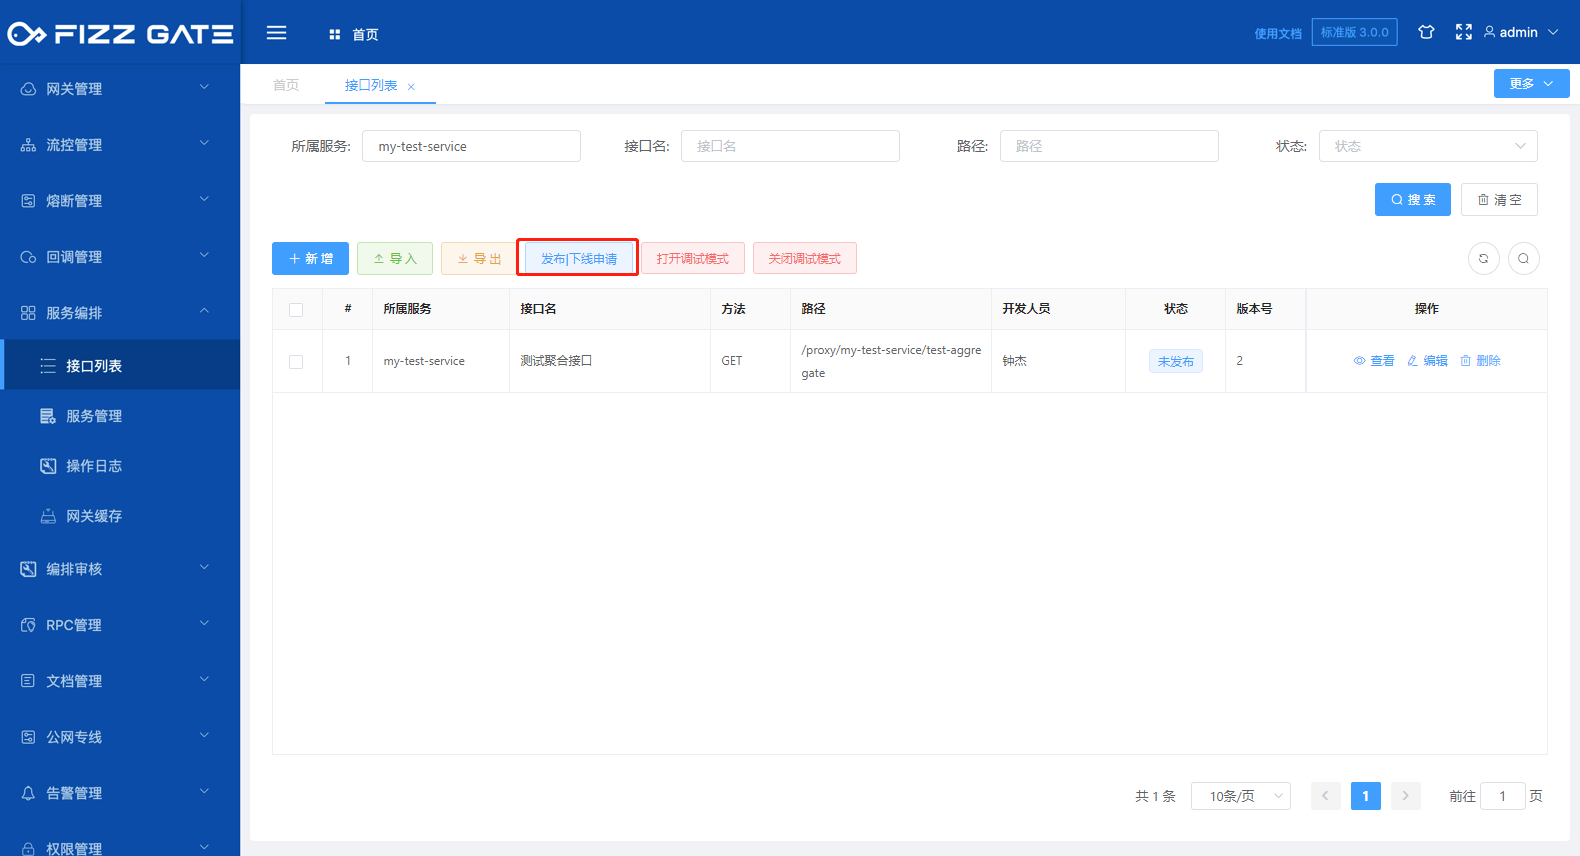
Click the Publish|Offline Application button to pop up the Publish|Offline Application window, as shown in the figure.
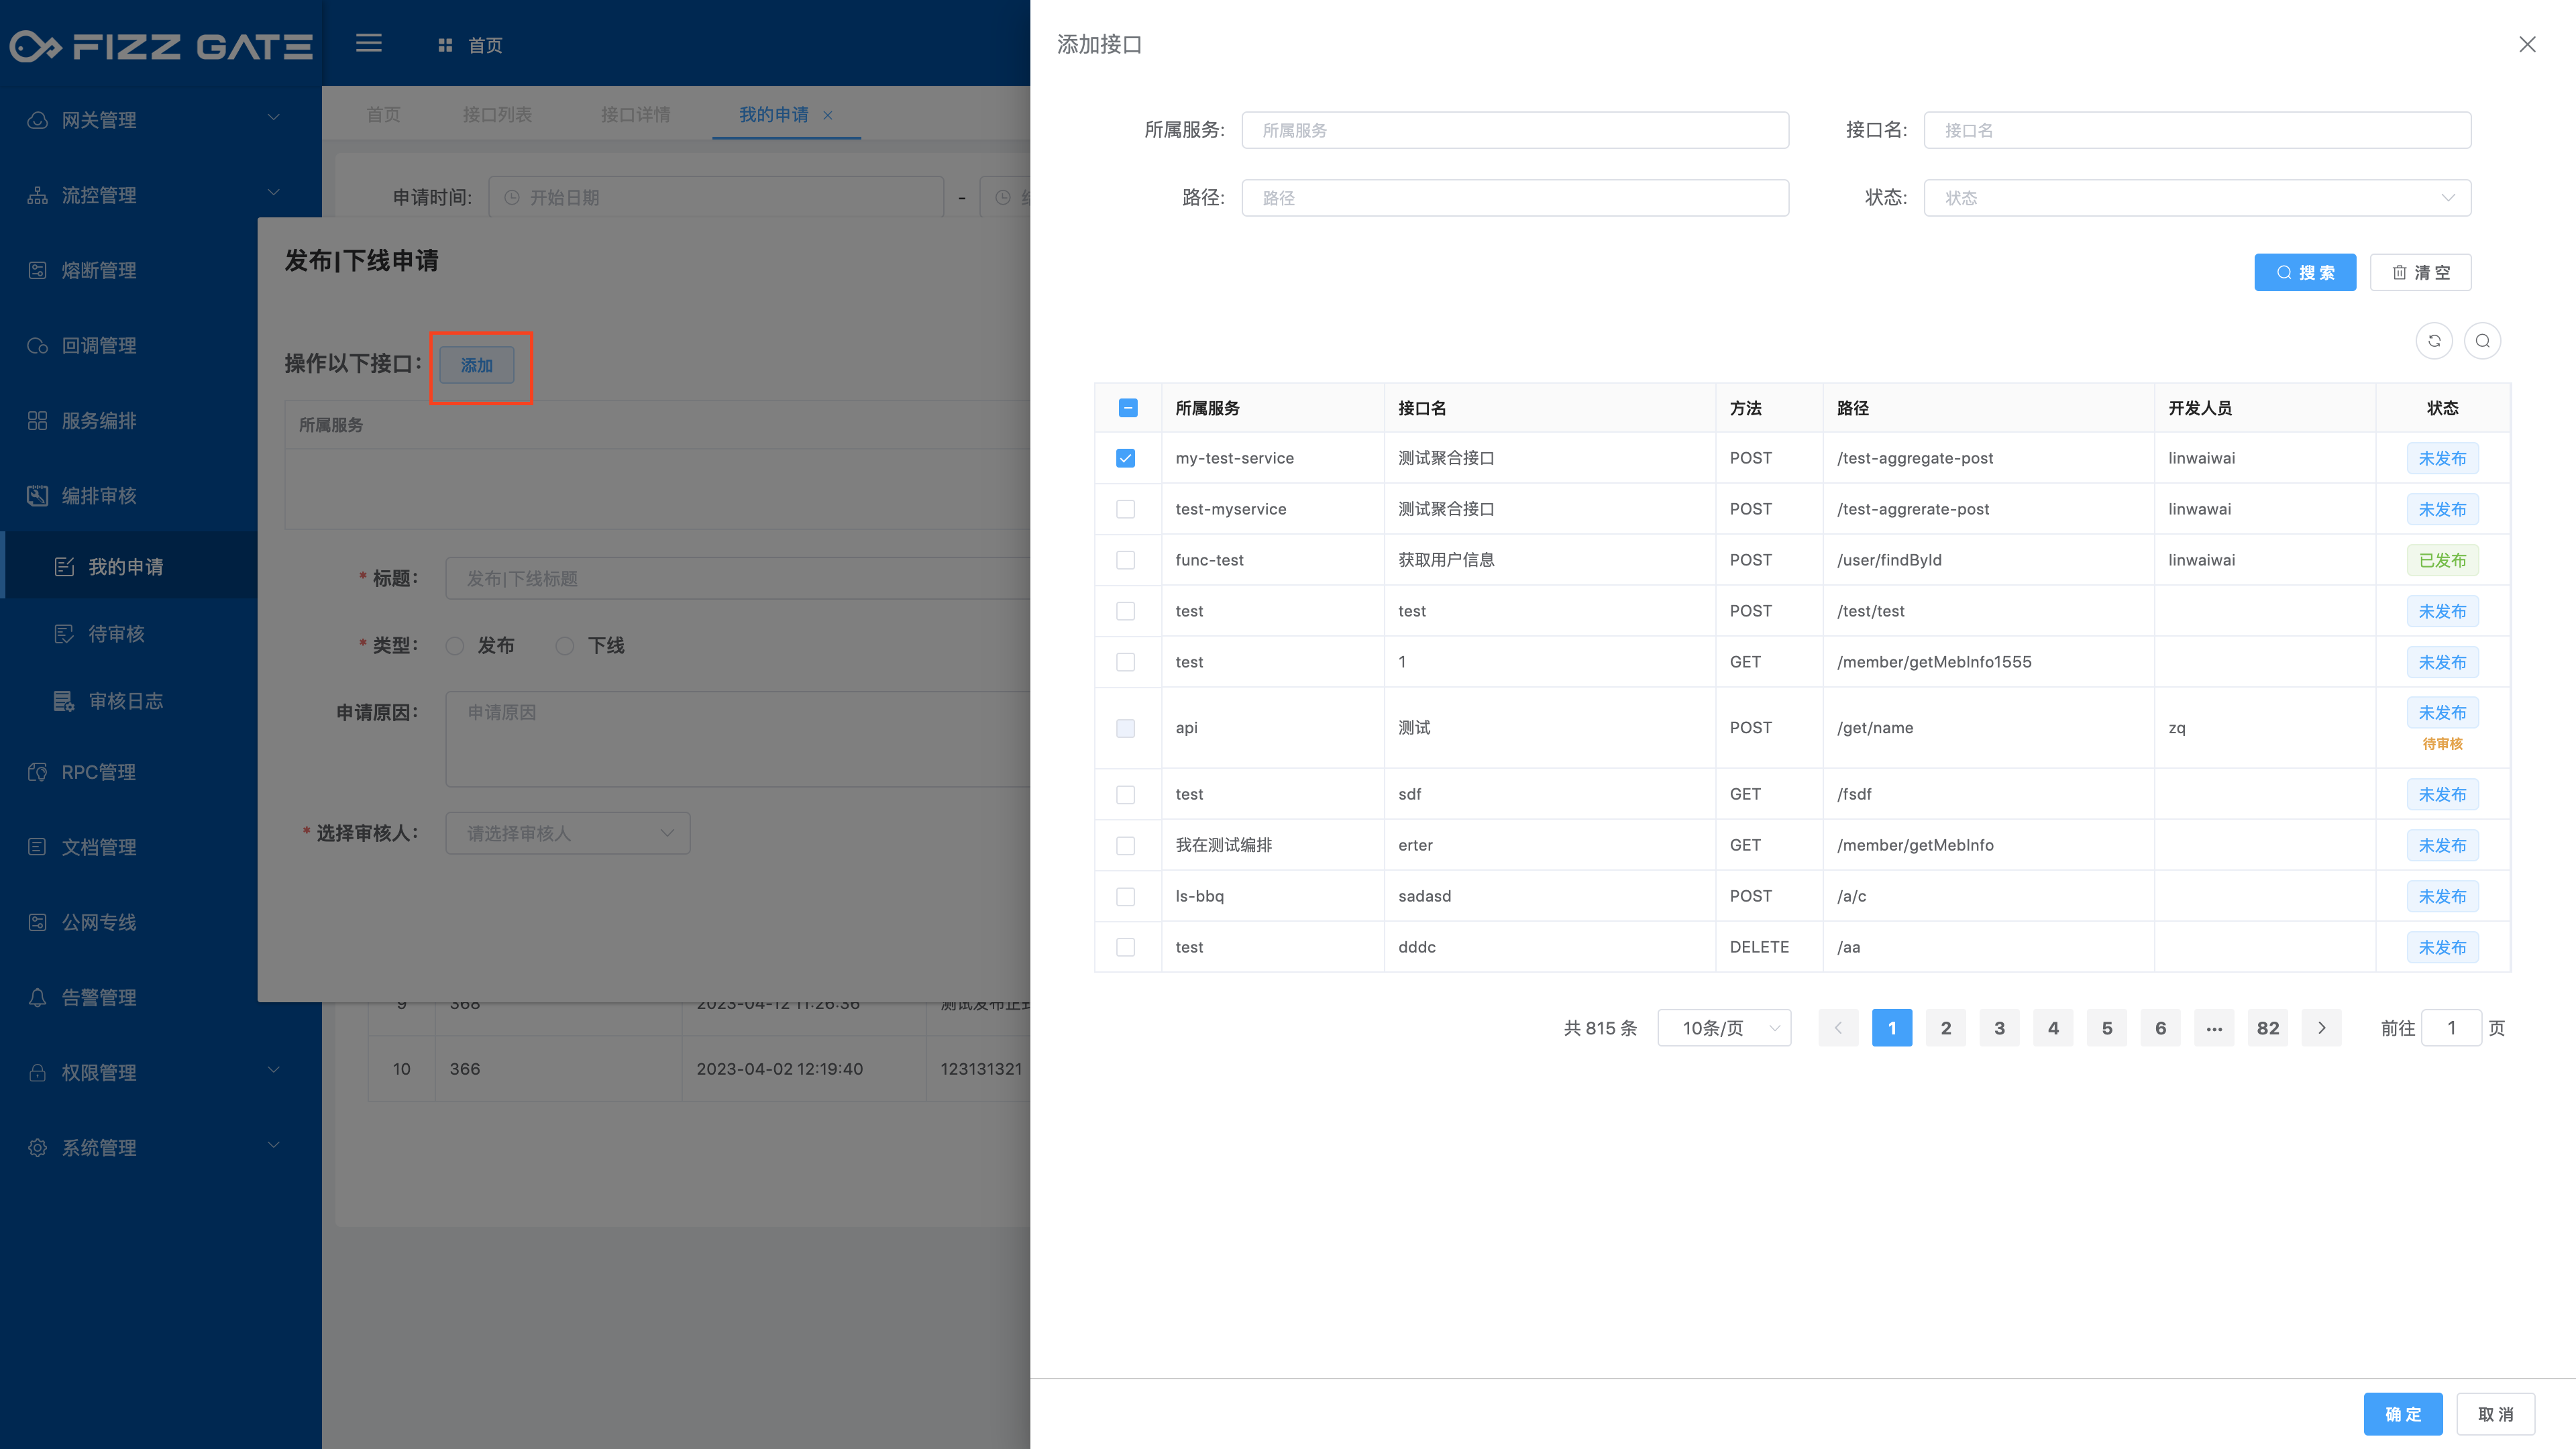
After clicking the Add button, the interface list will pop up. Check the interfaces that need to be operated and click OK to add them to the application.
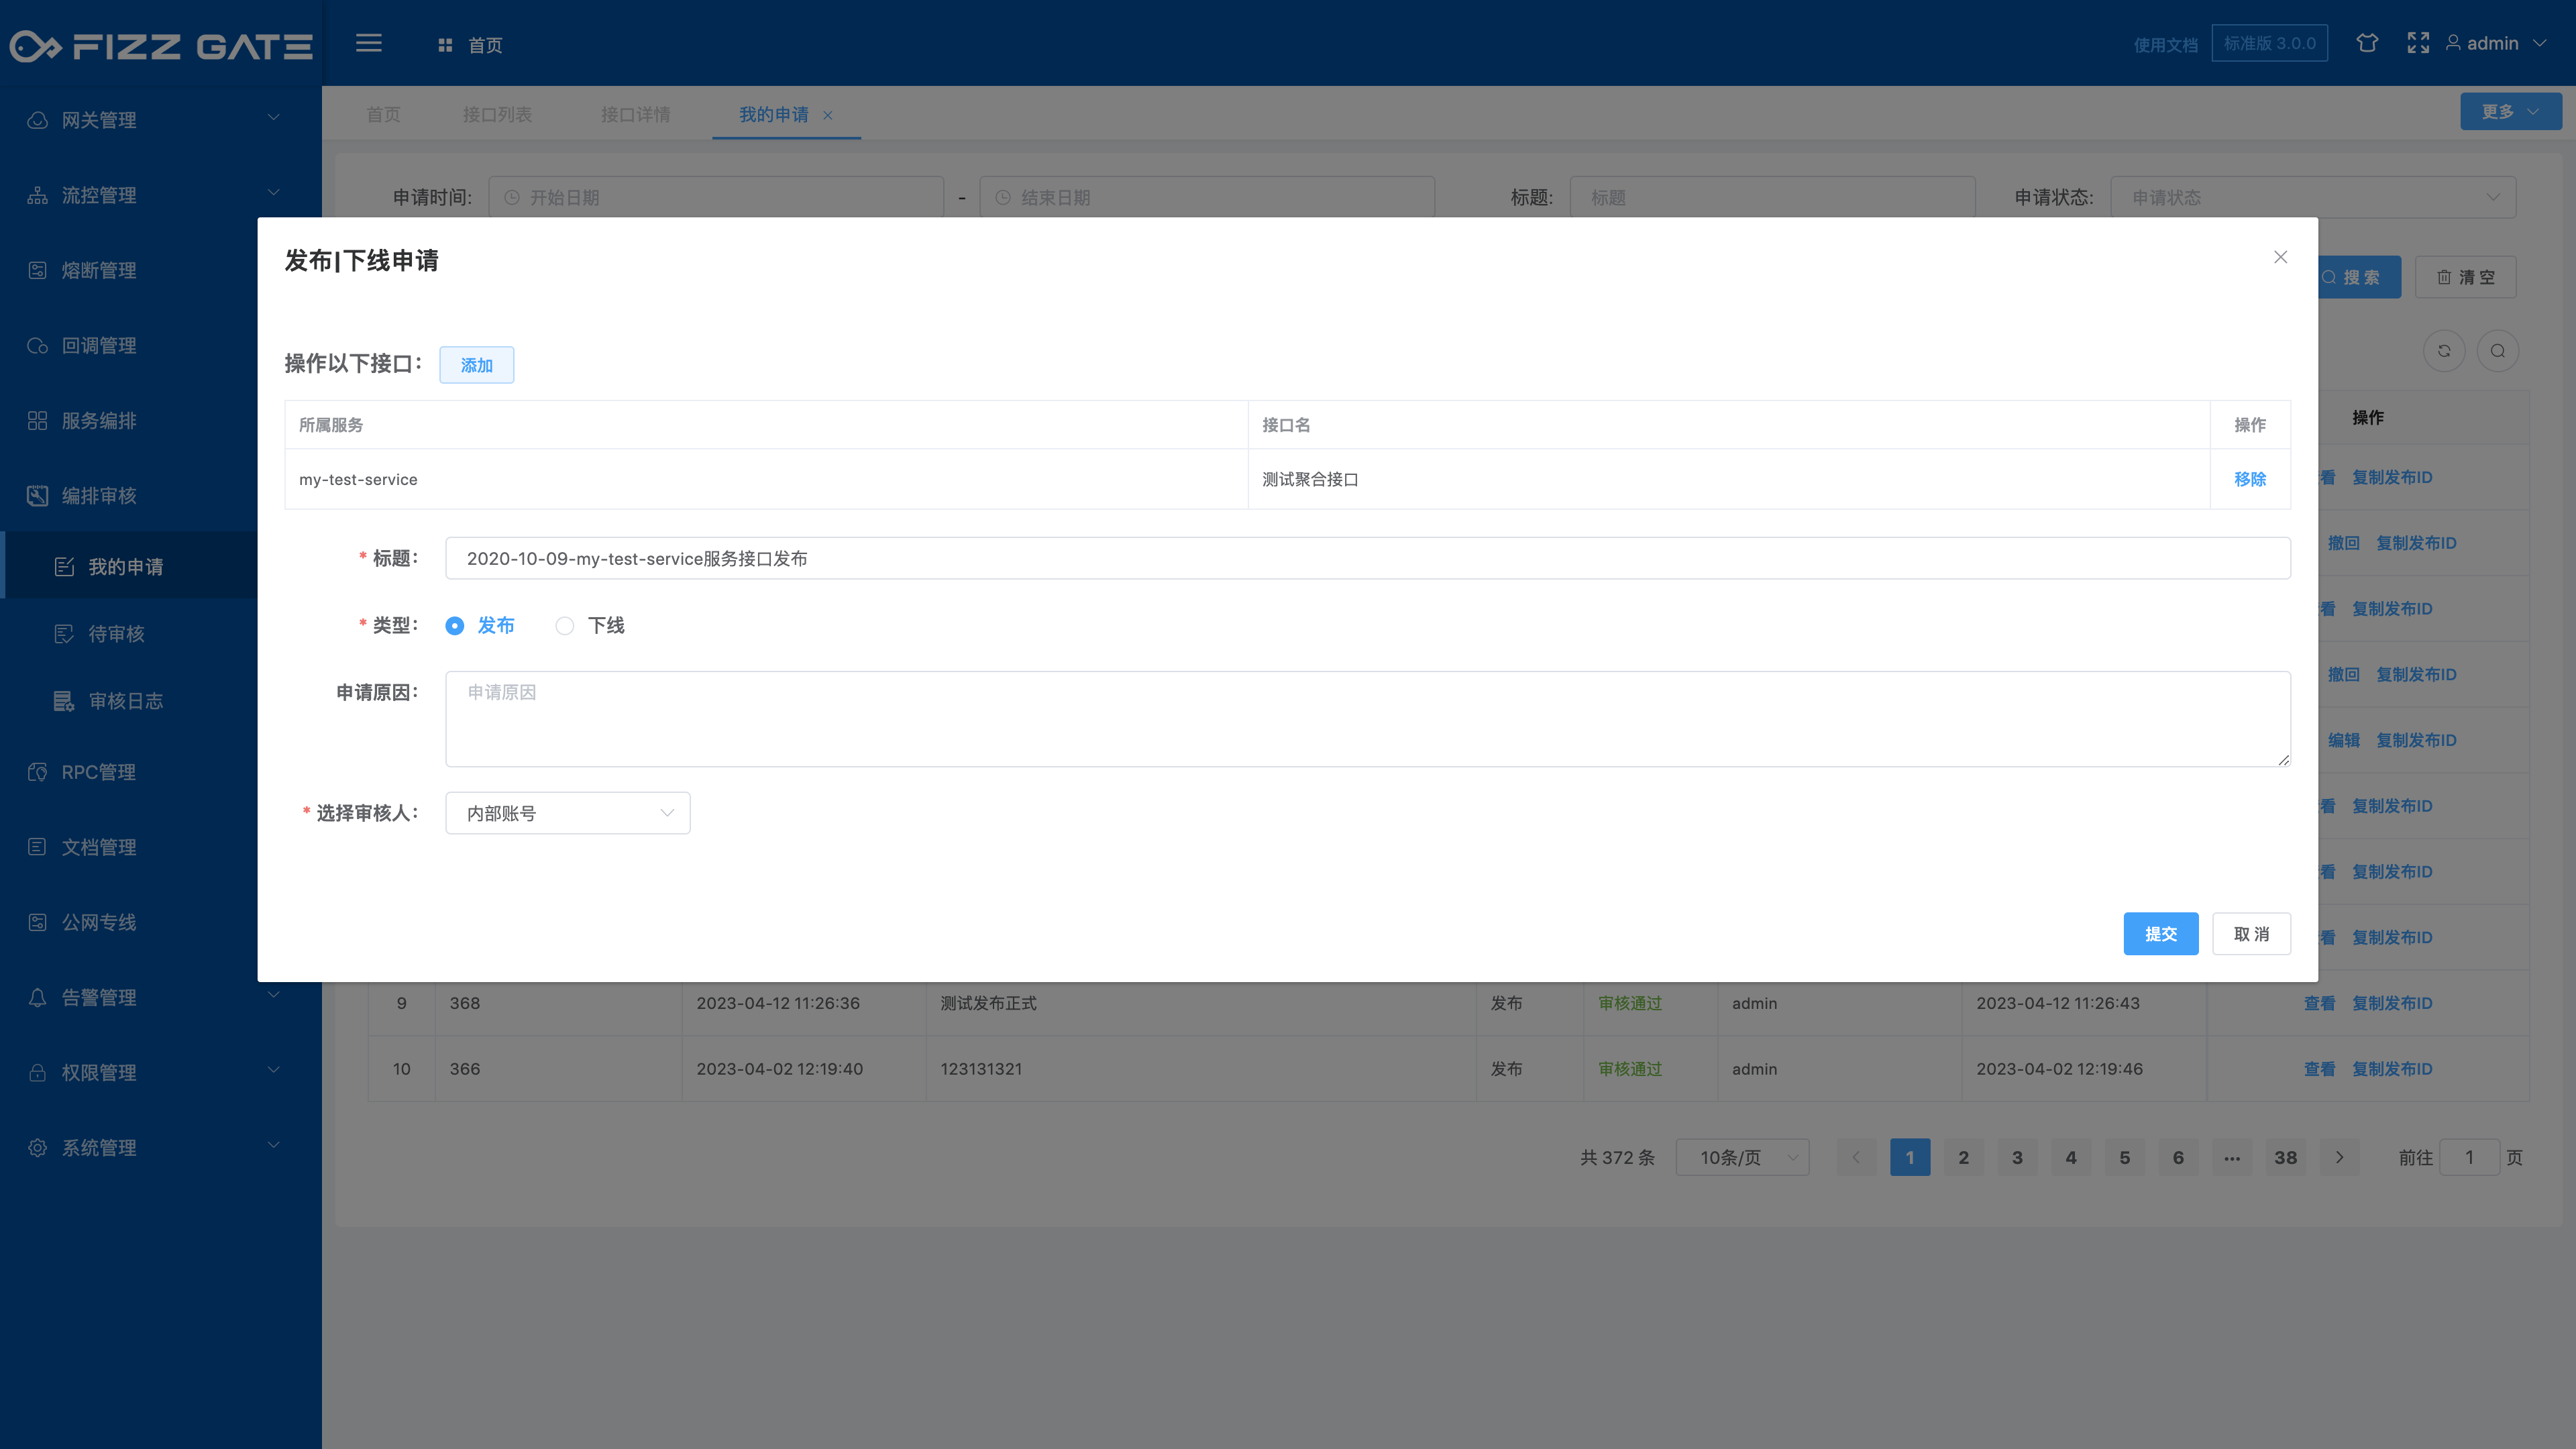
Title: The title of the application. The length cannot exceed 200 characters and is required;
Type: application type, optional release|offline, required;
Reason for application: Reason for application, the length cannot exceed 2000 characters;
Select reviewer: Select a person with review authority to review the application. The list changes dynamically according to the interface that needs to be operated (the list is empty when no interface is added. People with service permissions and menu permissions to be reviewed, or people with the operation administrator role can Select reviewer), required;
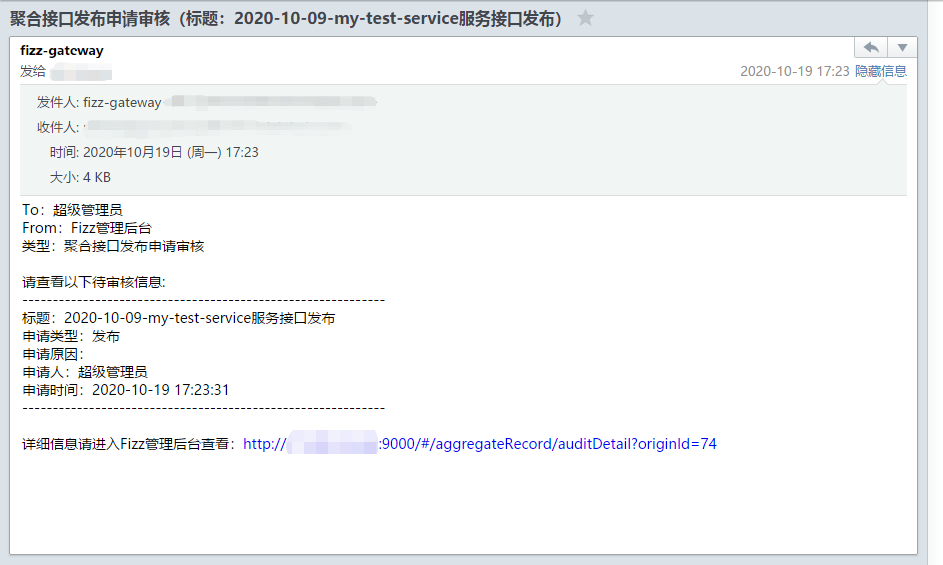
Click the OK button to submit the application. The selected reviewer will receive an application review email (the reviewer's email address is set through user management. For more details, please see the user management function introduction), as shown in the figure.
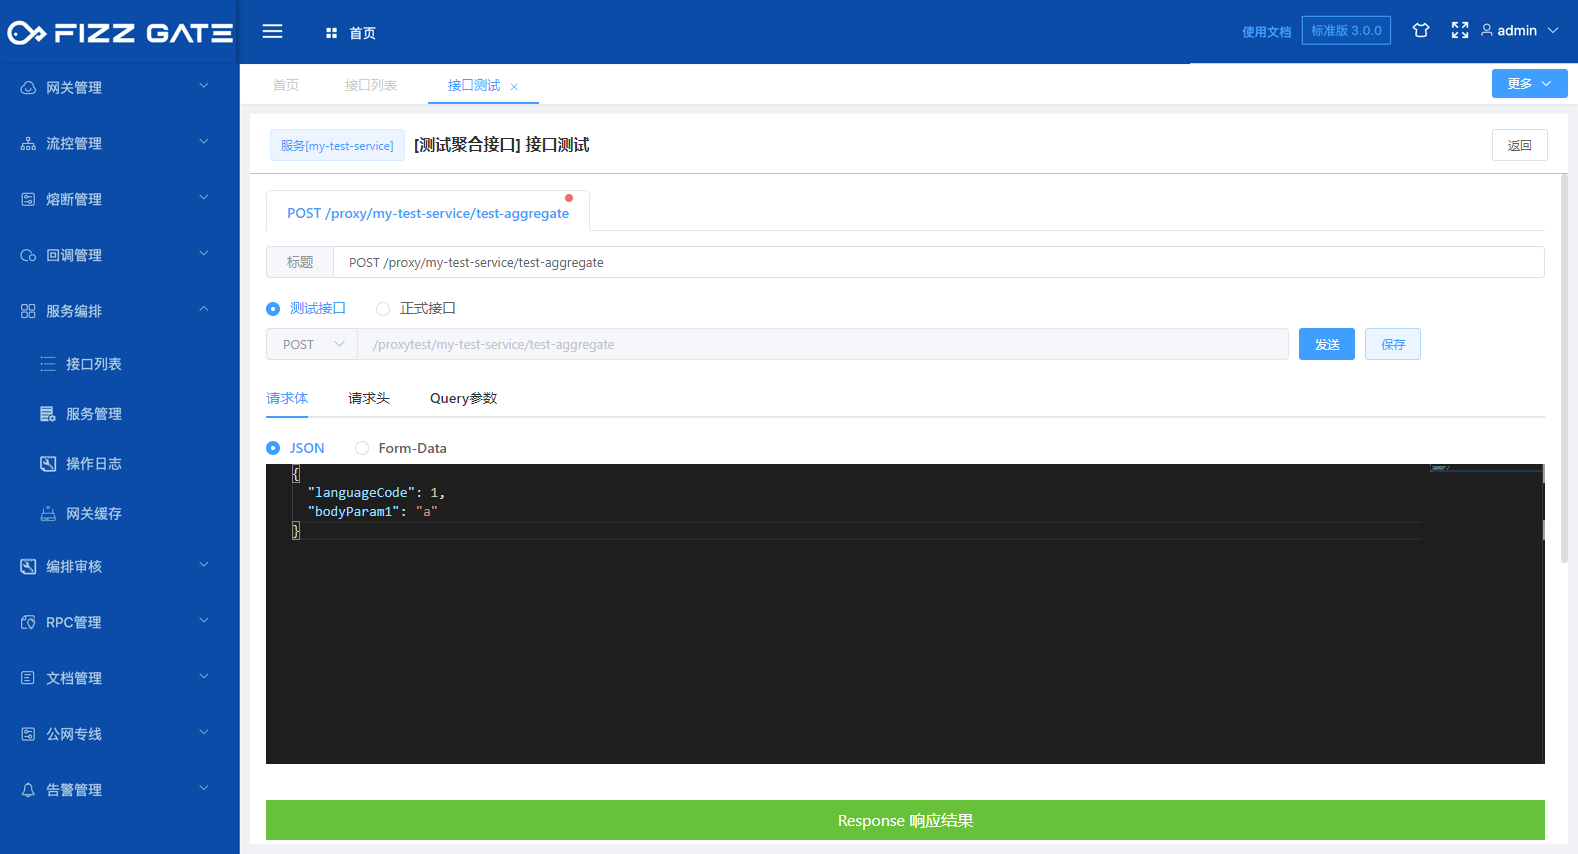
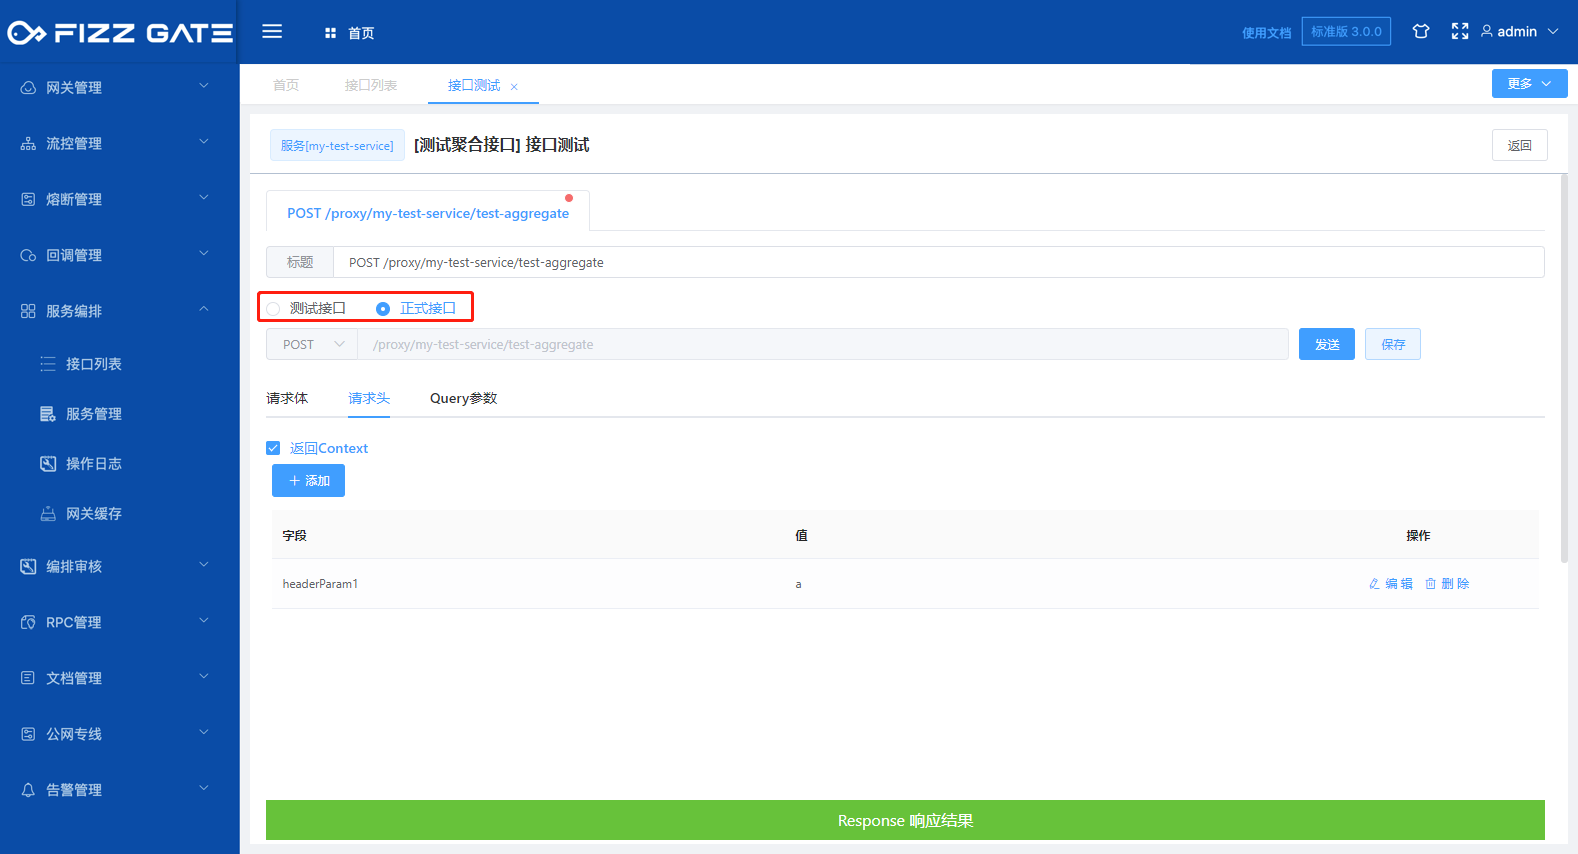
# Interface testing
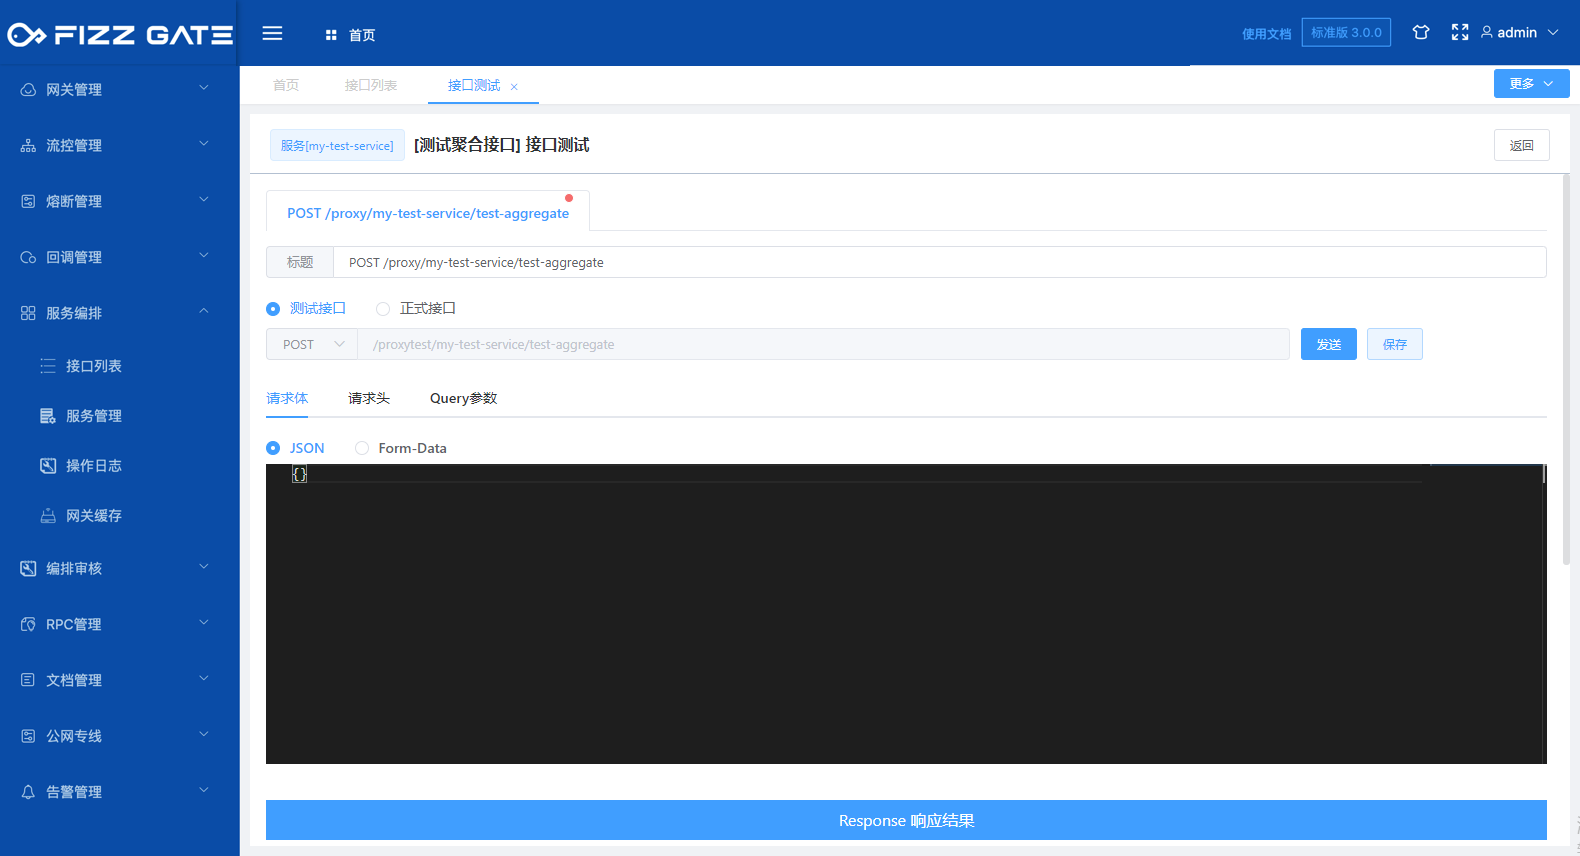
The background provides a visual interface calling interface. After the aggregation interface is created, the interface can be called and tested through this interface. Open the interface test page by clicking the Test button on the interface details page, as shown in the figure.

When jumping to the page, the background will push the latest current configuration of the interface to the FizzGate integration platform to generate a test interface. The request path is /proxytest/{service}/{apiPath}.
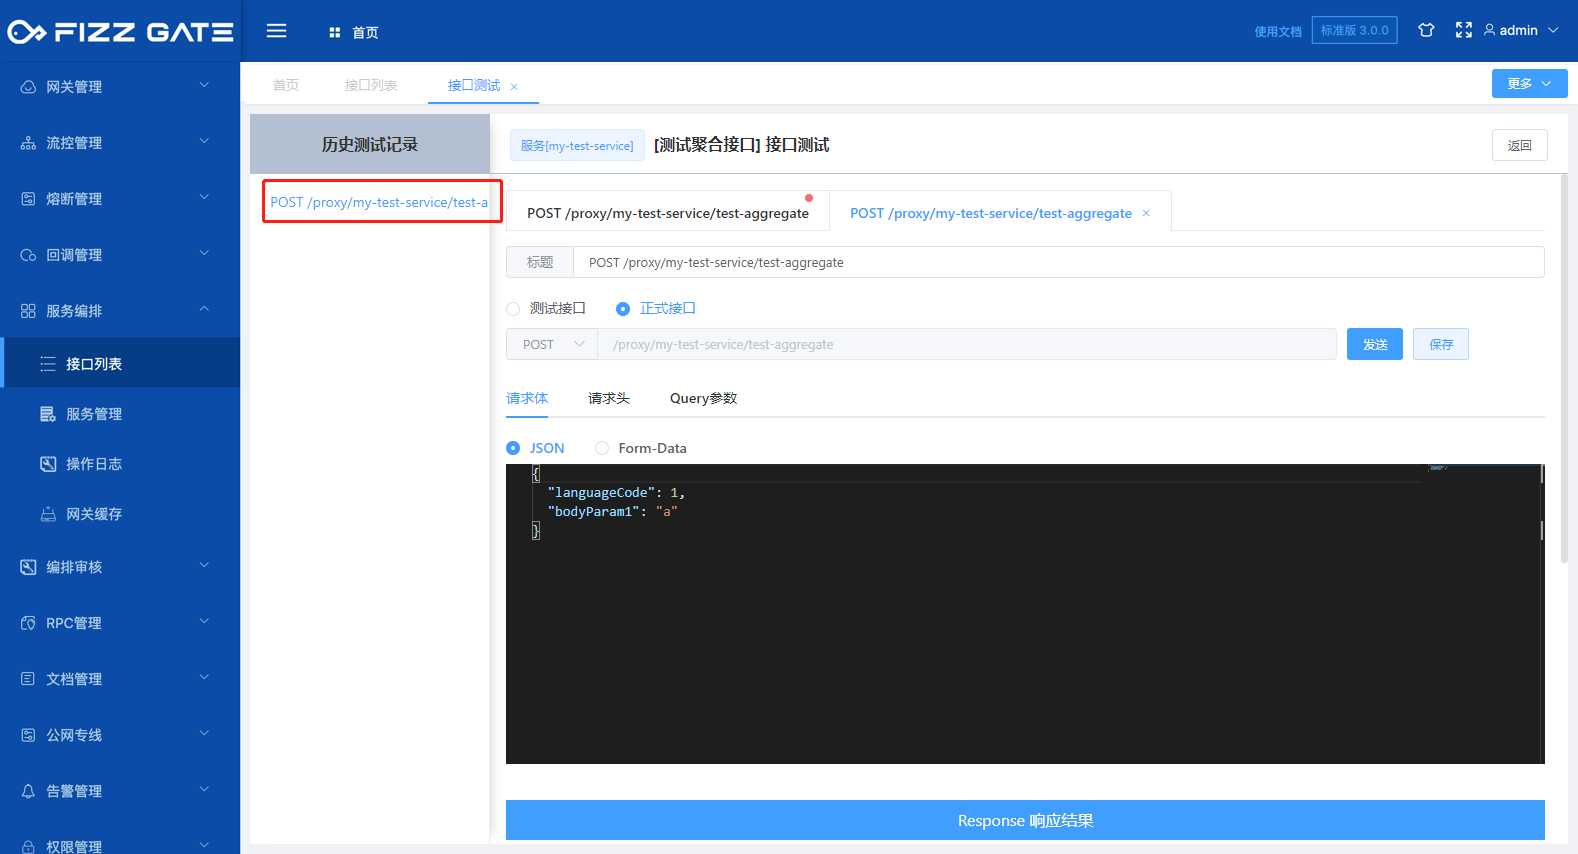
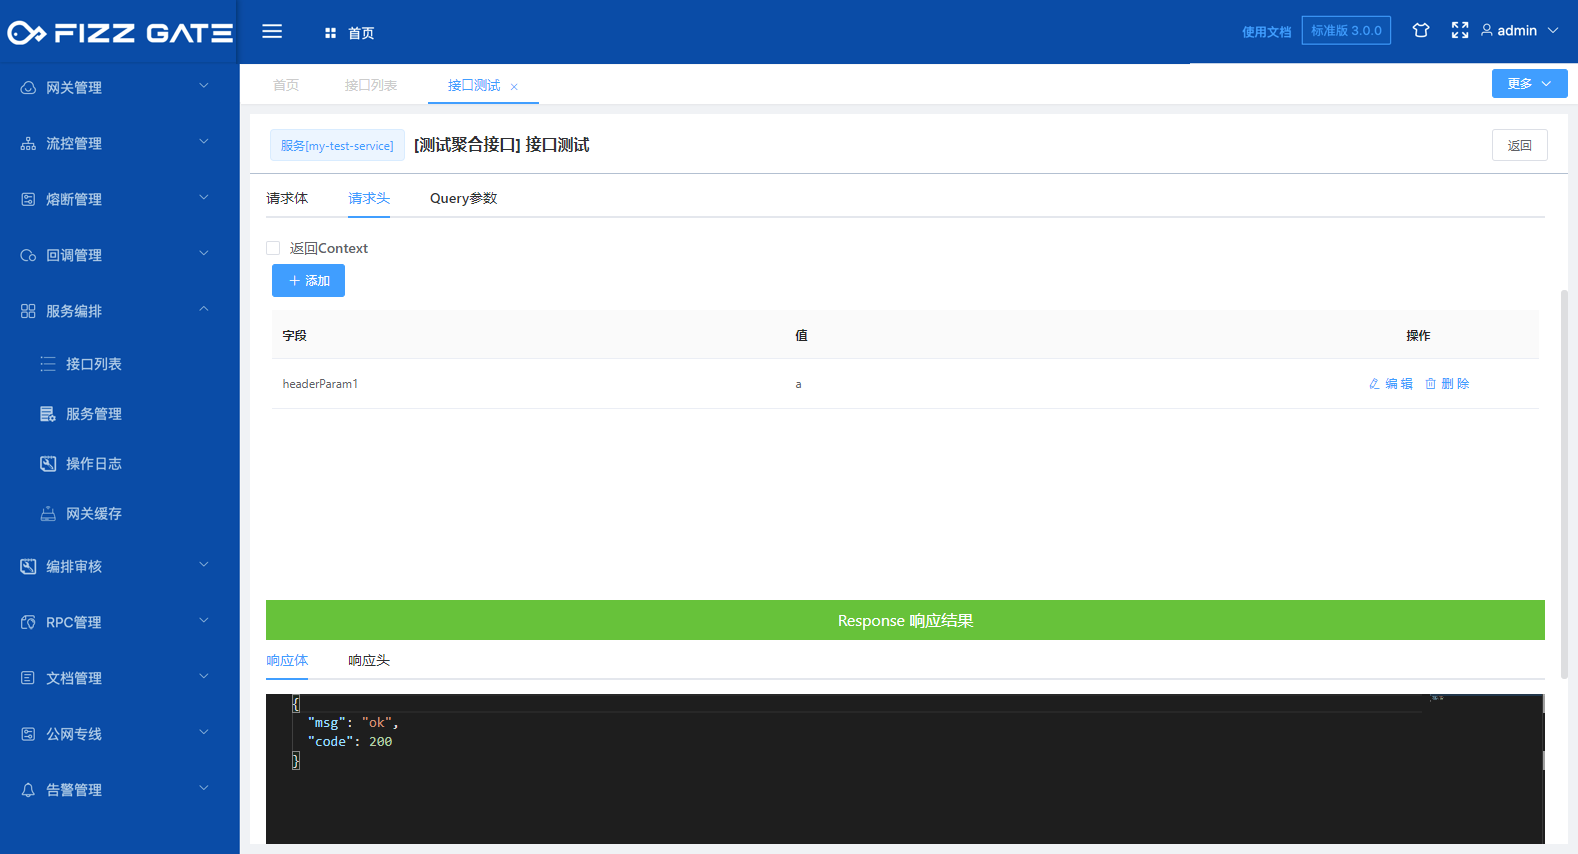
Click the Send button to send a request to the specified interface. The Response result area displays the result of calling the interface, as shown in the figure.
The request body tab is used to configure the request body parameters of the request.
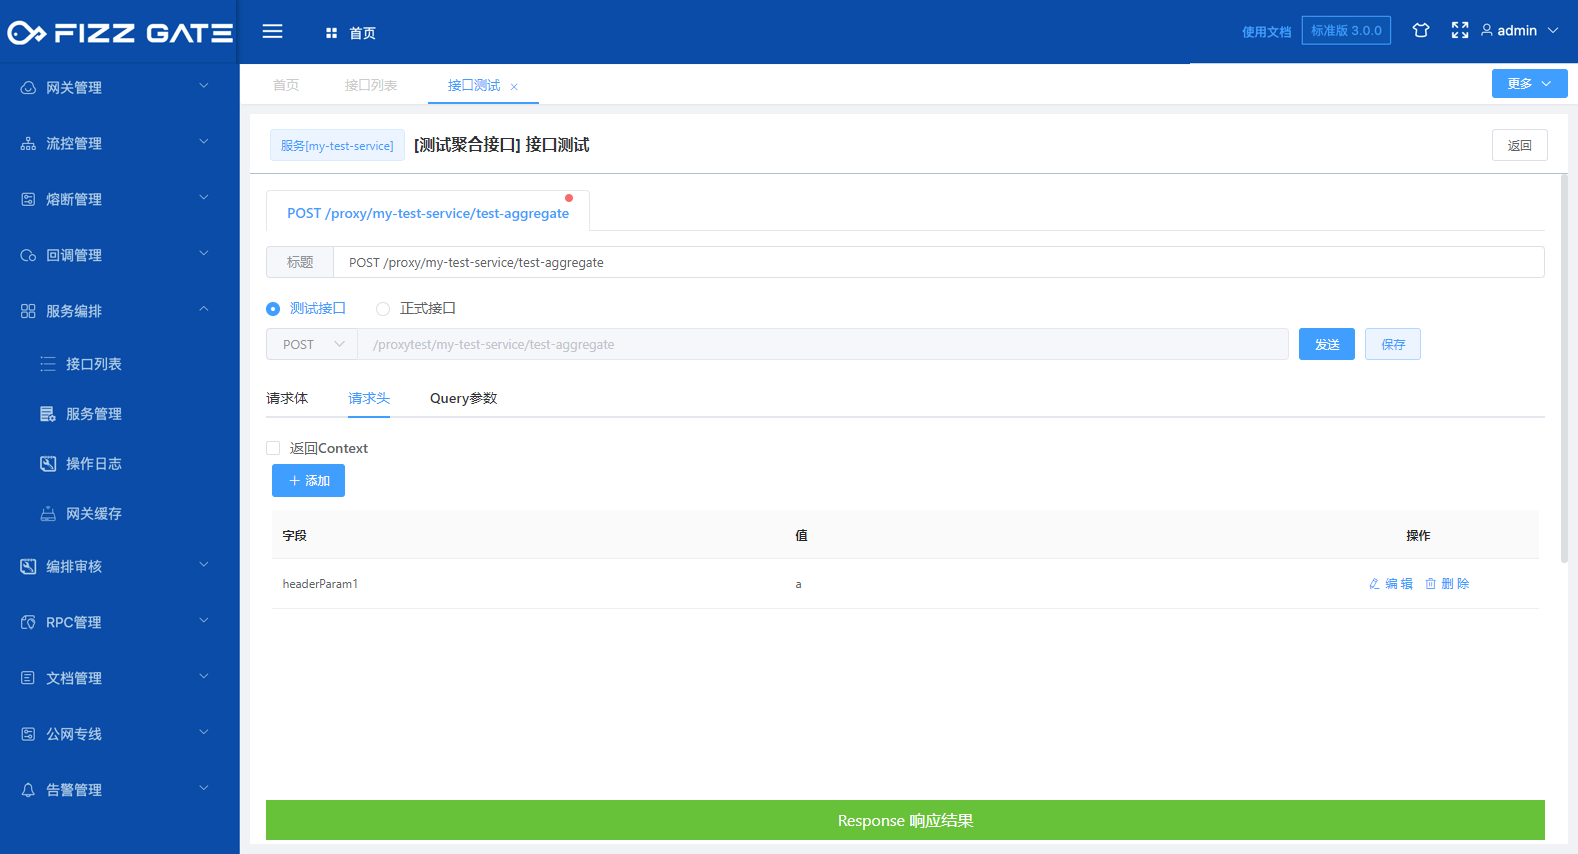
The request header tab is used to configure the request header parameters of the request.
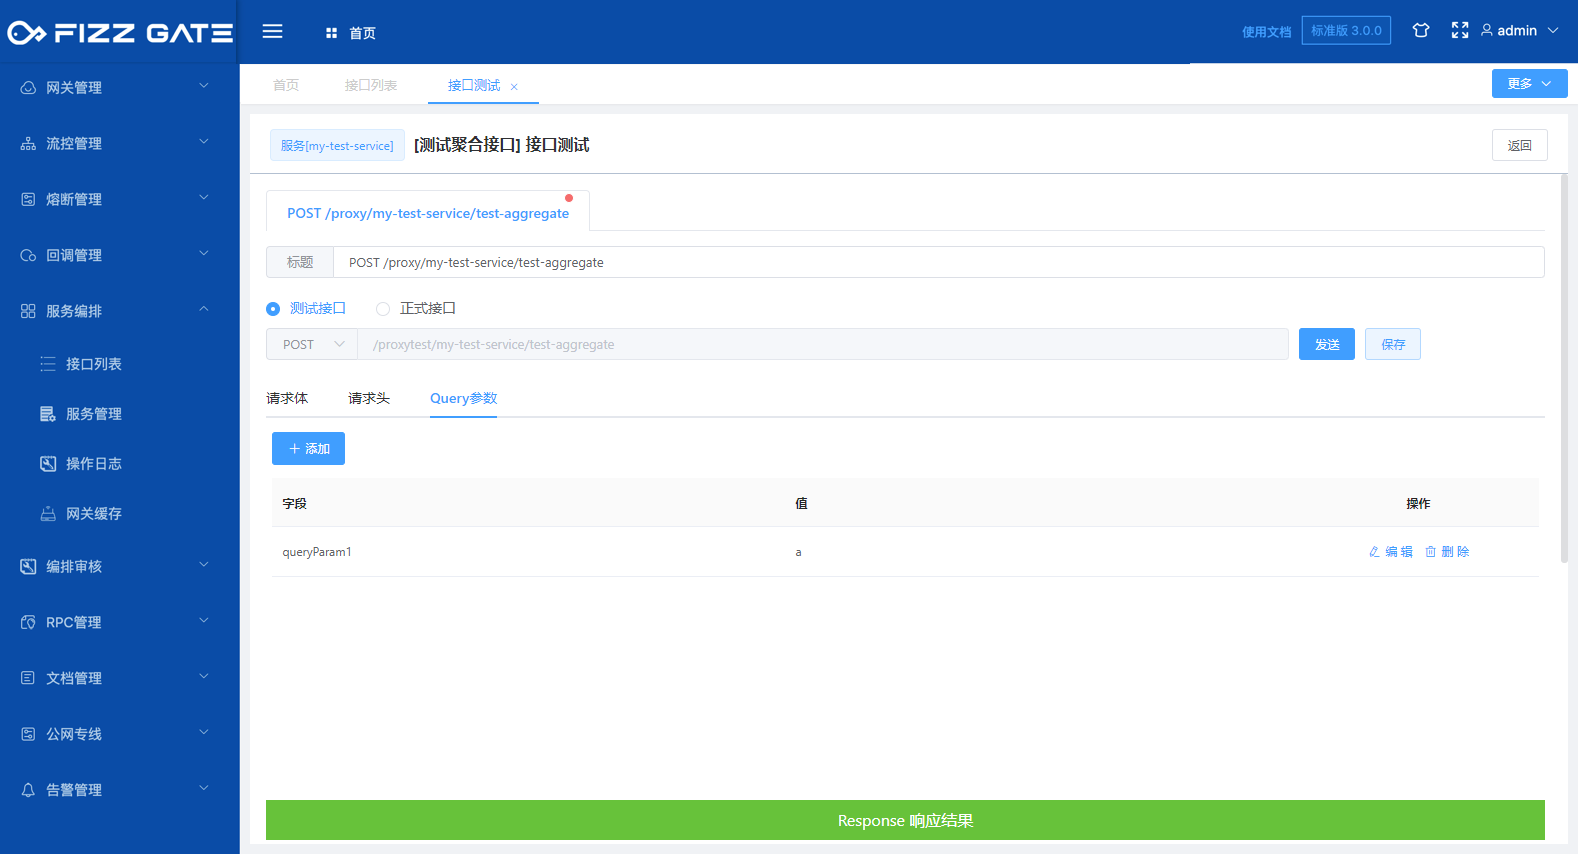
Query parameters are used to configure the Query parameters of the request.
Return to Context: A Context object will be held internally during an aggregation interface request in the FizzGate integration platform. This object saves the input parameter information, underlying service interface call information, and response information of this request process. By checking this option, The interface will return the Context along with the interface response. By viewing the Context, you can clearly understand the actual calling process of the interface.
When the Return to Context option is unchecked, the interface responds according to the settings output by the configuration, as shown in the figure.
After checking the Return Context option, the interface will return the Context along with the interface response, as shown in the figure.

Test interface: call the test interface, the request path is /proxytest/{service}/{apiPath};
Formal interface: Call the formal interface, the request path is /proxy/{service}/{apiPath};
Clicking the Save button will save the test request data. You can quickly restore the request data by selecting the saved test record, as shown in the figure.

Title: The title used when saving this test data. The length cannot exceed 2000 characters. After saving, it will be displayed in the historical test record list, as shown in the figure.