# One-step installation
Install and run FizzGate on a Linux machine with one click:
wget https://gitee.com/fizzgate/fizz-gateway-node/raw/master/install.sh && bash install.sh
One-click installation uses docker-compose to integrate fizz-gateway-node, fizz-manager-professional, MySQL, and Redis, including:
fizz-gateway-node: The log mapping directory is: ./docker_volumes/fizz-gateway-node/logs:/opt/fizz-gateway-node/logs
fizz-manager-professional: The log mapping directory is: ./docker_volumes/fizz-manager-professional/logs:/opt/fizz-manager-professional/logs
MySQL: The root account password is root123456, and the data mapping directory is: ./docker_volumes/mysql:/var/lib/mysql
Redis does not set a password by default
After the service is started, access the management backend http://{deployment machine IP address}:8000/#/login, and use the super administrator account admin password Aa123! to log in.
Gateway address format:
http://127.0.0.1:8600/[Service Name]/[API Path]
# Manual installation
# Install dependencies
Install the following dependent software:
- Redis 2.8 or above
- MySQL 5.7 or above
- Apollo Configuration Center (optional)
- Eureka v1.10.17 or Nacos v2.0.4 or above (optional)
# Install MySQL
- Operating system CentOS 6.5
- MySQL 5.7.30
- Download MySQL
wget https://downloads.mysql.com/archives/get/p/23/file/mysql-5.7.30-1.el6.x86_64.rpm-bundle.tar
- Unzip
tar -xvf mysql-5.7.30-1.el6.x86_64.rpm-bundle.tar
- Installation
sudo yum install mysql-community-{server,client,common,libs}-*
- Start
sudo service mysqld start
If the startup is successful, the following information will be displayed:
[root@localhost ~]# sudo service mysqld start
Initializing MySQL database: [ OK ]
Starting mysqld: [OK]
- Initial password
sudo grep 'temporary password' /var/log/mysqld.log
- Log in using initial password
mysql -uroot -p
- Change password
ALTER USER 'root'@'localhost' IDENTIFIED BY 'MyNewPass4!';
- Log out
quit
# Install Redis 6.0.8
- Download, unzip and compile
$ wget http://download.redis.io/releases/redis-6.0.8.tar.gz
$ tar xzf redis-6.0.8.tar.gz
$ cd redis-6.0.8
$ make
- Start redis
Run the compiled file:
$ src/redis-server
- Client connection
$ src/redis-cli
redis> set foo bar
OK
redis> get foo
"bar"
# Install Apollo Configuration Center
Note: apollo is an optional component (how to enable it, please see the instructions for installing the fizz-gateway-node community version). If you do not use apollo, you can use the local configuration file (application.yml). If you do not use apollo, you can skip this step.
For detailed installation steps, please refer to apollo official documentation: (opens new window)
# Install Eureka service registration center
Environmental requirements:
- JDK 1.8 or above
- Tomcat 6.0.10 or above (if using spring cloud, it is built-in)
- Install JDK 1.8
- Download JDK, such as: jdk-8u192-linux-x64.tar.gz
tar -zxvf jdk-8u192-linux-x64.tar.gz
mv jdk1.8.0_192 /usr/local/
- Set the JDK environment variables and chase the following content back to the end of the /etc/profile file
JAVA_HOME=/usr/local/jdk/jdk1.8.0_192
JRE_HOME=$JAVA_HOME/jre
PATH=$PATH:$JAVA_HOME/bin:$JRE_HOME/bin
CLASSPATH=:$JAVA_HOME/lib/dt.jar:$JAVA_HOME/lib/tools.jar:$JRE_HOME/lib/dt.jar
export JAVA_HOME JRE_HOME PATH CLASSPATH
- Execute the following command to make all environment variables take effect:
source /etc/profile
- Check whether the installation is successful
java-version
- Install eureka
- Use IDE to create a spring boot project, such as: sc-eureka-server
pom.xml:
<dependency>
     <groupId>org.springframework.cloud</groupId>
     <artifactId>spring-cloud-starter-netflix-eureka-server</artifactId>
</dependency>
Add the @EnableEurekaServer annotation on the startup class to enable the Euerka registration center function:
@SpringBootApplication
@EnableEurekaServer
public class ScEurekaServerApplication {

public static void main(String[] args) {
SpringApplication.run(ScEurekaServerApplication.class, args);
}

}
application.properties configuration file:
spring.application.name=sc-eureka-server

server.port=8761
eureka.instance.hostname=localhost
eureka.client.registerWithEureka=false
eureka.client.fetchRegistry=false
eureka.server.enableSelfPreservation=false
Maven builds and runs the sc-eureka-server application. After starting, visit the address http://localhost:8761/ to see the Eureka registration center interface.
Transfer target/sc-eureka-server-1.0.0.jar to the linux server and run it. (Only single-machine deployment is used as an example)
nohup java -jar sc-eureka-server-1.0.0.jar &
- The registration address of the eureka client is: http://localhost:8761/eureka/ (replace localhost with the IP of the server)
eureka.client.serviceUrl.defaultZone = http://localhost:8761/eureka/
# Install FizzGate
# Management background (fizz-manager-professional)
Download the fizz-manager-professional installation package from gitee's releases (https://gitee.com/fizzgate/fizz-gateway-node/releases)
illustrate:
- The
{version}that appears in the following installation steps indicates the version number of the management background used, such as1.3.0.
Installation method one: binary installation package
- Unzip the
fizz-manager-professional-{version}.zipinstallation package - Execute the
fizz-manager-professional-{version}-mysql.sqldatabase script during the first installation. To upgrade from a lower version to a higher version, select and execute the corresponding upgrade script in the update directory. - Modify the
application-prod.ymlfile and change the relevant configuration to the configuration of the deployment environment - Linux startup: Execute the
chmod +x boot.shcommand to add execution permissions toboot.sh; execute the./boot.sh startcommand to start the service, and support the start/stop/restart/status command - Windows startup. Execute the
.\boot.cmd startcommand to start the service. The start/stop/restart/status command is supported.
Installation method two (v2.0.0 or above): docker:
Download the SQL script page: https://gitee.com/fizzgate/fizz-gateway-node/releases/tag/{version} (replace {version} with the corresponding version number)
For the first installation, execute the fizz-manager-professional-{version}-mysql.sql database script. To upgrade from a lower version to a higher version, select and execute the corresponding upgrade script in the update directory (if there is a script, execute it)
- Download the image of the corresponding version: docker pull fizzgate/fizz-manager-professional:{version}
- Modify the redis configuration and database configuration through environment variables (the same applies to other configurations) and run the image
docker run --rm -d -p 8000:8000 \
-e "spring.redis.host={your redis host IP}" \
-e "spring.redis.port={your redis port}" \
-e "spring.redis.password={your redis password}" \
-e "spring.redis.database={your redis database}" \
-e "spring.datasource.url=jdbc:mysql://{your MySQL database host IP}:3306/fizz_manager?useSSL=false&useUnicode=true&characterEncoding=utf-8&zeroDateTimeBehavior=convertToNull&transformedBitIsBoolean=true&serverTimezone=GMT%2B8&nullCatalogMeansCurrent=true&allowPublicKeyRetrieval=true" \
-e "spring.datasource.username={your MySQL database username}" \
-e "spring.datasource.password={your MySQL database password}" \
fizzgate/fizz-manager-professional:{version}
Or use external configuration files and output logs to the host by mapping directories. The configuration files can be obtained from the installation package. Create the fizz-manager-professional/config and fizz-manager-professional/logs directories on the host, and put application-prod Place the .yml configuration file under config and run the image in the fizz-manager-professional directory.
cd fizz-manager-professional
docker run --rm -d -p 8000:8000 \
-v $PWD/config:/opt/fizz-manager-professional/config \
-v $PWD/logs:/opt/fizz-manager-professional/logs fizzgate/fizz-manager-professional:{version}
After the service is started, visit http://{deployment machine IP address}:8000/#/login and use the super administrator account admin password Aa123! to log in.
# Cluster deployment
When deploying a cluster, you only need to deploy one management background service instance.
# Gateway node (fizz-gateway-node)
illustrate:
- Supported configuration centers: apollo, nacos, supported registration centers: eureka, nacos. For detailed configuration methods, see the application.yml file.
- If you use the apollo configuration center, you can move the application.yml file content to the configuration center (the application name on apollo is: fizz-gateway); if you do not use apollo, you can remove the apollo parameters in the startup command below.
- The
{version}that appears in the following installation steps indicates the version number of the gateway used, such as1.3.0.
Installation method one: binary installation package
- Download the binary installation package of fizz-gateway-node, unzip and modify the configuration of the configuration center, registration center, and redis (the redis configuration must be consistent with the management backend) in the application.yml configuration file.
- Modify the apollo connection of the boot.sh script as needed. You can skip it if you do not use the apollo configuration center.
#Modify to the actual address of Apollo Meta Server
APOLLO_META_SERVER=${APOLLO_META_SERVER:-http://localhost:66}
- Execute the
./boot.sh startcommand to start the service. The start/stop/restart/status command is supported.
Installation method two: source code installation:
- Use the latest code on the local clone warehouse and modify the configuration center, registration center, and redis in the application.yml configuration file (the redis configuration must be consistent with the management backend)
- Execute the Maven command
mvn clean package install -DskipTests=truein the project root directory fizz-gateway-node - Execute the Maven command
mvn clean package -DskipTests=truein the project directory fizz-gateway-node/fizz-bootstrap - Enter the fizz-gateway-node/fizz-bootstrap/target/fizz-gateway-node directory and execute the
./boot.sh startcommand to start the service. The start/stop/restart/status command is supported.
Installation method three (v2.0.0 or above): docker:
- Download the image of the corresponding version: docker pull fizzgate/fizz-gateway-node:{version}
- Modify the redis configuration through environment variables (the same applies to other configurations) and run the image
docker run --rm -d -p 8600:8600 \
-e "aggregate.redis.host={your redis host IP}" \
-e "aggregate.redis.port={your redis port}" \
-e "aggregate.redis.password={your redis password}" \
-e "aggregate.redis.database={your redis database}" \
fizzgate/fizz-gateway-node
Or use external configuration files and output logs to the host by mapping directories. The configuration files can be obtained from the installation package or source code. Create the fizz-gateway-node/config and fizz-gateway-node/logs directories on the host, and put the application Place the .yml and log4j2-spring.xml configuration files under config and run the image in the fizz-gateway-node directory.
cd fizz-gateway-node
docker run --rm -d -p 8600:8600 --privileged \
-v $PWD/config:/opt/fizz-gateway-node/config \
-v $PWD/logs:/opt/fizz-gateway-node/logs fizzgate/fizz-gateway-node:{version}
The default service port of the gateway is 8600, and the gateway address format is:
http://127.0.0.1:8600/[Service Name]/[API Path]
The default context of the gateway is /, which can be modified by modifying the following steps. It can be configured to other values such as: /proxy; (the default context of v2.7.0 and below is /proxy)
- Modify the application.yml configuration of fizz-manager-professional
gateway:
   prefix: /proxy
- Modify the application.yml configuration of fizz-gateway-node
gateway:
   prefix: /proxy
Service orchestration test address:
http://127.0.0.1:8600/_proxytest/[Service Name]/[API Path], where /_proxytest is the test directory and should not be open to the public network.
# Cluster deployment
The gateway node service supports multi-instance deployment. If the gateway deploys multiple nodes, it can be configured to use nginx for load balancing.
# Nginx configuration
If the gateway deploys multiple nodes, it can be configured to use nginx for load balancing. The reference configuration is as follows:
Modify the nginx.conf file and add upstream under http
http {
   upstream fizzgate {
       server 10.10.1.1:8600;
       server 10.10.1.2:8600;
       server 10.10.1.3:8600;
   }
   # Your server configuration
   # server {
   # Omit...
   # }
}
Then add in location
server {
   #
   # Your other configuration
   # Omit...
   #
   location/{
     # Omit...
     proxy_pass http://fizzgate;
     proxy_set_header X-Forwarded-For $proxy_add_x_forwarded_for;
     proxy_set_header Host $host;
   }
}
The fizzgate here corresponds to the name after upstream. The request header X-Forwarded-For in line 2 records the configuration of the proxy process. By configuring this request header fizzgate can obtain the caller's IP. Line 3 indicates that the Host request header is forwarded at the same time when forwarding, which is used to count traffic by Host.
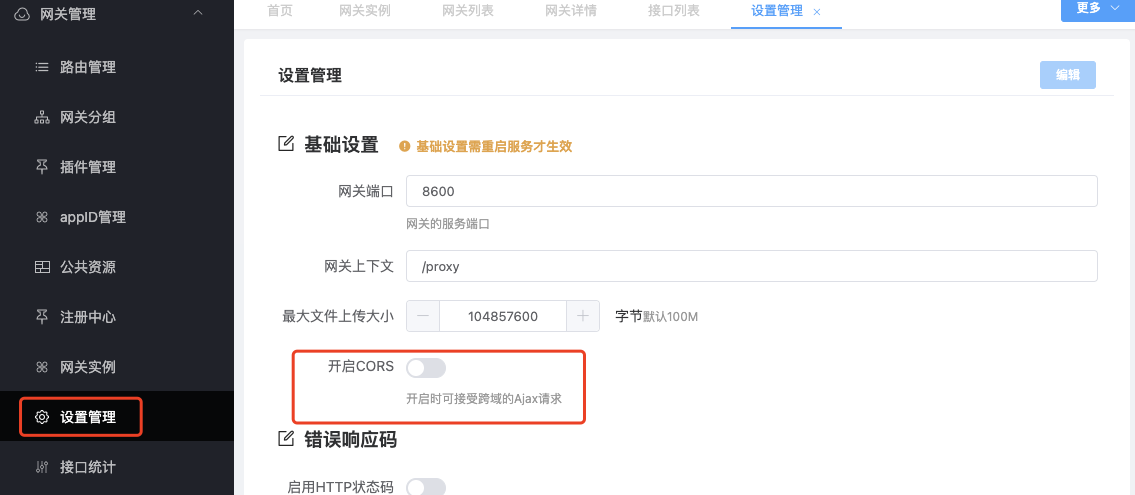
CORS cross-domain configuration: nginx does not need to configure CORS-related information. You can enable CORS with one click on the gateway management->settings management page of the FizzGate management background.
The management terminal supports HTTPS configuration: If HTTPS is enabled in the management background, it needs to be set in the background:
server{
   #
   # Your other configuration
   # Omit...
   #
   #Add two lines of configuration
   add_header Strict-Transport-Security max-age=0;
   add_header Content-Security-Policy upgrade-insecure-requests;
   #
   # Your other configuration
   # location / {
   #
   # }
   # Omit...
}
# Gateway internal management interface
/admin/**
This path corresponds to the management interface inside the gateway and is used to check health, cache, aggregation configuration, etc. The corresponding location also needs to be configured in nginx:
location /admin/ {
   proxy_pass http://fizzgate;
}
Note: The internal management interface cannot be opened to the public network.
# Version upgrade
Note: The {version} that appears in the following steps indicates the version number used, such as 1.3.0.
# Management background
Installation method one: binary installation package
Download the fizz-manager-professional installation package from gitee's releases (https://gitee.com/fizzgate/fizz-gateway-node/releases)
- Execute SQL script
To upgrade from a lower version to a higher version, choose to execute the corresponding upgrade script in the update directory. If it spans multiple versions, execute all upgrade scripts between the current version and the target version.
Copy the files or folders in the installation package except application-prod.yml to the installation directory to overwrite the corresponding files, and use the text comparison tool to compare the old and new versions of the configuration file application-prod.yml to merge the relevant configuration items.
Restart the service
boot.sh restart
Installation method two (v2.0.0 or above): docker
- Execute SQL script
Download the SQL script page: https://gitee.com/fizzgate/fizz-gateway-node/releases/tag/{version} (replace {version} with the corresponding version number)
To upgrade from a lower version to a higher version, choose to execute the corresponding upgrade script in the update directory. If it spans multiple versions, execute all upgrade scripts between the current version and the target version.
Download the image of the corresponding version: docker pull fizzgate/fizz-manager-professional:{version}
Modify the redis configuration and database configuration through environment variables (the same applies to other configurations) and run the image. Stop the original image before running.
docker run --rm -d -p 8000:8000 \
-e "spring.redis.host={your redis host IP}" \
-e "spring.redis.port={your redis port}" \
-e "spring.redis.password={your redis password}" \
-e "spring.redis.database={your redis database}" \
-e "spring.datasource.url=jdbc:mysql://{your MySQL database host IP}:3306/fizz_manager?useSSL=false&useUnicode=true&characterEncoding=utf-8&zeroDateTimeBehavior=convertToNull&transformedBitIsBoolean=true&serverTimezone=GMT%2B8&nullCatalogMeansCurrent=true&allowPublicKeyRetrie val=true" \
-e "spring.datasource.username={your MySQL database username}" \
-e "spring.datasource.password={your MySQL database password}" \
fizzgate/fizz-manager-professional:{version}
Or use external configuration files and output logs to the host by mapping directories. The configuration files can be obtained from the fizz-manager-professional installation package (https://gitee.com/fizzgate/fizz-gateway-node/releases). Create the fizz-manager-professional/config and fizz-manager-professional/logs directories on the host machine, modify the redis configuration and database configuration in the configuration file (the same applies to other configurations), and place the application-prod.yml configuration file under config. Run the image in the fizz-manager-professional directory
cd fizz-manager-professional
docker run --rm -d -p 8000:8000 \
-v $PWD/config:/opt/fizz-manager-professional/config \
-v $PWD/logs:/opt/fizz-manager-professional/logs fizzgate/fizz-manager-professional:{version}
After the service is started, visit http://{deployment machine IP address}:8000/#/login
# Gateway node
Installation method one: binary installation package
Download the fizz-gateway-node installation package from gitee's releases (https://gitee.com/fizzgate/fizz-gateway-node/releases)
Copy the files or folders in the installation package except application.yml and log4j2-spring.xml to the installation directory to overwrite the corresponding files, and use the text comparison tool to compare the old and new versions of the configuration files application.yml and log4j2-spring.xml. Merger of related configuration items.
Restart the service boot.sh restart
Installation method two (v2.0.0 or above): docker
- Download the image of the corresponding version: docker pull fizzgate/fizz-gateway-node:{version}
- Modify the redis configuration through environment variables (the same applies to other configurations) and run the image. Stop the old image before running.
docker run --rm -d -p 8600:8600 \
-e "aggregate.redis.host={your redis host IP}" \
-e "aggregate.redis.port={your redis port}" \
-e "aggregate.redis.password={your redis password}" \
-e "aggregate.redis.database={your redis database}" \
fizzgate/fizz-gateway-node
Or use external configuration files and output logs to the host by mapping directories. The configuration files can be obtained from the installation package or source code. Create the fizz-gateway-node/config and fizz-gateway-node/logs directories on the host and modify the application. .yml and log4j2-spring.xml configuration files and place them under config, and run the image in the fizz-gateway-node directory
cd fizz-gateway-node
docker run --rm -d -p 8600:8600 --privileged \
-v $PWD/config:/opt/fizz-gateway-node/config \
-v $PWD/logs:/opt/fizz-gateway-node/logs fizzgate/fizz-gateway-node:{version}